The new Archangel model is a majestic thing to behold. This will now be the 4th huge-based model that I'll be working on and I decided that this one above all the others really deserves special attention. To that end I'm going to chronicle my progress here as I go along. It'll be a slow process since I'm also working on other projects, but my goal is to have it completed in time for Lock & Load. So with 7 weeks to get it completed, I now embark upon my quest!
The first step with any model is to take all the parts out of the box, make sure everything is accounted for, and look for anything obviously mis-cast or broken that would need replacement. Fortunately I was able to do a quick scan of the pieces at the store to make sure everything looked intact. With that first step out of the way, let's take a quick survey of the parts.
So that's 20 pieces, which is significantly less than many other Colossals have been. And unlike my Judicator project, I expect to be able to assemble this entire model before painting which will be nice.
At this point I did a quick dry fit as best I could to get a sense of size at this point. My best estimate is that this model stands between 11 and 12 inches tall.
Now that I've unboxed and accounted for everything, my next step will be to start trimming and build a plan of attack. My top concerns at this point are the assembly of the tail so that it's solid, and the trimming of the wings. As I said above, my hope is to have frequent progress updates here, even if they don't seem very significant, just to keep my motivation high.
The first step with any model is to take all the parts out of the box, make sure everything is accounted for, and look for anything obviously mis-cast or broken that would need replacement. Fortunately I was able to do a quick scan of the pieces at the store to make sure everything looked intact. With that first step out of the way, let's take a quick survey of the parts.
| Body and Base: The main body and the base are pretty solid pieces. On a cursory glance, the base looks like it has virtually no trimming needed, and the body looks like it has minimal trimming. |  |
| Arms and Tail: There's actually a couple extra bits in here, but these are all the smaller resin pieces which is mostly legs, arms and the thicker half of the tail. There's also a piece of the head there. Again, upon cursory glance they look pretty good. |  |
| Bits and Tail: These are all the metal bits. Smaller wings, head, spines and claws. These bits all look great. Admittedly I worry much less about flashing and miscasts on metal parts. I rarely see miscast metal parts and trimming of metal is super easy for me. | 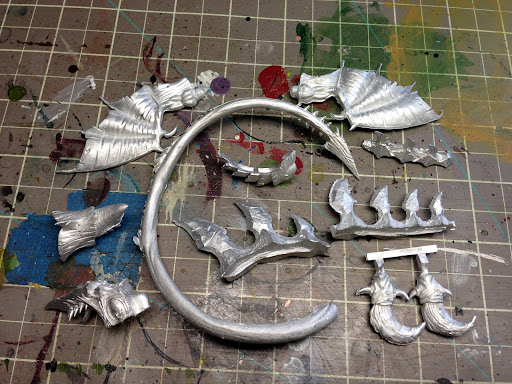 |
| Wings: Ok, now we come to the ugly part. Now seriously these are nice wings. Really nice. But holy smokes are they going to be ugly to trim and clean up. Really ugly. I see why they did what they did, but honestly they look like they will be a nightmare to take care of. Let's take a closer look... |  |
| Wing Details: Here's a closer picture of some of the wings. As you can see, it's a real mess for trimming. I'm not sure I should have expected any less though. In order to mold them so that they wouldn't be too fragile during transport or too difficult to get out of the molds they had to have all the extra bits, but cleaning it up is going to take a while. I imagine that I'll spend at least as much time cleaning up the wings as I do all the other pieces combined. |  |
So that's 20 pieces, which is significantly less than many other Colossals have been. And unlike my Judicator project, I expect to be able to assemble this entire model before painting which will be nice.
At this point I did a quick dry fit as best I could to get a sense of size at this point. My best estimate is that this model stands between 11 and 12 inches tall.
Now that I've unboxed and accounted for everything, my next step will be to start trimming and build a plan of attack. My top concerns at this point are the assembly of the tail so that it's solid, and the trimming of the wings. As I said above, my hope is to have frequent progress updates here, even if they don't seem very significant, just to keep my motivation high.
2 comments:
Colour me jealous! Looking forward to seeing your progress.
I second that, I so want one of those and I don't even play Legion!
Post a Comment