[Apologies up front. I'm an engineering manager, and thus sometimes that side of my brain takes over and looks at metrics.]
So the year is up, and I was looking back at how much I painted this last year, using this blog as a tally sheet. 85 models! I couldn't believe I'd painted that much! There's a pretty good variety in there too. It was actually quite shocking to see how much stuff I'd painted, and how the effort had distributed out:
Cryx: 32
Mercs: 31
Menoth: 15
Trolls: 1
Cygnar: 1
Circle: 1
Minions: 1
Khador: 1
non-PP: 2
All things considered, I feel pretty good about my progress this last year. I developed a number of skills, entered KublaCon with an entry I felt good about, and overall got a lot of painting done. Compared to 2007 where I only painted 47 models, I also feel like my speed has really picked up, and I'm painting on a more regular basis with less downtime due to burnout. It probably helps that I've scaled back on other activities and learned how to manage my time better.
So what does 2009 hold for my painting hobby? After some not-so-serious thought, here's my top 3 goals for the year:
1) Close out my unpainted models down to 2 factions at a time.
2) Start a Legion army.
3) Enter KublaCon again with entries I feel even better about than last year.
Wednesday, December 31, 2008
Friday, December 26, 2008
Sorcha
 No, I haven't started playing Khador too now. This is a Christmas gift for Sean who is playing Khador a lot now. I've wanted to paint this model for a while and I figured this would be a good option. He's undoubtedly already got Sorcha, but hopefully this alternate sculpt will find a place in his collection.
Admitted, digressing into rules for a moment, I think Sorcha would be a really fun caster to play. However she has a reputation of being a real pain to play against and one of the leading "power gamer" casters. Perhaps if people see effort put into painting her well, it will take the sting out of playing against her. Hey! A guy can dream!
 I spent a pile of time cleaning up details on this model as I went along. The white on the armor never did end up looking great to me. My blending is just not quite clean enough still to pull off white armor plates.
The coat on the other hand worked out quite well. The "imperfections" in the blending tend to create a sense of texture. That coupled with a fair variation in color created an effect I was quite pleased with.
The metals were again part of the new style I've been working on. Lots of blending in black paint to create a more dramatic shading and highlighting on metals.


Tuesday, December 23, 2008
Holiday Link Dump
Today is another link dump day! A couple of random things I came across that were interesting to me on the Privateer Forums. Perhaps no one else, but at least now I won't lose these links.
This was a post about creating molds for bases which I found very interesting. I'm definitely going to try this out for myself.
Legion paint scheme
This was a post of some Legion models for which I somewhat liked the color scheme. Not entirely, but it's helping me decide what I want to eventually go with.
Saturday, December 06, 2008
Terminus
 Now this was a big model. Lich Lord Terminus is probably in the top 5 largest models I've painted. This is the latest addition to my Cryx force. I kept in style with the other Cryx models I've painted, and also focused on a balance of speed painting and quality. As a result, I got him done pretty fast, mostly due to the use of washes and 2 brush blending techniques.
Still having a little bit of color balance challenge with my photo setup again, so the blue/yellow shifts between the left and right sides. Kinda screwed up the saturation which makes the blade of the sword look all white. It's actually painted to look like carved bone. Oh well.
 The armor was the standard formula I've used before. The skirt and darkened armor plates was CXH then 2 brush blended with CXB and then black to shade them.
The wings were a whole different issue. I did a number of passes and washes, starting with a base mix of half Rucksack Tan and half Midlund Flesh. Then I did a heavy wash of Battlefield Brown and "sponged" and "rubbed" some places clean of the wash to restore the highlights. Then I did 2 more heavy washes of Umbral Umber and Black in controled areas and 2 brush blended the washes at the edges to smooth them out. This created a deeper and richer shading for the wings which have a lot of surface complexity to work with.
 There were a number of features of this model that I didn't like so much, nor make a big attempt to work with. The face/mouth are an example. He actually has a gun barrel in his mouth, but honestly I thought it was kinda silly. There's lots of detail under his chest as well which I didn't put much work into other than the standard washes. I could have done a bunch of OSL work, but again, the focus was on finishing in a timely manner. Overall I'm happy with the results and don't regret any of the shortcuts I took.
Thursday, December 04, 2008
Random Resource Day
While I'm in the middle of a meeting at work, figured I'd post an interesting resource that I found on the Privateer forums today: Tartan Generator.
Tuesday, December 02, 2008
December Goal
Well, the whole "showdown" idea has devolved into just setting goals for myself. So it's time to set a December goal. Given that it's the holidays, and I'm likely to be busy with visitors and activities and such, I'm going to set a modest goal.
First, I want to get Terminus done. It's a great model, and he's already assembled.
Second, I picked up the Blessing of Vengeance last night and it's an awesome model. Highly positionable. I'm totally bumping it in the priority queue.
Third, well, I'm not sure there will be a third, but I'm going to shoot for getting the 4 Shredders done.
Well, that's the plan. We'll see how I do. I'm not expecting to make it, but hopefully I can carve out enough time to finish these.
Sunday, November 30, 2008
Master Gunner Dougal MacNaile
 This rounds out my November goal for myself. The Master Gunner himself. Overall I can't say I especially enjoyed this model. It had an awful lot of detail for such a small figure. I don't mind too much detail, but this one was quite busy with details. It made it difficult to do the model justice. Admittedly, I did decide to call it quits fairly early. However, this rounds out my remaining mercs, and he is a badass on the battle field. Not only does this close out my unpainted mercs, but I met my November goal, which feels good. I'm getting quite fond of setting monthly goals as a way to pace myself.

Saturday, November 29, 2008
Cephalyx Slaver
 This model got a bit of an unplanned bump in my painting schedule. I'd been eyeballing it for a while and love the look of it, but and planned to wait until I was ready to do the whole squad of Cephalyx Drudges as well. However, I finally couldn't resist the itch to paint it and got him primed and prepped the other day. Poor Dougal is in progress still while this guy got preferential treatment.
 I pretty much followed the painting advice in No Quarter #14 for this one. However there were a few differences. First, I added some shading to the deeper folds using armor wash, and shaded some of the lower sections as well. Second, since the article didn't have any advice on the metals, I decided to start using a basecoat of Pig Iron, then a heavy Metal Wash, then actually paint over the lower portions using Thamar Black in order to make the metal look like very dark iron. Then I picked out highlights using Cold Steel. The hinge points got Blighted Gold and Shining Gold treatments to make them stand out and give the metal arms a little more character.
 Due to holiday visitors, I had to tear down my photo setup and reassemble it today. Unfortunately, I seem to have gotten the lighting positioning wrong. So the color balance is a little off, but not terrible. You can see how the right side of all the pictures is a little more yellowing from the tungsten bulbs, but the left side is more balanced (due to sunlight bleed from the window through the curtains). I had the same problem with the Gandalf model I just posted a moment ago. Anyway, it's still not too shabby.
Gandalf
 This was a gift project for a friend of mine. She'd asked for Gandalf long ago, and I finally got around to doing it. Yay for early Christmas! Nothing super fancy here, as the model doesn't have a high level of detail. Overall though, the simplicity of the model allowed me to focus on blending and color practice. I did some more of the hue variations on the cloak in order to experiment with giving it more depth. And then of course, with the base, I sorta went to town and put together something much more extravagant than necessary.
 Anyway, here he is, in all is LoTR glory... Gandalf the Grey!
Wednesday, November 19, 2008
Midwinter (take 2)
There's a time for speed painting. There's a time for detailed paint jobs. And then, there's a time for experimentation. This was one of those times. Now as a disclaimer, it's important to note that I never expected this to turn out great. I expected to fail miserably.
The Vision: I'd always been inspired by this paintjob. The OSL work is remarkable, and the limited palette makes for a really compelling piece. For some time now, I've wanted to try my hand at something like this.
The Setup: Again, I knew full well that it would not turn out even remotely close to what EricJ did. He's so far out of my league that there's several leagues between us. But, I firmly believe that the difference between an average painter and a good painter is that the former settles for what he can do, and the latter forces himself to push his limits and learn new things. This was me trying to push my limits and move out of my comfort zone. I've dabbled in OSL before, but this was a gigantic departure from what I'd done before.
The Canvas: I chose Midwinter to use for this experiment. He seemed an obvious choice, and since I'd already done one before, it seemed like a good opportunity to experiment.
The Results: Well, I give myself a B for effort, and a D for execution. I could have easily put more effort into this, but it was uncharted territory. I decided early on that I'd just dive right in and study it after I finished. The reason is that until the whole piece is done, it's hard to really analyze the overall OSL effect.
I used a total of 8 different paints for this model, counting black and white. I used no washes, and no inks.
I'm not too happy with the overall brightness balance. The OSL broke down for me in application when I needed to start thinking about distance and incidence angles and such. Clearly an area where I could use more practice, but it was quite the learning experience.
The lighting on the ground has too sharp of an edge to it also. It could have benefited from a little fuzzing to make it more realistic.
The runes on the back turned out pretty well I think. I opted for smaller runes to include more of them, but the implementation would have been the same if I'd done larger ones.
The center of the model, around the amulet on his chest and such, tended to get a little muddled. This could have been more crisp, but it was a facet of the model that I didn't anticipate when I chose it. The OSL is really hard to handle in those little details.
The Photos: Ok, here I had a huge failure. The photos aren't terrible, but they could obviously be much better. I have no experience photographing dark models like this, and particularly in a situation where it really should have a black background instead of gray. So, I tried a couple different versions for comparison purposes. Both sets are bad, but it'll give you a general idea of how the model looks.
Overall: It was nice to do this as an experiment, and I certainly learned a lot by doing it. I'm glad I didn't dwell on it too much either. It will look strange on the battlefield, but I could care less about that.
To my readers: If there are any of you out there, I'd appreciate feedback on this experiment. Let me know what you notice that doesn't look good and leave a comment. I'm very interested to get others' perspectives.
  |
  |
Saturday, November 15, 2008
Company Halt!
Well, the last week was pretty hectic, and now that the weekend rolled around, I ended up doing a ton of painting. I probably used over a gallon of paint in fact. Instead of miniatures though, I was helping my wife paint our stairwell and upstairs hallway. As she put it, "Since you like painting so much, how about you help me paint!", and so I did. Work has been severely kicking my ass and leaving me a vegetable in the evenings, and I was a little burnt out after painting Grim that this was a nice break. Hopefully I can find my muse again tomorrow.
Monday, November 10, 2008
Grim Angus
 This model rocks. Plain and simple. I loved painting it. It's a great pose with a good level of detail. Everything was easy to get to on the model as well, which made it pleasant to spend an excessive amount of time on it. In fact, this guy got a much higher level of quality treatment than anything else for the last couple months. It was nice to slow down and spend extra time on this. It was also nice to paint a troll again, given that I hadn't painted one for quite a long time now.
 I spent a fair amount of time working the metals on this model, as I've been prone to do lately. I really have found that the extra work really pays off. It gives the metals more "forced" contrast and helps create a better sense of surface. It also helps in the end product after I've sealed it so that the dullcoat effect doesn't flatten the entire thing.
I'm still not feeling very good about my zenithal highlighting skills, but it's coming along. It's just hard to think that way still. The face could have used a bit more work too, as the highlights seem to be much less dramatic than everything else. I won't even comment on the shirt/pants except to say that for some reason the color rubs me the wrong way, but I can't pin down why.
 Something I did very different this time, best exampled in this third picture, is use a lot more color hue variation in several areas. The jacket is a good example. I used primarily brown-based colors, but varied between green tones and red tones as I went. I focused more on choosing hues carefully than blending. In the end, the blending turned out to be less important as the variations in hue created a sort of unique blending effect of its own. This was a real branch out for me, and required much more attention to color choice for me. I'm very happy with the result though, and looking forward to experimenting more with this.
Sunday, November 02, 2008
November Happiness
It occurred to me this afternoon while painting that my "challenge" for October was totally blown out of the sky. I had intended to just finish Kraye, the Vassal and the Redeemer. In addition to those 3, I also painted 10 Bane Thralls and Deneghra! Somehow I got my groove back and hadn't noticed. Granted, many of those were "speed painted", but I did get a lot of models painted, and to my own tabletop standards.
So, November brings with it the promise of time to paint (as work will be hopefully calming down soon), and the threat of holiday activities. In light of that, I'm going to set a new challenge for myself. My goal is to paint Grim, Midwinter, Dougal, and one other as yet unspecified model. I'm going to aim for quality over quantity in this batch. Hopefully I'll get more painted than just 4 models, but this is my goal.
On a side note, I did some swapping with Lance to get his Legion box set models along with Thagrosh. I've been fancying some of the Legion models for a while so this felt like a first step towards that doom. Legion will likely end up being similar to Cryx for me in that I'll select models I like and aim for a balance of quality and speed.
Saturday, November 01, 2008
From the Painting Desk: Detail Management
 I'm nearing completion on Grim and figured I'd post a picture. The nice thing about doing laundry is there's plenty of excuse to spend the time painting between changing loads. So I've spent the majority of the day painting and made a ton of progress on Grim. After finishing the Vassal, I'm even more in the mood to spend excessive time on a single model working for higher quality. Grim is turning into a great project. Some parts are not so good, but other parts (like the coat) turned out really good I think, although this quick pic from my desk doesn't show it well enough. I used a lot more variation in color tones and achieved an interesting effect.
On a side note, I figured I'd share a tip that I've found handy. When I'm working on a model that has many little details (like Grim), I find that it helps to keep a list of details left to do. Usually I don't start this list until about two thirds of the way toward completion. Often I'll make the list pretty detailed and then scratch them off as I do them. Sometimes as I continue to paint I'll spot other bits that I hadn't written down (hence starting the list at about 2/3 done). Below is an example list for Grim:
- Goggles Strap
- Belt Pouch
- Extra Nets
- Net Gun
- Rifle Blade
- Rifle Scope
- Rifle Trigger
- Rifle Runestone
- Shoe Armor
- Shoulder Armor
- Glove Runes
- Glove Armor
- Bottle
- Coat Runestone
- Backpack Runestone
- Buckle
Thursday, October 30, 2008
Vassal of Menoth
 The other day when I explained to my buddy that I still hadn't painted the Vassal, he looked at me quizzically and couldn't fathom how a model that was both quite cool and had awesome game stats hadn't moved to the top of my painting queue. It was a fair question. Admittedly I'd been a little burnt out on the Protectorate paint scheme lately and enjoying doing fresh stuff. However, I finally got crackin on this guy. I decide to take my time with him, since he was a small model. After some amount of struggle I managed to get rolling and suddenly it felt like my muse was back.
 I tried to go for a fairly dramatic highlighting technique on this one. I also tried to balance the color around so that it draws the eyes back and forth. For example, the lower legs and the should armor and flesh all draw to each other. Similarly with the chains, mask and cloak, and again with the red cloth and hair. It's not very well done, admittedly, since I didn't force the color tones closer together, but that was the intention. I feel like it sort of works.
 For the metals I tried using as much contrast as possible, particularly on the chains. I only really used Cold Steel, thinned Black, and Vallejo Metal Medium. I tried to keep a good solid defining line of black around the bits to make them stand out. I used this technique on the Testament before and really liked the results then. I spotted on some thinned down Vallejo Smoke to give it a slightly rusted and dirty look, but not enough to overpower the metal.
Saturday, October 25, 2008
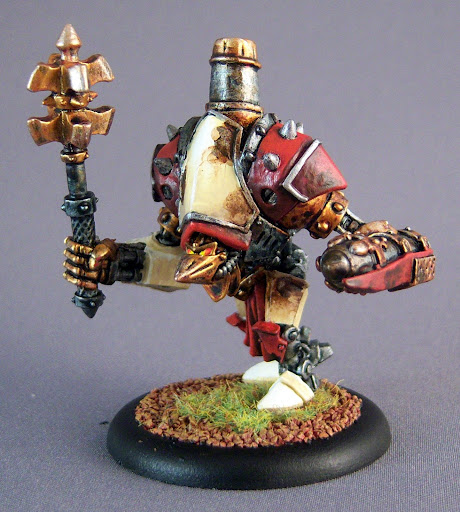
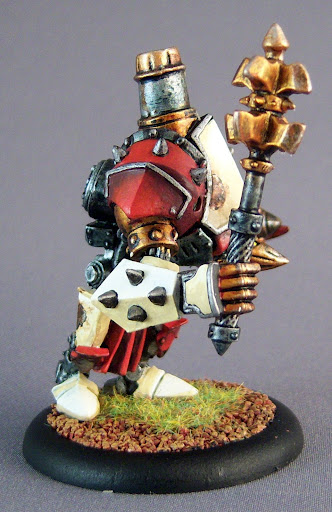
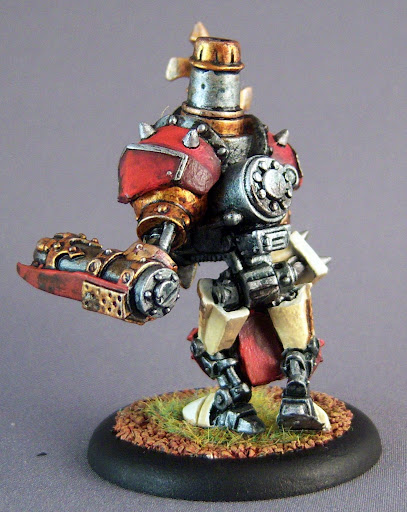
Redeemer
First, let me state that this is was an enlightening model for me. I primed this one white rather than black as I normally would with jacks and protectorate models. Then, about halfway through I looked at it and got quite frustrated. It was just not looking very good. In fact, I was having that same problem with the Vassal too. So I decide to just muscle through it and aim for tabletop quality. Well, an interesting thing happened. I also got more magnets in the mail the other day, so I decided to haul my remaining models up to my painting desk and glue magnets to them. The remaining models consisted of mostly some protectorate troops and all the protectorate jacks. After getting them up here, I set down my Revenger and came to a huge realization: My painting skills have really improved dramatically. You see, the Revenger (pictured below) was one of the very first models from Warmachine that I painted, and definitely the first jack I painted. I remember putting a lot of effort into it too, since I loved that jack. And today, sitting beside it, is the Redeemer that I rushed through and settled for "tabletop quality". Needless to say, I'm feeling pretty good about my painting skills now, and not going to beat myself up for the quality.
 |  |
 |  |
Monday, October 20, 2008
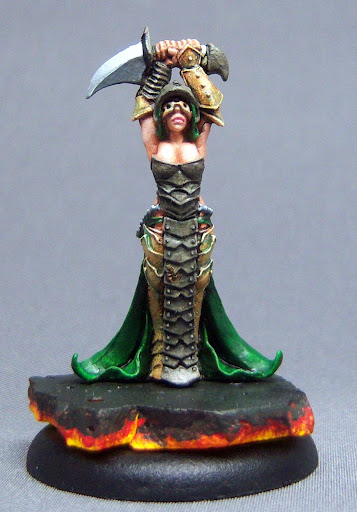
Warwitch Deneghra
 This model went remarkably fast. I primed her Saturday afternoon and pretty much painted her all in one day yesterday. Again, it helps that I'm balancing quality vs speed, so the couple corners I cut really helped speed things up, but part of that was offset by trying to do more NMM work on this one as well as having to work delicately on the skin. I ended up spending a lot of time correcting mistakes that spilled over onto her skin. However, the end result worked out pretty well. I like the overall look of the NMM on her witch barbs. The spear could have been better, but I decided not to dwell on it. I can always get the other sculpt at some point and paint her over again.
 Working the NMM areas was much easier on a single model instead of 10 at once like with the Bane Thralls. I was able to keep paint wet and workable longer and could take my time getting just the right shades. Her skirt was also a nice place to practice some very controlled, small 2-brush blending work. I wouldn't necessarily rank this in my favorite models to paint category, but the delicate and accessible features made for a much easier project that some of my other recent choices.
Saturday, October 18, 2008
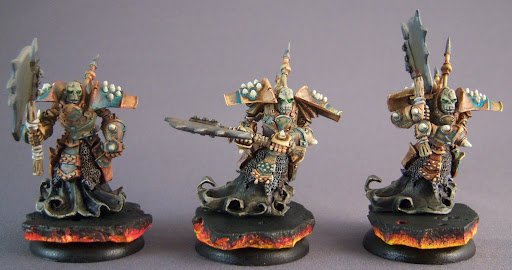
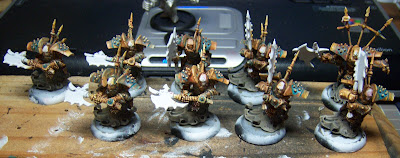
Bane Thralls
Let me say it again: Painting squads can be really soul crushing. It takes so long, and it often feels monotonous. Fortunately, these models were not completely soul crushing. I was pretty stoked to paint them, and although I only aimed for tabletop quality, I still feel pretty happy with the results.
 Again, I used the NMM rust technique I've used before (on the witches for example) and I really like how it turned out. I also used NMM on the axe heads which, well, it turned out adequate, but not fabulous. They clearly could have benefited from much more effort, but by the time I got to the axe heads (last) I was pretty antsy to get them finished. I used a couple washes on them (black and Bloodstone) to sort of dirty them up which really helped. In hindsight, I think getting a better spread of grayscale paints would really ease the whole NMM thing for simulating steel.
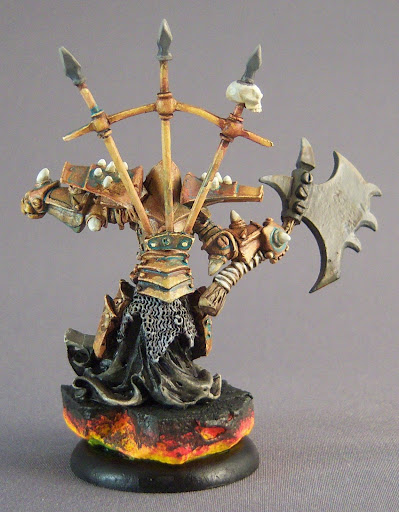 Admittedly I cut a few corners. There were some inner sleeves that I skipped, and some dangly bits that didn't get extra attention. Fortunately the washing technique gave them enough pop that they didn't need additional work, and in a group it's less likely to be noticed. Part of me hates to cut these corners, but I'm trying to stick with balancing quality and speed. It's sort of a "time boxing" rule I guess, as much as using that term makes me sick.
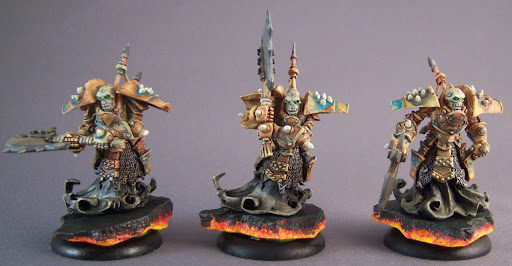

Saturday, October 11, 2008
From the Painting Desk: From Quality to Quantity...
Just a quick post before bed. After working on higher quality stuff, I've shifted gears to work on my Bane Thralls and practicing more of the speed washing techniques I used before. Probably almost halfway done at this point. I just worked on the main armor and chainmail using layers of washes, and then laid down a base coat for the skirts. It feels nice to make such a large amount of progress in a single day. Again, not going for super quality, but medium quality and relative speed, and so far I'm pretty happy with how these are turning out.
On a personal note, tomorrow my wife and I are celebrating Canadian Thanksgiving with a couple friends of ours, so between that and work, I'll probably not get the other half of the work done on these until next weekend. Yay for fun and holidays and such, but boo on lack of progress.

On a personal note, tomorrow my wife and I are celebrating Canadian Thanksgiving with a couple friends of ours, so between that and work, I'll probably not get the other half of the work done on these until next weekend. Yay for fun and holidays and such, but boo on lack of progress.
Thursday, October 09, 2008
Capt Jeremiah Kraye
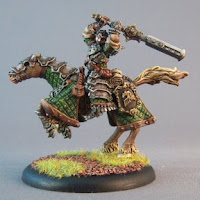
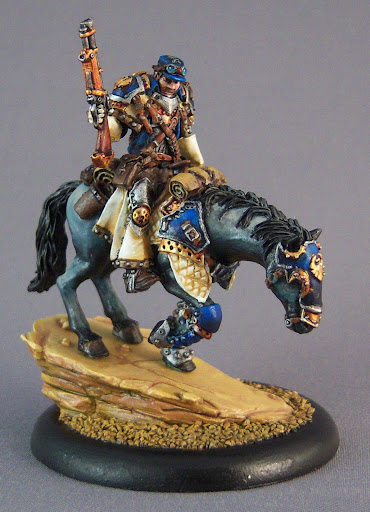 And here he is... Capt Jeremiah Kraye. My second mounted figure. This was a job for Jeff, who was kind enough to let me paint this model. I wanted to paint it, but didn't really fancy buying it for myself. Again, like the stuff for Sean, another perfect opportunity to paint a great model without having to buy it myself. Maybe I'm a little crazy. However, I will admit it'll be nice to be back to painting my own models that will get table time.
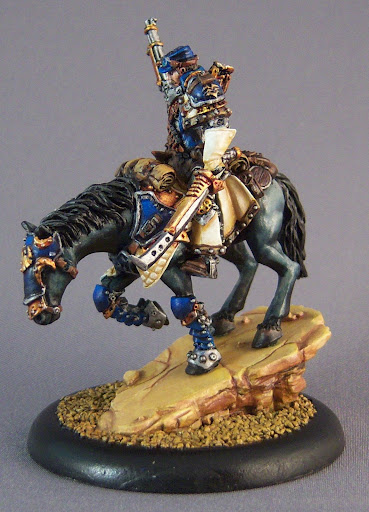 For this model, I did more than normal prep work in getting him assembled. I originally started the model as two pieces also, with the horse/Kraye separate from the base, and once I got far enough I attached the two together. I still ended up getting a little slop on the base that had to be corrected, but it was pretty minor. It's become my habit for a while now to paint models fully assembled unless absolutely necessary.
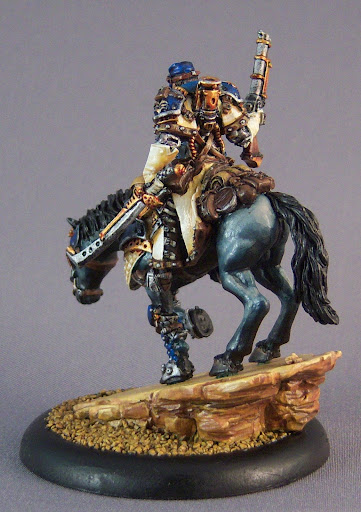 As for this particular model, here's a handful of things that I feel worked out well:
- The gray/blue/black horse made a nice offset color to the rest of the model.
- Kraye's white gloves/chaps/etc give him a nice "civil war" type of feel, which I thing really suits the sculpt.
- A combination of both silver and gold helped give the metals plenty of pop without overpowering the general feel of the model.
- In general, the brightness and color balance of the model I feel keeps the eyes moving over the whole thing decently, but helps to draw the eyes to Kraye himself.
Thursday, October 02, 2008
October Woes
Well, as October begins, I realize I should set forth another challenge for myself. However, this week started off with an avalanche of challenges at work and home, and left me pretty much a drooling vegetable. I'm not expecting things to get much better, so this month will see a break from the Mercs to get caught up on other things that I've wanted to get done. This month I plan to finish Kraye for Jeff, and get the Vassal and Redeemer painted for my Menoth force. I'm worried that even that is ambitious, but hopefully October will level back out for me.
On a side note, I got some new brushes (more Series 7s). I picked up a couple new #2s since my usual one had gotten a fair amount of paint in the ferrule and it has lost a number of hairs making it's precision a problem. Now I can use a fresh #2 and not worry. If it wasn't for the amazing prices from Dick Blick, I'd never be able to paint so freely with the Series 7s. I also picked up a 2/0 brush to try out for super detailed work. I don't expect to use it often though, as even the 1/0 I have now is pretty specialized.
On a side note, I got some new brushes (more Series 7s). I picked up a couple new #2s since my usual one had gotten a fair amount of paint in the ferrule and it has lost a number of hairs making it's precision a problem. Now I can use a fresh #2 and not worry. If it wasn't for the amazing prices from Dick Blick, I'd never be able to paint so freely with the Series 7s. I also picked up a 2/0 brush to try out for super detailed work. I don't expect to use it often though, as even the 1/0 I have now is pretty specialized.
Monday, September 29, 2008
Orin Midwinter
 Another model off the desk: Orin Midwinter. Nothing especially fancy here. Overall I'm not super pleased by it, but I used a couple techniques that I've been trying to practice, so the quality sometimes dips. I aimed to have some red in the majority of the model to tie it together better. The black robes are shaded using red for that reason, along with including some red in many aspects of the model.
 In addition, I tried to work the metals a bit more than normal. I painted a faux horizon line being reflected on the end of his staff, and generally tried to do a lot more specific shading on the metals. This same stronger shading scheme was used on the skin as well, making more dramatic definition to his face and hands. I also took this opportunity to try painting the pupil of his eye so that the color in it was visible.
Wednesday, September 24, 2008
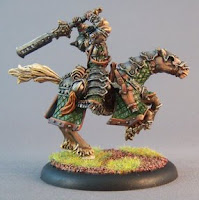
Stannis
This was my first model that included a mounted rider. I really enjoyed it, although overall the sculpt had some odd things that I had to work around. Still, of all the Privateer mounted sculpts, this is one of my favorites so far. It also made a good warm up for painting Kraye for Jeff. This also rounds out my showdown challenge for myself for mercs. I haven't really worked out my upscale to 750pts yet either, so getting done for Sept early is an extra bonus. Anyway, no time for extended chatter... here's the pics!


Sunday, September 21, 2008
Productive Weekends Rocks
This was a remarkably productive weekend for me. I got 21 more lava bases made (plus writing up the tutorial for them). Then I got a large amount of progress done on Stannis, and got all my Bane Thralls assembled. I'm not specifically planning on working on the Bane Thralls soon, but it was nice to get them assembled in case I get the itch to work on them. Painting them would indeed bring my Cryx force up over 500pts, but I've been so much more interested in mercs lately that they are taking a back seat. Anyway, it's time for sleep. Stannis can wait until tomorrow.
Saturday, September 20, 2008
How To: Lava Bases
 Well, it's about time I got around to this. Today I decided to tackle finishing up a big batch of lava bases for my impending Cryx infantry. So, while working on this project, I snapped some pics (some of which aren't so great unfortunately), and present this how-to on making lava bases.
What you'll need:
* An old WM blister pack
* Hobby knife
* Drywall joint compound (available at hardware and home improvement stores)
* Green stuff
* Bases
* Paints (detailed below)
* Pliers
Getting Started:
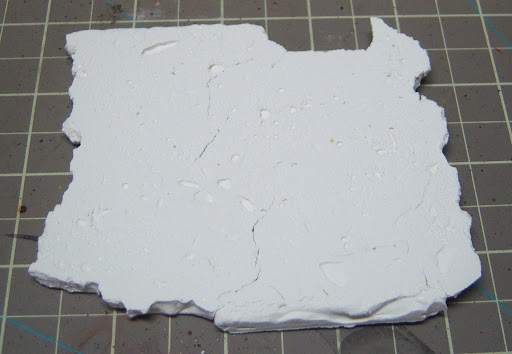 The first big hurdle is to create some pieces of joint compound that you can break up into lava rocks. First, take your old plastic blister pack and cut the back part off. You want to use the back part as a tray for a mold. Next, fill in the "mold" with drywall joint compound. It's not important to fill it in perfectly, just to get it pretty well filled in and decently smoothed out on top. Let this sit out in the sun for a day or two until sufficiently hard. It's very important that it completely dries out, otherwise when you start breaking it into smaller pieces it will simply crumble into unusable parts. Once it dries, you can pop it out of the mold and you should have a nice rectangular piece.
Assembly:
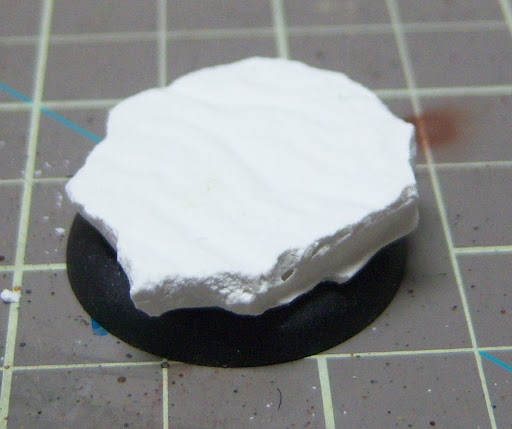 Next, start breaking it into smaller pieces. I keep a base handy for sizing the pieces as I break them. The goal is to have a piece that covers the inset top of the base without sticking out too much. I use needlenose pliers to help break the pieces more accurately. It's good to keep it somewhat irregular to make it look more natural. Once you have your broken piece for a base, mix up some green stuff and use it to attach the piece of compound to the base. Make sure to squeeze it down well, but not so hard as to break your piece of compound. Let this dry appropriately.
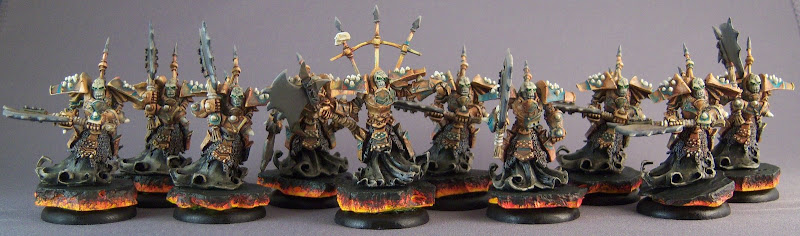
 There's definitely an economy of scale here. Today I was making 21 new bases to save myself time. Since there's a lot of time spent waiting for things to dry, mixing green stuff, and painting layers, it becomes easy to make a bunch at the same time once you have the hang of it. I've got 2 full squads of Cryx models that will eventually need bases, so this seemed like an appropriate amount to make.
Painting:
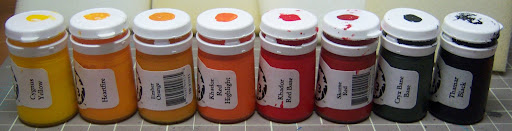 Ok, time to start painting. Here's the spread of colors I use. I've arranged them in the order that I use them. I'm using the P3 line from Privateer, but any line of paints will do. The key is to have a decent spread of colors. The compound takes paint well on its own, so there's no need to prime it beforehand. I just paint right over it, and the white base color helps a lot in this project. I start with the yellow and move towards the darker range as I go. Basically, the first pass is just laying down a good swath of yellow along the side of the compound. Then the next few colors are a combination of drybrushing and rough shading.
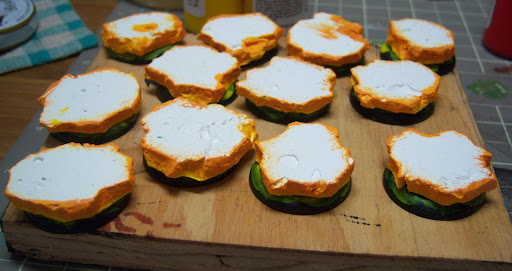 Now, when you get about halfway through, you're probably going to feel like I do and say to yourself "Where the heck is this going? It isn't looking very promising." Especially if you do like I do here and only paint the sides, leaving the tops white. It doesn't look very impressive and it's easy to get disenchanted with the process. Just stick with it. Your patience will be rewarded.
 The transition from orange to red can appear pretty abrupt, as you can see in this comparison shot. I use extra care once I reach the first red step to make sure I am accurate with where the paint lands. It's important to keep the band of glowing lava pretty thin, otherwise it will look like whoever is standing on the rock is about to get themselves burnt to a crisp.
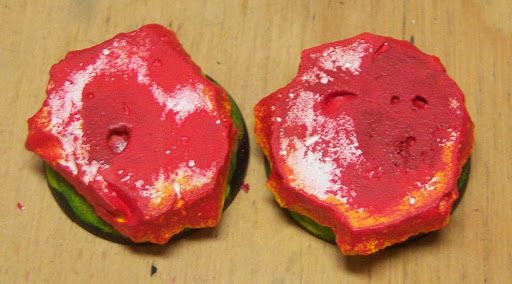 If the pieces of compound you selected had bubbles or cracks in the top, such as these, you can fill them in with some of the orange and red shades to give the look of lava in the pits of the rock. This is why I mentioned not to fill in the mold too perfectly. These sorts of irregularities can really add to the realism.
 Just keep working up until you get to your rock shade. In my case, I've used Cryx Bane Base. I like it due to the slightly greenish shade which helps offset the orangish colors of the lava. At this point I like to make sure that the rock color is spanning at least one third of the side of the rock, then I paint the top as well. Once this base coat of the rock color is done, I give it a wash of black, then drybrush again with the base color. And there you have it!
It's important to note that these bases, although relatively sturdy, are not indestructable. When you drill a hole for a pin, make sure to let the drill bit do the work. Too much pressure and you could cause the compound to crack, ruining all your work.
Subscribe to:
Posts (Atom)