Wednesday, September 30, 2009

Minor Avatar Progress

Yadda yadda yadda... Work is kicking my butt and slowing my progress, but I'm still making headway!
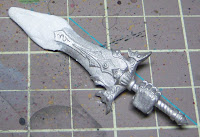
First change is the sword. I wanted to extend it, not just to reflect reach, but to create a bit more of a dramatic balance to the pose overall. I actually did a few steps here. First I lopped off the top point of the sword. Then I drilled a hole and put a thick pin sticking out to a length that I wanted to extend the blade to. I gave it just a bit of a bend to put some angle to the sword. I should point out that I repeatedly and obsessively verified that I was putting the right angle on the blade tip relative to the hand's pose. Finally here I used some Milliput and built out a rough shape for the blade extension. My goal was not to create the final shape for the blade. I intend to use the dremel to shape it down.
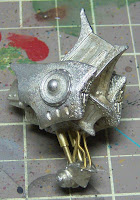
Second, I added the sides of his torso, and also added a couple "tubes" to the hip join. For these tubes I used thick guitar string as the shape gives them that ribbed hose look.

That's it for today. Hopefully I'll get some more time tomorrow to work on this. Thanks to everyone for the feedback so far! Although I'm not real confident with doing conversion work, this is turning out to be quite fun.

Monday, September 28, 2009

The Avatar Gets a Hip Replacement

Step one is complete! I chopped the hips off of the center torso. It took a while to saw through and then file and clean up the surrounding material. Once that was done I drilled some small test holes and made sure things line up ok. Then I drilled the larger holes and put in the supports. In order to make two of them look more like pistons, I picked up some brass tubing and slid shorter pieces of them over the main pins. If you buy your brass rod at hardware or train stores, they usually have a variety of types including tubes as well. I just made sure to get ones that slid over smoothly. Note that you can't just cut the tubs with wire cutters since it will mash the tube. Once that was in place I just added a little milliput to the surrounding area to smooth things out. Despite seeming like a small step, this actually took me quite a while to do, mostly because of the sawing and dry-fitting steps.

Sunday, September 27, 2009

Project: Avatar of Menoth

I've been absent for a while (working lots, plus trying out Malifaux), so the Warmachine aspect of this blog has been on a bit of a hiatus unfortunately. However, with the preview release of the final MKII stats (and if you haven't seen them, head over to the PP site), I got a sneak peak at the Avatar and was pleasantly surprised at him gaining reach! It was the one feature I felt he was really lacking that would give him the extra edge he needed to be worth taking. The Avatar is the last unpainted PP model I have currently, and this preview was enough of a kick in the shorts to get motivated to work on him. To that end, as I did with a couple of other key projects, I'm going to do a series of posts of my progress on the Avatar.

First, let me be blunt: The stock sculpt is kinda... dumb. I'm almost done with a post about my favorite models to paint which will get more into what I like in a model, but I think I'm not the only one who dislikes the Avatar's standard pose. I've had this model in my backlog for probably at least 2 years now and had decided it needed to be a serious conversion project. I'm pretty pitiful when it comes to converting, and I'm primarily a painter, so this will be a big departure for me. My goal is to turn this model into something truly worthy of being the Avatar of Menoth, without trying to cobble together an entirely different model.

So, the first step was to make a plan. I got all the pieces out, trimmed them, and started reviewing them (all 18 of them). I also did some research by searching the PP painting forums and CMON for examples of conversion work that was done. There also used to be a great conversion job on the BrushThralls site, however that set of pictures seems to be inaccessible now. In any case, the following is a list of things that need to be done to the existing pieces:
* Extend hips lower from the body - This will help make him look taller.
* Widen hips to give a wider stance - This will help make him look more stable.
* Lengthen legs - This will allow for a more dynamic pose to his lower body.
* Extend upper arms - This will allow for a more dynamic pose to his upper body.
* "Fix" sword - Yeah, seriously... the flaming butter knife is just dorky, especially now that he'll have reach.
* Remount shield - Not sure exactly what I plan to do here, but something that improves the pose angles.

Well, that's about it for now. My goal is to have at least a small amount of progress every two to three days.


Saturday, September 26, 2009

Sorrows

Well after what has felt like an eternity, I've finally finished painting something new. Work was absolutely kicking my ass lately, otherwise I'd have gotten these done a while ago. Now, to be honest, they aren't my best work, but the photos really seem to have come out worse than they are in real life for some unknown reason to me. Probably a problem with how skinny they are against the backdrop or something. However I don't photoshop anything anymore (cause I'm lazy), so I'm stuck with mediocre photos. Sorry out there. Anyhow, these guys were actually quite fun to paint as I opted to practice more with using washes to smooth out blending transitions and also practice using more variance of hue in my paint schemes. Overall I learned a lot and am quite happy with how they turned out.

What went well:
* Lots of color variation. I feel like I'm really starting to build a better sense of color, both in terms of when to add a different hue, and what hue to add. These have a lot of variation in the washes which gives them a much more rich and complex color scheme.
* Washes, washes, and more washes! Really, I feel better about my abilities here. On these I did some pretty rough highlighting on them and then used multiple controlled washes to smooth out the transitions which worked great.
* Themed, but varied. For these guys I decided to make them all different, yet cohesive. I kept the same sort of flowing magical mist beneath them, and the eyes and tongues are all the same, but the skin was all handled quite differently.

What could have been better:
* I could have spent more time on them. Honestly, it could have made a noticeable difference. These were half experiment and half serious.
* Better zenithal highlighting. I did a little of this, but I don't feel like I made it dramatic enough to make it obvious. It's something I'm always conscious of, but still haven't quite mastered.

Well, the good news is that this wraps up my Pandora box set for Malifaux! I'm pretty stoked to have made it this far. I'm looking forward to more Neverborn models being released that fit with her crew, but I've certainly got enough backlog to keep me busy until then. Before I close this out, I wanted to include a group shot of all three of them, just because the basing scheme really helps to bring them together as a group. Until next time, happy painting!

Sunday, September 20, 2009

Lady J Strikes Again.... Almost

Today I played two more games of Malifaux. Well, sort of. The first game was the Lady J box vs the Zoraida box. The quick summary is that I ended up forfeiting after turn 2. The whole Zoraida thing is turning out to be completely broken. Both Henry and I worked through the mechanics and math of it and it turns out she basically can't fail on the Obey whack. There was a battle report I failed to post from last Sunday where we played Lady J vs Zoraida and it went pretty much the same way. I hate to say it but I highly recommend steering clear of Zoraida for your first 30 games, particularly if someone knows how to play her well. The game honestly feels broken.

The second game was the Lady J box, Scales of Justice and Bishop vs Leviticus, Rusty Alice, Bete Noire, and Desolation Engine. This game was a blast. The Leviticus list was pretty crazy to play against. Lots of weird things going on, with Bete Noire popping back in a couple times. It was very strange. In the end it looked like I was about to lose and then Lady J made a gamble to move over and engage Leviticus. It turns out that Lady J is pretty much a freight train of pain. She walked twice and then carved Leviticus to ribbons, and that sent the rest of the game solidly in my direction.

All in all, I think we both had a great time, and it was certainly nice to use the gamer side of my brain again after an absolute hell of a week at work. I haven't picked up a brush for over a week now!

Games played: 8
Dollars spent: $115.00
Cost per game: $14.50

Sunday, September 13, 2009

Pandora

Quick post today. I sealed up Pandora last night. Work has been quite busy lately so I've just been tinkering away as I can. This model was, unfortunately, not one of my favorites to paint. Something about the sculpt was just a struggle. There's an awkwardness to her features that I can't entirely pin down that made it hard to paint and be happy with. I think a large part of it was her hair, but also the "stuff" coming out of the box. Some parts I'm happy with, and other parts are just very blah.

For this model I decided to follow the art in the book rather than anything resembling the studio scheme. I opted to ditch any OSL work on it as well, which now that I'm finished I think was maybe a poor choice. Overall, not my best work by a long shot, but I'm happy to get her finished and on the gaming table.


Monday, September 07, 2009

Candy

Another ridiculously small model. This is definitely stretching my skills to paint these tiny models and to do it to the best of my abilities. I'm enjoying the challenge though, and I can honestly say that I never really felt like I just wanted to "be done" with this model. It has a certain sort of fun to it due to the pose and implied story. Unlike the studio scheme, I wanted to capture a more realistic skin tone and more innocent looking appearance while still maintaining a hint of malicious intent. In hindsight, I think having the eyes looking to the other direction would have been better (since the scissors would have been more "behind" her), but I still like how this turned out.

What went well:
* The eyes looking to the side gave a bit more of a scheming look to her.
* The overall composition turned out ok, although there is a something I can't quite pin down as wrong. Maybe someone will notice and let me know.
* Lots of details! I really spent the time to pick out the little details on this model rather than gloss over them. I feel it really helped the overall appearance and yet it doesn't look too "busy".
* Lots of happy accidents! I'll point these out later, but there were a number of happy accidents that happened.

What could have been better:
* Blending on this small scale is still difficult. There are a few spots I'm not terribly happy with (shirt and skin for example).
* Mounting to the base just didn't work out. I knew it would look like she was somewhat floating, but there wasn't much I could do. I either needed to file the bottom of her shoes down more, have her leaning forward, or just go with it. In the end I decided not to stress over it and just do my best to minimize it without doing surgery or making her look like she was going to fall over.

Ok, now it's time to talk about "happy accidents" and what I learned while doing this model. Typically when I paint, I tend to focus on a particular area and base, shade and highlight, before moving on to another area. Then at a later point, I'll go back and clean up things that need some adjustment. While I was working on Candy, specifically her face, I had a number of happy accidents along the way. Rather than correcting them at the time, I decided to just leave them and I'd address them later. The main ones were the corner of her mouth (her left) had a little extra dark shading to it, and her eyes were off center when I painted the irises. Once I was done with the first pass of work on the face, I noticed that these (and other subtle "mistakes") led to a more mischievous expression. So the lesson I learned? Sometimes the small mistakes should be left until later when the overall composition of the model is more assessable.

Anyway, my long weekend is nearing a close. Time to get Pandora primed before I have to start tackling my weekend tasks that I've been putting off.


Sunday, September 06, 2009

Lady Justice vs Ramos

Just a quickie battle report here. Played two incredibly fun games of Malifaux today with Henry. I was fielding the Lady Justice box set and he was fielding the Ramos box. Both games were to the wire and I can honestly say we are really starting to get the hang of the game. We played both games in under 4 hours!

The first game pitted Ramos with a Reconnoiter mission against Lady J with a Claim Jump mission. We were quickly battling in the middle and the Steamborg was really bringing the hurt train. However Lady J is a powerhouse in melee and made short work of the mechanical monstrosity. At that point it was a matter of mopping up, and the Judge was able to deliver some serious pain to Ramos. Ironically though, it was the Slow To Die attack from a Death Marshall that really put the nail in the proverbial coffin.

In the second game, Lady J was charged to Assassinate Ramos while he was trying to perform a rapid Treasure Hunt. Again, the Steamborg brought a pain train, nearly killing all three Death Marshalls in one turn. Lady J quickly held off the Arachnids from making off with the Treasure. This one was a nail biter! At one point Ramos had Lady J down to 1 damage point left. Then she and the Judge rallied back and nearly killed Ramos. Through some judicious use of soulstones to stay alive, Henry averted a loss and pulled out a tie as the game to a close after turn six, thwarting my attempt to pull out the victory.

There were a number of highlights in these games. First, we played two games in under 4 hours! Second, we really have a better handle on the rules and there were no significant rules questions that came up that we couldn't handle. For only being game four, those two points are pretty huge.

I really really enjoyed playing Lady J's crew. It was very entertaining and I felt like I had lots of good options. As entertaining as Pandora is, she's more tedious to plan out. Having more terrain on the board really helped as well. Unlike WM/H, this game plays well with lots of terrain since it really is a skirmish based game. Anyhow, I'm very much looking forward to my next game of Malifaux already!

Saturday, September 05, 2009

Allegiant of the Order of the Fist

I love long weekends. Nothing like a three day weekend to get out of a painting funk. Work has been kicking my ass lately and so it was nice to round out my week with an evening of painting. I had his guy primed and decided to just start working on him last night. I was just aiming at tabletop quality and to get him done fairly fast, but it was still surprising to me to finish him off in about 4 hours. It would have been faster but I was watching the latest disc of Torchwood that came from Netflix.

Anyway, I'm skipping my normal painting analysis this time. I got him painted fast, and I'm happy with the quality. I didn't want to go overboard since this guy isn't in my "my paint awesome" category. He's more in my "must collect everything for Protectorate" category which has pretty much stopped being an obsessive thing for me now.

At this point I'm down to just the Avatar for all my PP models. I'm sure that will change next time I hit the LGS. Anyway, it's time to get back to my Wyrd stuff and perhaps working on the Avatar conversion some more.