Tuesday, July 31, 2007

The Wolf Starts To Shape Up

Made some serious progress tonight:

Armour: Did the metal bits, including a few select pieces of highlighting on it. This stuff was really basic. Just Blighted Gold followed with highlights of Brass Balls. I love the look of the Blighted Gold. In addition I did some specific highlighting of the green with straight Iosan Green.

Skin: This was the real work. Rather than starting all over, I decided to just rework some key spots. I basically just re-did the highlighting work I had done before, but on the pieces I felt really needed it. Notably were the chest, thighs, hands, and shoulders. I also highlighted some of the transitions between skin and spines/claws.

Spines/Claws: Did these entirely. Basically they are 5 coats, going in order: Battlefield Brown, Bootstrap Leather, Rucksack Tan, Menoth White Base, Menoth White Highlight. I'm thinking that I'll do one last highlight of straight white, but not tonight. Getting too tired to see straight.

Base: Just gave this a clean-up coat of Cryx Bane Base.

Muzzle: Did a little stippling with black ink to create a bit more natural transition between the nose and skin.

There's still alot of details to do, but now it's just down to details. Eyes, Rune Stones, Fur, Teeth, and a couple other things probably, but the list escapes me at the moment. Headache and all. Anyway, pics ahoy!

Saturday, July 28, 2007

In Need Of Warp Speed

The Warpwolf is in the early stages of taking shape. The leathers are done, and I've started the armor plates. One thing that makes this model easier to cope with is that there aren't a large amount of varied details. There's plenty of detail, but not lots of little tiny fiddly details like the Fell Caller had. Anyway, here's what I did since last update:
Leathers: These are finished up. I gave them a glaze of the Rust Brown ink, and then a thin wash of dark brown ink to create more depth to the surfaces. Overall I'm fairly happy with the results.
Armor: The inlaid green of the plates is done. These were first given a couple good layers of Iosan Green, and then glazed with green ink, and then a wash of green ink with a dash of black as well t really deepen the recesses. They don't look too snappy at this point, but once the gold trim is done, they should really pop nicely.
Claws/spines: This have just gotten a first coat of battlefield brown. There's plenty of work to do on these. The goal at this stage was just to get the base brown on them so that I start thinking about them now.
I traded a couple emails with Sean about the skin tones. At this point, the plan is go rework them. I just need to mull it over a bit more before I make the next attempt. Most likely I'll continue to work on other aspects of the model first and then come back to the skin later. I'm sure I'll regret that, but I really want to see the model take shape before I commit to reworking the skin.

Thursday, July 26, 2007

The Stupid "Middle Phase"

Made some more progress on the Warpwolf yesterday, but got lazy about posting. 2 update pics. Basically it's slowly coming together, but the skin is giving me some real grief. I'm having alot of trouble getting a blend that I like. I think part of my issue is I'm trying to create more shading than there is legitimate surface to shade. In other words, it's overly dramatic shading for the surfaces. Here's a pic of the progress before I decided to start working on the leathers to help bring the model together more.I'm really frustrated with this skin. I've give some details of what I'm doing, but 1) the blending is kinda sucking right now, and 2) I've been doing so much experimentation that I've forgotten what I mixed. Mostly its mixing Ironhull Grey and Frostbite together at different ratios. I'm half tempted to go back to a pure Frostbite base coat, and the highlight up to Morrow White, and do some very slight washing with Frostbite and a touch of Bloodstone. I'm not convinced this will look any better though, so it's a question of whether to cut my losses here, or keep laying more paint. I'll see what Sean thinks so far.

Models often seem to get depressing for me at this stage. It's before all the base coats are done, and there's still primer showing. The model always looks terrible at this stage. It will get better... I hope.

The leathers are going much better. The pic below shows the first 3 steps. Start with Bootstrap Leather as a base coat. Next, do a wash of Battlefield Brown. Next, highlight with Rucksack Tan.
My next steps are to do a very thin wash of Black paint, and then a thin glaze of GW Rust Brown ink. The GW ink is one of the non-P3 pigments I use. I just love this stuff on leathers. It gives the leathers a slightly wet look to them, which I prefer.

Wednesday, July 25, 2007

Menoth Puts Away The Skorne!

Had an unoffical summer rampage battle yesterday with my buddy Lance. We were too lazy to drive down to the LGS (which happens to be 25 minutes away), so we just played at my place. It was Amon vs Hexeris, in a brutal scenario. We played the Menoth mission, which had the effect of dust storms that pretty much shut down most options for units.

The Armies:
Skorne: Hexeris, Titan Gladiator, Cyclops Savage, Krea, Paingivers, Totem Hunter and Gatormen
Menoth: Amon, Castigator, Revenger, Daughters, Knights Exemplar, Vilmon, Rupert,a Paladin and 2 Wracks.

The Battle:
Generally the battle went well in my favor. Skorne took control of 2 of the objective points early due to the dust storm delaying my plan. However, it wasn't long before I dislodged control and evened things up. The Totem Hunter found himself on the business end of Amon's Sand Blast, putting him away early. This freed up one end of the field for the Paladin to just park on the objective for the rest of the game. From there, it was a slow downhill slide for the Skorne. The Castigator held control of the middle. The Knights and Daughters held the other flank firm, and eventually thinned down the paingivers. In the end, the battle was tied on objective points and came down to VP's, of which Skorne game up short.

The Dice:
Overall, the dice were fine for me, but the Skorne had some odd luck. Hardly a single missed attack roll, but routinely poor damage rolls. Overall I think it ended up mattering little, but it did throw the game in my favor.

Top Performers:
Again, Daughters were remarkable, and Amon, as always, was a badass. I really enjoy Amon for his versatility. I've heard alot of bad comments about him, but I think alot of that comes from him not being a very good "playbook" caster. I'll post more about that another time though. Overall, this was a lovely list, and I look forward to using it again. I think it strikes a good balance between Amon's battlegroup and flexible but potent units and solos.

Monday, July 23, 2007

Juggling Activities

Lots going on right now. Trying to get painting time in, but there's 4 other big things going on:
  • Work managed to get me wrangled as the release manager for this July release, so there's a couple long long days coming up for me.
  • Summer Rampage League is totally fun, and I'm totally trying to pack in lots of games with people I normally don't play against.
  • I enrolled in Bartender School. It's 10 4-hour classes, which I can spread out as much as I like, but I'm going to shoot for once a week. I'm totally stoked about this, but 4 hour classes that run from 6 to 10 in the evening is going to be killing one evening a week for a while.
  • I'm reading Harry Potter 6, and the 7th book is sitting on my desk as well. I just can't put them down!

All things considered, I can't really complain too much. Other than the work stuff, I am totally excited about all these activities.

The Alpha Project

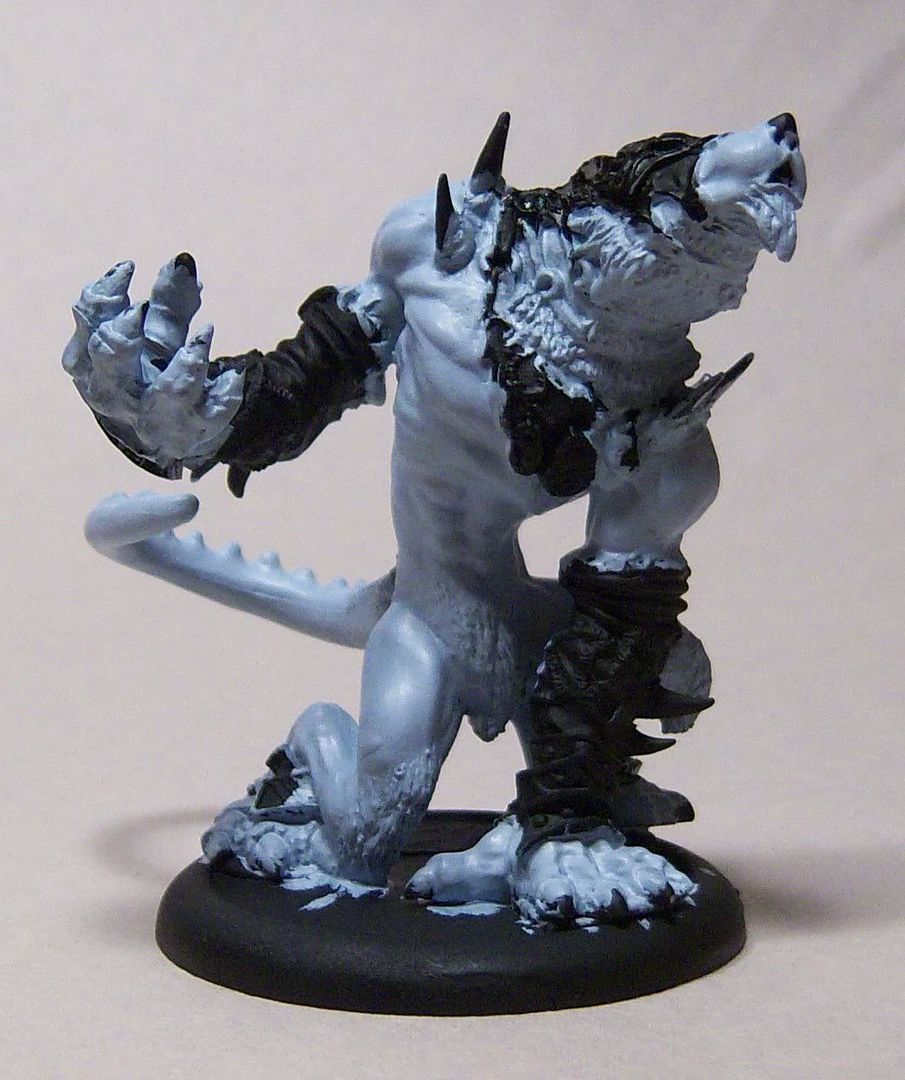
Tonight I started painting the Alpha Warpwolf for a friend of mine (Sean). This is a majestic model. It makes me sad that I don't like the Alpha Troll as much. Anyway, this beasty is going to take a while, especially given my busy schedule, which I shall discuss later. So, I figured I'd use this as an opportunity to do another series of posts of the progress, but this time show alot more incremental updates. I'm not going to haul out the lightbox for every photo, so the picture quality will probably not be so hot. Plus, this photo will be one of the only ones where he isn't glued to a spray can for easy handling, so even if I wanted to use the lightbox, it would be difficult at best.

This first update isn't going to look like alot of progress. Basically, I received the Alpha fully assembled, attached to his base, and primed black. And when I say attached to his base, I mean this bad boy is going nowhere. Kudos to Sean for a kick-ass job getting him attached. He's not moving at all.

I've been mulling over what to do color-wise with this model. Sean already has some of the studio green/gold armor bits on his other Circle models, so that choice was made easy. However the fur was another issue. I decided after debating options for a couple weeks, and looking at other warpwolves on the Privateer forums and on CMON, that the studio scheme will be my base for the color. I've got a fair amount of experience with painting white, and it really does make this model stand out. We'll see how I feel about that once I start trying to shade him.

With a basic color scheme chosen, this first step was to base coat all the white skin. I'm starting with this for three reasons. First, there's alot of it, and I've found that painting all the skin on trolls first serves me well for feeling like I've made progress early on. Second, it's easier to just be sloppy when doing all the skin and then be precise later on when doing smaller bits. Third, it gives me the opportunity to review the whole surface of the model. There were a few places where the primer was rather thin, so I made sure to get some paint on there to cover up any bare metal. The irony of going with black primer (and I really love black primer) is that whenever I paint a predominantly white model like this, I always feel like there's some wasted effort going on. Tonight I tacked this single task of getting a couple of nice even coats of P3 Frostbite on all the skin and the fur transitions. This first step always takes me longer than I expect.

The next step will be to begin shading the skin, but not tonight. One thing I still need to decide on is what to do with the base. I want to really spice it up a bit, but there's limited real estate to work with.
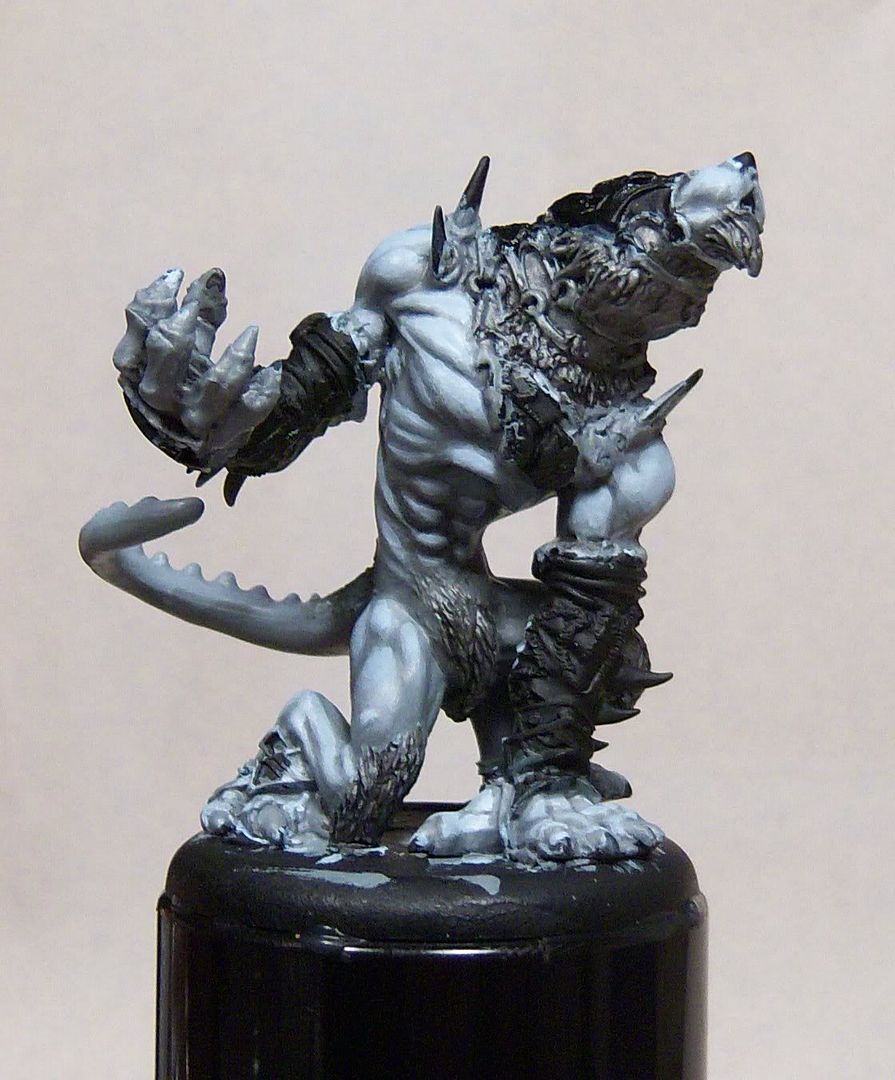
Saturday, July 21, 2007

Dire Troll Blitzer

Finally got off my lazy butt and finished up the blitzer. He'd been sitting there all done except for his Pyg Ace rider for almost a week. I used alot more washing techniques on this one with mixed results. I'm not entirely happy with it, but it did give me more experience with a technique that I feel I could really benefit from using more. Something I think will help in the future is to add matt medium to washes in order to eliminate the reflectiveness that often results from using the flow extender in the washes. Something to try next time I guess. Beyond using washes, the rest of this was pretty standard techniques for me. The model itself was rather hard to work with due to its shape and weight. I'm not sure if I like the bone-style protrusions. Painting them as rocks achieves a better look I think, but this does help maintain a better color balance. Overall though, a very entertaining model.

The camera is starting to get more comfortable for me. Plus, I learned how to use Gimp to crop the image down. For those interested (and as much for my own benefit in case I forget next time), here are the steps:
  1. Open the image in Gimp (Duh)
  2. In the image window, go to: Tools -> Selection Tools -> Rect Select
  3. Select the region of the image to keep
  4. Go to: Image -> Crop Image
  5. Save the image

The reason this is so valuable is that the camera really produces a very large image (larger than necessary), and also that taking the picture from further away helps focus the image better, especially for a model like this that has much more depth of field

Friday, July 20, 2007

Har Har Harry!

Just a little amusement...

You scored as Severus Snape, Well you're a tricky one aren't you? Nobody quite has you figured out and you'd probably prefer it stayed that way. That said you are a formidable force by anyone's reckoning, but there is certainly more to you than a frosty exterior and a bitter temper.

Severus Snape

70%

Ron Weasley

55%

Remus Lupin

55%

Albus Dumbledore

55%

Hermione Granger

55%

Sirius Black

50%

Harry Potter

50%

Ginny Weasley

40%

Draco Malfoy

35%

Lord Voldemort

30%

Your Harry Potter Alter Ego Is...?
created with QuizFarm.com

Thursday, July 19, 2007

Summer Rampage League: Week 1

Just a quick update... I might come back and edit this more later.

Played 3 games for the summer league on Tuesday. It was awesome. Lost 2, won 1.

The first game was against Eric's Trolls, which I lost, but it was a fairly pitched battle. I just couldn't quite secure my hold on the field. Plus, I totally pulled off a rampage, but failed to actually use it at the time. Doh!

Second game was against Jeff playing Menoth. Icky... Menoth vs Menoth. This game was a little more one sided. He got a good ranging on me and wiped out most of my zealots, and from there the rest of it folded. I had a No Quarter Challenge moment, but it required better than average luck and my dice were not cooperating.

Third game was against Dan playing Menoth. I switched lists from Amon to Feora. This payed off well. He had mostly infantry and a good turn with Feora's feat wiped out over 50% of his troops. It earned me the bounty, and the victory. He almost pulled off a No Quarter Challenge on me, but he needed superb damage rolls and didn't get even close to lucky enough. Overall, that battle felt like a mugging.

Saturday, July 14, 2007

Blitzer In Progress

Spent most of the day working on the Blitzer today. I'd done the skin earlier this week. At this point everything except the Pyg Ace and his machine gun are done. Here's a quick snapshot of him, although the picture isn't fabulous. The Blitzer is a pretty dynamic model and I need to learn how to properly focus at such close range with this camera. I'll write up more about the actual painting techniques when I finish. Needless to say I'm beat from a full day of working on this guy. Great model, but the large models definately take me a while. I'm not sure I like the overall color scheme at this point, but once the Pyg is on top I'm sure it'll shift.

Wednesday, July 11, 2007

New Camera!

My new camera arrived today! It's not a big fancy camera like some people recommend, but it's adequate for my needs. Below is a comparison picture between the new (left) and old (right). There's definately a color quality improvement. It's also 10 megapixels vs the old one that was 2 megapixels. It also has image stabilization which makes taking clear pictures much easier. There's some oddness though to using the macro mode on this camera though. The old camera could focus in macro mode when zoomed in all the way. This new camera seems to have trouble focusing in macro mode when zoomed at all. However, it does have a very close focal range, so what it lacks in zooming, it makes up for in distance. It'll take me a while to refine the process, but overall this feels like a fair upgrade.


Grim days for Severius

Played another game against Zugbart yesterday and I have to say, he delivered a thrashing to me. The entire game I felt like I was trying to recover from the previous round and if I'd had a lucky round, it probably could have turned my way. Overall though, Grim never presented himself as a target, and used careful scalpel-like strikes to eliminate key models. By the 3rd round, I was really hurting for firepower. Overall, I just executed poorly and spread out my forces too wide. I should probably have bricked up. Following my practice of fielding whatever I most recently painted, the second Seneschal and Grogspar both got some field time. Although my Seneschals got whacked early on, Grogspar at least got to fire a couple harpoon shots. He wasn't supremely effective, but he was very intimidating.

The armies:
Me: Severius, Revenger, Vilmon, 2 Seneschals, Daughters, Grogspar, 2 Wracks
Zugbart: Grim, Mauler, Axer, Impaler, Gobbers

The dice:
Overall, I can't complain. I had a number of very poorly timed bad rolls (like the triple ones on a damage roll to kill the axer), but I also had some good rools, and I can honestly say I don't recall missing more than 1 attack roll. It was the damage rolls that really fluctuated wildly and caused problems. I've started getting more conscious of matching up my attacks on targets in such a way to increase my odds of hitting overall.

The endgame:
In the end, Severius and the Revenger were trying to hold off Grim, a nearly dead Axer, and the fresh Mauler. There was just never really a good chance to blast Grim unfortunately. I can definately say though that Severius made it very very hard to finally get damage to bear on him, between his Sacred Ward and his Vision spell.

Star Performers:
Once again, the Daughters outperformed my expectations. With Eye of Menoth as a bonus, 2 of them laid out a pile of damage on the Impaler, taking it out after it had been hit a couple times by Ashes To Ashes.

Learning Lessons:
  • Stay in closer formation.
  • Focus firepower when targetting a warbeast.
  • Flanking with the Daughters works well, but not at the 350pt level where there isn't enough other support.
  • Don't forget all the special features of models, like Daughters' stealth, and Seneschals' Righteous Fury.

Sunday, July 08, 2007

Exemplar Seneschal

Finished my second Exemplar Seneschal tonight. As opposed to my first one which was green, I did a more traditional red color on this one. I didn't put the same level of effort into this model as the other recent stuff I've been working on. I just went for tabletop quality. The one effort I put out was the freehand work on the banners. The runes use the protectorate character set to spell out Menoth. They weren't as hard as I was expecting. I was going to leave them blank, but I found that adding them was not only a good chance to practice freehand work, but also really rounds out the model better. It's really probably the only good feature of the paint job. Overall this model is a pain in the ass because of all the parts. I painted him as all seperate pieces (all 7 of them) since, once assembled, he's just a nightmare to reach all the nooks and crannies.

Wednesday, July 04, 2007

Bosun Grogspar

Yay for time to paint! Finished Grogspar this afternoon and he was a blast to paint. I took a few shortcuts on things like skin and metals this time. Overall though, even though it was a relatively simple model to paint, he ended up being fun. I have to say though, I waited to paint the stripes on his shirt last and, up until that point I was thinking that he wasn't that great looking. Something about putting some stripped pirate flair on him really brought him to life. He may not be my best paint job, but he's definately going to the top shelf of the display case. The stripes on his shirt worked out pretty well, to the point that I even did a small amount of shading on them in a couple specific places. Definately worth the effort. The rest of the model was pretty routine though, so putting the extra effort into the stripes was my bit of painting like I have a pair. I'm starting to get more confidence in my "freehand" work finally.

Sunday, July 01, 2007

Fell Caller

Finished the Fell Caller tonight, and I must say, this model was both very fun and very torturous at the same time. There were a zillion little details to paint. There was a comment I had heard about Hordes models when they were first released: "You can spend as much or as little time painting them as you want." Well, this is definitely true for the high end. I spent the better part of 3 days working on this guy. In any case, I'm very pleased with how this bad boy turned out. The picture is kinda lame for a couple reasons, the primary of which is that it makes the water effects of the base look bad, and they really aren't. This time I was smart and sealed the model before attaching him to the base.

There were 2 things that I decided to just paint like I had a pair. First, the fire effects on his torch-banner-thing was something I hadn't really done before. I think this turned out not too shabby overall. I started by painting the inset part white, and then building towards orange as I went out, with a final haze of orange around the edge. Second, the Tartan patter, which is moderately ok. I'm pretty unpracticed at freehand work, so the lines are pretty poor. Still though, I'm glad I did it. From more than 12" away, it looks decent enough.

Well, my desk is a total disaster so I need to clean it up. I have this habit of leaving out the paint pots that I used for a model until I finish that model (yes, I only paint one model at a time), and for this guy I seem to have an excessive number of pots out. Let's see... [insert abacus sounds]... 32 pots of inks and paints.

...Let there be Swamp!

Here's my second attempt at a water base, this time with more of a swamp style to it. I used the article from the Brush Thralls on making swamp bases as a guide, following the 3rd option for maximum quality (and effort). This picture wasn't done in the lightbox and I don't think really does justice to the base, but it gives you the basic idea. Overall it probably took a total of an hour of work to make this one, which isn't bad. The Envirotex behaved quite well for me. Here's some notes of what I did that seemed to work well:
  • Just used a teeny tiny drop of green and blue ink, rather than a big drop. Gave just the right tint to the water.
  • Used several clumps of tall grass to make the base seem more populated. For the grass I also followed the Brush Thralls article and used Woodland Scenics tall grass, bunched up. I put in the grass before pouring the Envirotex, so as a result, the Envirotex sort of soaked into the grass a bit, further clumping it up. Mildly unfortunate, but not very noticably unless you actually poke at the grass with your finger.
  • To create the texture on the ground I used DecoArt's stonelike textured acrylic. This stuff worked great. It created a very fine but uneven texture to the whole thing which, once painted and drybrushed, looks very nice I think.