Saturday, December 31, 2016

Carver

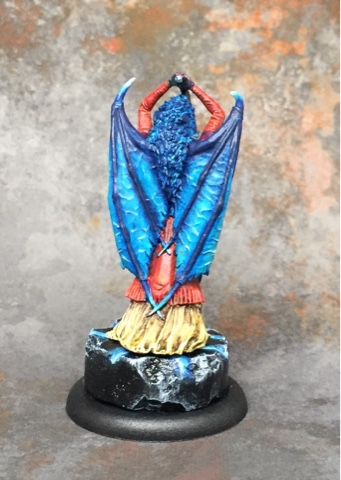
As mentioned previously, this is my Sketch Style experiment. I'll be taking a Sketch Style class from the great Matt DiPietro in the near future, but prior to that I wanted to take a practice run at the process by myself to figure out where I may or may not have big questions. Boy did that experiment turn out valuable. The end result is actually better than I anticipated, but it did open up specific questions for me:
1) What does Matt use when actually "painting" the sketch colors in? The underpriming process is very straight forward, but the coloring process is elusive to me.
2) How does he handle metallics?
3) How does he handle OSL?
4) Am I leaving my overall brightness too high? Should the piece as a whole be darker? I aimed for a high amount of contrast, but it might actually be too much.
In any case, I'm really looking forward to the class!

Friday, December 30, 2016

From the Desk: Weekend Roundup #139.5 and Desk Rescue Update

Fake roundup post. Just cause!

First update is that I finished building a new paint rack, clearly pictured here. It holds all my paint! And conveniently takes up less footprint of my desk. It is not quite as good quality as the previous one, but it's pretty close and definitely meets my needs. The project is pretty easy and below I have included a sketch of materials for my own reference in the future. However I am going to note some key learnings for the (potential) next time that I try to build a paint rack:
1) Next time, get access to a table saw to do all the cutting to make all the cuts perfectly aligned.
2) Build each level one at a time, using rods to do the joining to make it more modular.
3) Stain it before doing the final assembly. Perhaps also find a better wood glue choice that takes stain and/or works on already stained wood.
4) Measure stuff a little bit more accurately. There's some jamming happening because the width is a little off, and the pigment pots on the top don't fit as well as they could.
Other than that though, it was fantastic. I'm super happy to have an expanded paint rack and clear space on my desk.

And on the desk front, things are still moving along slowly. Carver here is nearly done, and has been an interesting experiment of Sketch Style. I'll post more about that when I finish him of course. Beyond Carver I really don't have a good plan of what's going to get done next. I've got 2 primed Shredders, and 2 primed Beckoners, but neither of those really interest me, so today my goal is to review my sizable backlog of models and figure out what will stir my muse to action.

I'm also going to start working out my 2016 wrap up post. That will no doubt take me a while to do.

Paint rack reference notes:
Wood was all project pine wood from Lowes. 1/4" thickness, with mostly 2.5" width pieces. The edge parts are 1/2" square pieces.

Wednesday, December 28, 2016

Lilith Avatar

Likely my last finished model for 2016. This old metal sculpt of Lilith's avatar form is really nice to paint, although it was a bit of a challenge to assemble. None of the pieces fit cleanly together and I had to do some cutting and greenstuffing to make everything look reasonable. I'm really happy with the final results for the base, where I was able to blend together my normal Nephilim basing style with the actual Lilith sculpted base.

Thursday, December 22, 2016

Holiday Happiness

My gaming bros (Lance and Henry) and I had our annual gift exchange which is a fun and relaxing end to the year. Gifts from those guys included:
* Miss Fire (limited edition) - Such a crazy awesome detailed model. It's a really challenging project that I'm excited about.
* Barbaros (alt sculpt) - Although I already have the regular plastic Barbaros, this sculpt is simply amazing. Gotta paint it.
* Amphibious Assault (Swamp Mother + 3 Gupp Swarms) - I'm on a quest to get all the scenario boxes assembled. This one also includes the translucent green version of the Swamp Mother so I have a nefarious plan for how to paint that.
* Master of Puppets (Collodi, Vasilisa, 4 Marionettes, 3 Wicked Dolls) - Just... yeah... so awesome. Can't wait to play Collodi.

And so now I have a bunch more Malifaux painting projects to keep me busy. Hooray!

Monday, December 19, 2016

From the Desk: Weekend Roundup #139

Probably my last roundup post of the year.

My muse is still somewhat on holiday, but I'm still finding a little inspiration. More progress on Lilith Avatar, and started working on a this memorial-style terrain piece.

Played another two games of Malifaux this last week, wrapping up week 4 of our campaign for me at least.
Total games played this year: 56

Monday, December 12, 2016

Angel Eyes

The face is unfortunately quite muddled, and the photo isn't great, but she's done. Honestly the parts of this model I'm the most happy with are the pants/scarf (which only took 3 layers to accomplish), and the boots (which only took 2 layers to accomplish). The coat was also a specific practice in focusing highlights not only using zenithal techniques, but also specifically modulating the highlights to draw attention around the torso and head. Not entirely successful I know, but I feel like I'm getting there.

Sunday, December 11, 2016

From the Desk: Weekend Roundup #138

Doing this post extra early just because of expected timing issues.

My muse seems to be on holiday, but I did get some stuff done. New Nightmare base for Carver is finished, and I did the extreme whites/blacks for Carver as well as prep for sketchstyle. Angel Eyes is done except for getting on to a base. I also got the Lilith Avatar model assembled and primed, which also included attaching it to one of my blank Neverborn bases and getting it gap filled. Other stuff got done too, like priming my 2 plastic Shredders and assembling a bunch of other things (2 Transmortis, the 4 Guild models from the starter box, and the Batman model).

There was also a backslide for my painting percentage as some of my Wyrd Black Friday order arrived this last week, which included the Titania box, Will-O-Wisps, Bandersnatch, and 3 limited edition models (alt Nicodem, alt Guild Guard and alt Bishop).

Played another game of Malifaux, wrapping up week 3 of our campaign.
Total games played this year: 54

Wednesday, November 30, 2016

Widow Weaver

Grace, beauty, and twistedness. Love this model and it's story. It dresses like a proper nanny and quietly invokes nightmares in them in order to steal those nightmares away. Terror hidden under frilly victorian manners.
I tried to keep my color range as limited as possible here, creating a much more subtle triad of yellowish-off-white, light magenta, and deep blue.

Tuesday, November 29, 2016

From the Desk: Weekend Roundup #137

Two days late, and lazy fast...

Life has been super busy for me lately. Holidays, family visits, promotion at work, family health issues, traveling, etc. Just a rough time in general for the hobby. Here's what I've been working on...

Made more blanks for Malifaux bases. Lots of them. I'm planning to paint lots more Neverborn. Widow Weaver is mostly done as well (probably post tomorrow). Angel Eyes is started, and Carver is primed. I'm actually planning to paint Carver in Sketch Style as described by Matt DiPietro. More about that in the future though.

Played 2 games of Malifaux last week as a part of our campaign (week 3).
Total games played this year: 53

Quick review of progress against my 2016 goals: Basically everything is done except for painting the Batman model. I'm not sure I'm going to manage to pull that off actually.

Saturday, November 26, 2016

10 Years of Blogging

This last week my blog turned 10 years old. It's a little staggering to realize I've been posting here that long now. If I'm honest with myself this blog started as a "me too" response to all the other blogging going on there. Over the years it has sometimes felt like a chore, and there's obviously been times when Blogger changed and caused me problems. However despite my original reasons and challenges over time, this blog has become a huge source of self-motivation for myself. I feel that a few reflections are in order...

My favorite lessons learned:
* Building a portable assembly kit was one of the smartest things I did. It allowed me to keep projects moving even when life forces me into weird corners. Having it as a modular kit that I can expand and reorganize has just made it even more valuable over the years.
* 10 years ago I only used GW paints. Now I have paints from 10 different makers and an appreciation for why each one is useful in different situations. My eye for color has also improved which is why having all these different paints is so valuable. The real lesson though is that experimenting with new paints and techniques is always a good idea.
* Keeping a painting journal has been incredible useful. I'm not great at doing it all the time, but being able to go back and reference past projects and formulas has been very helpful many times now.
* Color theory is totally a thing. It allows for a little analytical process in the midst of the creative process and has really helped bring my projects to life better. More on that below.
* Basing is also a thing. The more I do it, the more I appreciate doing it. Whether it's to create a uniform army theme or to tell a story, basing is something I truly enjoy rather than "just do".

And now a couple comparison photos and some thoughts about my painting journey:

This first photo shows Ashlynn (painted Nov 2006), and Taelor (painted June 2016). The comparison is pretty interesting. The first thing I noticed when I put them side-by-side was that my sense of brightness range is much better managed later on. Taelor's overall brightness is pretty even with much of the brighter parts centered on her torso and face to draw attention to the center, but still not overly bright. Ashlynn on the other hand has a really bright face and the metallics are pushed far too bright.
The second thing I noticed was the basing. Even though Taelor wasn't any sort of fancy project, the base helps tell a small piece of a story, whereas Ashlynn's base is, well, her standing on a rock. The difference in basing efforts over the course of time has definitely changed for the better.
The last thing I noticed is just the amount of push in the shading and highlighting. More about that in my other comparison picture though...

This second photo shows Alexia (painted Nov 2006) and Mysterious Effigy (painted Oct 2016). This comparison is extra fascinating to me because it really spotlights how I use color differently now. I remember finishing Alexia and being stoked about the color work on her. Looking back at it now though, It was still just a hack. The cloak has good color variation in it, but everything else is too flat. The Mysterious Effigy on the other hand used a triadic color scheme. My shading and highlighting techniques involve shifting tonal values towards cool and warm colors, and in general I push the contrast much farther than I would have ever considered back then. I also attempted to balance color usage around areas of the model in order to keep the overall appearance of the model more balanced.
My favorite projects/accomplishments/events/things:
* Painting a huge Cygnar army as a uniform project still feels like an amazing accomplishment.
* Building my own paint rack was sort of a separate project but often when I look at it I'm really pleased with myself.
* Learning to use an airbrush was a ton of fun, even though I'm still learning how to use it.
* Playing Unbound with Jason Soles as his last MK2 game of Warmachine was perhaps one of my favorite games ever played.
* Painting the Archangel was a huge project that I really threw myself into and used the airbrush a lot for, and learned a lot about painting very large projects.

Some interesting stats over the last 10 years:
* Total posts: 1119
* Total models painted: 712
* Most popular post by hits: Paint Toxicity

Friday, November 11, 2016

Bloodwretches


Bloodwretches done. My normal process of getting posts on this blog has finally been completely gronked, so this is my first post testing out a new method. Hopefully this works out ok.

Monday, October 31, 2016

Mysterious Effigy

Now this model was a delight to work on, but not without challenges. This post is going to be a bit of a rambler here, so don't be shy about just looking at the photos and then moving on if you aren't interested in the process.

So this plastic model has no logical place for it's tiny tiny appendages to attach to a base. Not without making it even more fragile. So I dealt with this by putting a pin in under the dress to attach to the base. Getting it centered properly on the base was a bit of a challenge and required a bunch of careful measuring but worked out well in the end. I would highly recommend this method to anyone else attempting this model. This also gave me an easy way to prime it and mount it while painting as well which was invaluable. The pin of course was painted black at the end. One mistake I made was to glue the pin into the base prior to sealing the model. This is a problem since I wanted the base to remain gloss-coated, but wanted to put a final matte seal on the model itself.

I had been intending to paint this model for a while, and to a higher standard than my current stuff. However a bonus opportunity came up to paint it for a facebook group Halloween challenge so it really helped jump-start my muse. I opted for a nice pumpkin-orange dress color and then worked from there. I focused on a triadic color scheme (orange/cyan/purple) to try for a bit of color harmony.
One challenge I faced was the masks. I originally wanted to tint each one of them slightly to reflect the mood that the masks themselves showed. I left this to the very end to decide though and I am sure glad I waited. I feel like adding the tinting could have easily thrown off the whole color balance and made the model just look too busy.


Sunday, October 30, 2016

From the Desk: Weekend Roundup #136

Turbo mode...

Not a lot of progress. The last week has been busy with home improvement work. Mysterious Effigy is done and just need to post pictures. Started the 2 Bloodwretches. Widow Weaver wants to be started but isn't yet. Not much else to report unfortunately.

Sunday, October 23, 2016

From the Desk: Weekend Roundup #135

I'm sleepy...

Spending a lot of time on this one model. Really enjoying it too. I'm getting close to done, but still a few hours more work left to do.
Also primed the Bloodwretches. Other stuff got done as well. I'm down to 3 remaining Legion models, none of which I'm at all interested in painting of course.

Saturday, October 22, 2016

Bolt Thrower (take 2)

Plastic Bolt Thrower from the Legion box. Definitely like the original metal sculpt better. Also doesn't help that I speed painted this one pretty aggressively.

Friday, October 21, 2016

Project Desk Rescue: Why?

As if having the Barcade project wasn't enough, I'm starting this effort to make better use of the space on my desk.

So my painting desk (which occasionally doubles as my work-from-home desk) is a pretty intense little spot in terms of what's packed into it. It's the result of years of evolution of painting and trying to make the space as useful as possible. Lately however I've started to feel like it needs a bit of a focused makeover. There's 4 key spots in particular.

First, my paint rack is overflowing. As visible in the bottom right of this picture, there's a box of extra paints that don't fit on my paint rack anymore. This happened due to acquiring more paints than the rack was originally built for. The rack I have now is one that I built myself, which I'm very proud of. The rack is stained a nice color, and doesn't look like I just glued a bunch of leftover wood together. It took me a decent amount of time to build too so I'm loath to replace it. I need to make a decision as to what to do here.
a factor in this decision is the sheer storage issue. The current rack has capacity for 150 dropper bottles, however I have over 200 dropper bottles now. It also has a top surface for putting things on top of which is always full of stuff that's either reference, or in progress, or just inspiration or utility, and I'm always shuffling stuff on that top surface. It also has a flat open space in front for holding various paint pots, of which is always full and tends to not get touched too much. I also end up putting my brush trays on top of the paints in that lower section when I need more desk space.

Second, my computer just takes up a bunch of space. And the size of my current paint rack is sort of an artifact of the amount of remaining desk space after the computer monitor. Now straight up I'm not replacing my iMac. It's a 2010 model and still performs everything I need, and does it flawlessly. What I really need is to have it on an arm mount so I can shift it around easier. There's a big problem though, which is that the mid-2010 21" iMac that I have has no option to remove the built-in stand.

Third, which isn't really a problem, is my lighting. I unfortunately saw this picture of Mathieu Fontaine's painting desk which includes (among many other badass things) a lighting halo. Now I don't know how practical this will be for my space, but I'm curious to see what it would take to build something similar from a dollar perspective. I really do love my lamp, but there's a potential that this light halo could be both better and cheaper.

And fourth? Well there's just a lot of stuff that ends up on my desk. Some of it could be better organized, such as spare brushes and tools. There's loads of other storage beside and under my desk, but the desk itself follows my 90% rule, which is to say that I try to only keep stuff on it that is getting used 90% of the time that I'm at the desk painting. Lots of things have accumulated on my desk again and I just need to clean it up and figure out how there can be a spot that's routinely dedicated to some amount of spillover junk.

Wednesday, October 19, 2016

Malifaux Campaign Week 2 (game 2)

Super fast notes.

It's always unfortunate for a neutral model when they flip a black joker against Nekima's attack. Ouch.

Played my second game for week 2. My Neverborn crew against Henry's Gremlins. He outnumbered me and honestly that allowed him to really dominate on the strategy as well as with schemes that required placing scheme markers. In hindsight I probably should have focused my scheme choices better. In the end I had 7 VPs and Henry had 10 VPs. We both accomplished our bounties which meant I completed mine.

I'm pretty beat and afraid I might be fighting off a flu, otherwise I'd do a longer write up. Most of these campaign game reports are likely to get shorter going forward though.

Games this year: 51

Scion of Black Blood

Probably could have done more on this guy. Not the most interesting pose though.

Saturday, October 15, 2016

Project Roadrunner's Barcade: Planning

Occasionally this blog will be the destination for other projects than my normal miniatures painting. This new project is one such situation. So for all my followers that don't care about this, sorry. You can merrily skip anything that starts with "Project Roadrunner's Barcade" or are tagged with "barcade".

So what is this? It's pretty simple. My son (who is in 1st grade) wasn't able to join the local coding class due to many factors. So I decided that a project at home was a good alternative. Coincidentally a friend and co-worker had sent me pictures of the bar-top arcade that he built. There's a ton of tutorials online for this so I'm not going to spend a ton of time explaining how we build ours. Instead I'm going to document the details that we need to keep track of and the fun that we're having building it together.

First some links:
This guide is a primary source for details.
This one also though which is linked from this Reddit post.

Today we went ahead and ordered a bunch of parts:
Raspberry Pi 2 with power supply and plastic case and heat sinks
Arcade joysticks and buttons with controller card
19" LCD flat panel monitor
Power cord inlet
Micro SD card

There's a bunch more stuff we'll need eventually, and I'll certainly need tools, but first I want to get the basics together. Our first task once the parts start to arrive will be to assemble the control console I think, which will require wood and tools as well as some electronic assembly. I'm also planning to get some plexiglass cut for key pieces of the cabinet, such as the controls console. There's a local place that I can get that done at a local plastics specialty place.

Updates will be sporadic as we make progress. Wish us luck!

Other less important links:
This place sells pre-cut panels which I may go to if I get sick of doing all the MDF cutting myself.
This is a smaller module version that plugs into the TV. Here's another version

Wednesday, October 12, 2016

Waldgeists

These were very satisfying models to paint. So quick and easy. I think I actually spent more time making the bases. I really like the look of these. It makes me somewhat eager to paint more swampfiend models now.

Malifaux Mini-Campaign: Weeks 2 and 3

So I forgot to post results from week 2 of the mini-campaign, so here's highlights from weeks 2 and 3:
* I completed my bounty and saved enough scrip to get Pandora for week 3.
* The final VP score overall was 21 (me) to 17 (Lance). The last game is what swung the whole thing.
* The Widow Weaver with a Jetpack is so much awesomeness.
* There were a lot injuries, which is not nearly as bad as I thought it was going to be.
* Have a game with a master in one crew but no master in the other can make for a pretty serious power slide, but not necessarily insurmountable.
* This game continues to be super fun.

We've decided to conclude this mini-campaign now that our 3rd member of our 3-man-meta has returned from vacation. However this side diversion has been really educational in terms of getting more solid on the core rules, our own models, the campaign dynamics.

Games this year: 50

Tuesday, October 11, 2016

Stitched Together

Most of my gallery posts have been brief, but this pair deserves a little extra attention. These models were amusing to paint mostly because they practically tell a story all by themselves. I spent a lot of time doing little patches of crosshatching in order to imply the canvas fabric to the look of the surface. I then buried that under many layers of thin washes. I was specifically aiming to create a bit more texture to the canvas so that it contrasted well with the metals and especially with the spilling intestines.
Then there was the basing. These represent my first "puppet" models based. I'm hoping that it's self-evident what I did, but here's the explanation. The base is a carved control which then has strings running to the models' arms. The string is actually thin fishing line which I then coated with SWW Amethyst as added some pink highlights to.

Monday, October 10, 2016

From the Desk: Weekend Roundup #134

Technically I'm still on weekend, just long, but here goes...

Lots of progress in the last 2 weeks. My 2 Stitched Togethers and 2 Waldgeists are painted and just need to be put on bases. Speaking of which, I worked out basing schemes for "Puppet" and "Swampfiend" types in Malifaux and not only prototyped them, but also created extra bases for most of my current backlog of remaining Neverborn. In addition to that, I got the Black Blood Scion and Mysterious Effigy primed. And to top it off, I've started painting my Nephilim Bolt Thrower from the Legion battle box.

On a more personal note, I feel like my muse is really strong lately. It's especially comforting given all the stresses in my life right now. Painting has been an important outlet for me to work out frustrations and just get out of my own head.

Sunday, October 02, 2016

Hellmouth

Both Hellmouths! Done! I painted the chitin so that it had a different tint on each unit to keep them straight.

Wednesday, September 28, 2016

Resource: Kuku Kube

If you haven't tried this and wondering how sensitive your eyes are to color, this site is a great way to test it.

Tuesday, September 27, 2016

Malifaux Mini-Campaign: Week 1

Because sometime you gotta just play an alternate mini-campaign when of your buddies goes on vacation! Super brief notes. Not interesting to anyone!

My starting Arsenal: Widow Weaver, Doppleganger, Black Blood Shaman, 3 Terror Tots. Bounty: Escort Mission.
Lance's starting Arsenal: Datsue Ba, uh some other stuff, and, uh, some bounty.

Weekly event: Forbidden Text
Strategy: Turf War
Deployment: Standard
Available Schemes: A Line In The Sand, Breakthrough, Assassinate, Vendetta, Plant Evidence
Schemes chosen (both of us): Breakthrough, Plant Evidence.
My outcome: Loss, 7 VPs, +4 scrip for 2 Texts. 7 total scrip. Injury to 1 Terror Tot (need to re-flip). Completed bounty challenge 1 time.
Lance's outcome: Win, 8 VPs, +4 scrip for 2 Texts. 8 total scrip. Injury to something.
My aftermath: Hand - 3 Masks. Barter - 13 Tomes.
Lance's aftermath: Hand - 12 Crows/13 Crows. Barter - 9 Masks. Injury - 9 Tomes.

My aftermath and purchases:
Purchase: Jet Pack (5 scrip)
Remaining scrip: 2

Games this year: 48

Sunday, September 25, 2016

From the Desk: Weekend Roundup #133

Can't believe how much I've done in the last 2 weeks!

No picture tonight. I finished a pile of stuff, which I won't recap here obviously. Ironically I don't have a lot of stuff in progress. The Widow Weaver and 2 Stitched Togethers are primed and ready for paint, but I haven't started them. I've assembled 2 Waldgeists, Black Blood Scion, and Mysterious Effigy. In general, I'm in a bit of a holding pattern.

Terrain: Sign Post

What it is: A Neverborn sign post, warning intruders.

How I made it: Balsa wood, plastic skulls from some ancient skeleton kit, and a random base from my Secret Weapon Bag-o-Crap. I made sure to put a magnet in the resin base so that I can bring it in my small model transport case and add it to whatever game I happen to be playing at. I also drilled a number of holes in the wood in order to accentuate that it's been at the center of battles. There's even an exposed pin painted to look like a nail.

What I learned: It's amazing how a small piece of terrain like this can get done so quickly. This took me maybe 3 hours total effort and that was just because I was enjoying the project rather than trying to rush through it.

Rules for Malifaux: Severe and Soft Cover.

Malifaux Campaign Week 2 (game 1)

Again, not really sure how to do a proper battle report yet, but here's notes from the first game of week 2.

Additional week 1 cleanup: Gaki Injury flip: 8 Tomes

Weekly event: Swamp Creatures (7 masks)

Game 1:
Strategy: Turf War
Deployment: Flank
Available Schemes: A Line In The Sand, Breakthrough, Protect Territory, Vendetta, Make Them Suffer
Lance Crew: Anna Lovelace, Hannah (Unnerving Aura upgrade), Datsue Ba, Jaakuna Ubume. Schemes: Vendetta, Make Them Suffer.
My Crew: Nekima (Quick Reflexes skill), Lilitu, Lelu (Clockwork Seeker equipment), Iggy. Schemes: Make Them Suffer, Breakthrough.
My outcome: Win, 10 VPs, +2 scrip for 1 Silurid. 8 total scrip. No injuries. Completed bounty challenge 1 time.
Lance's outcome: Loss, 4 VPs, +4 scrip for 2 Silurids, +2 scrip for crew rating difference. 8 total scrip. No injuries.
My aftermath: Hand - 9 Crows/8 Tomes. Barter - 2 Rams.
Lance's aftermath: Hand - 9 Tomes. Barter - Red Joker (+6 Rams).

My aftermath and purchases:
Total scrip prior: 11
Purchase: Metal Plate (3 scrip)
Remaining scrip: 8

Games this year: 47

Saturday, September 24, 2016

Terrain: Gallows

What it is: A gallows, for hanging criminals.

How I made it: Loads of coffee stirrers, balsa wood, hot glue, and some twine. Also I painted it using P3 Umbral Umber, P3 Beast Hide (drybrushed), and then P3 Hammerfall Khaki (drybrushed).

What I learned: Originally I tried staining the wood, but there was 2 major problems. First, the stain doesn't really work on coffee stirrers and balsa wood. Second, the stain caused some of the hot glue to detach, which meant a lot of fixing. Also, wood stain smells horrible and takes a long time to properly dry.

Rules for Malifaux: Ht 1 models can walk under unimpeded. Ht 2 models can walk under as severe terrain. Walking up the steps requires no additional cost for climbing, but anywhere else must pay 4" to go up before moving onto the platform. The platform is a vantage point. targeting between above and below the platform is not blocked.

Terrain: Water Tower

What it is: A water tower! Shocker!

How I made it: Lots of balsa wood, wooden dowels, coffee stirrers, popsicle sticks, hot glue, and a single empty food can. I also used some simple craft foam to make the bands around the giant barrel.

What I learned: This actually was inspired mostly by a tutorial or youtube video I'd seen a while. I will say though that I learned using hot glue is much easier for this type of construction that normal glue. Shockingly easier.

Rules for Malifaux: Soft Cover while in the ground area contained by the posts. Beginning a Wk action at the base of the ladder allows for getting to the top in a single 1AP.

Terrain: Angel Statue

What it is: A weeping angel status to watch over those about to die.

How I made it: Very simple. I bought a "Doctor Who Angel" statue, hot-glued it to a small empty can, and then painted it. I used some of the ModelMates weathering paints to quickly speed the process as well, which they worked great on.

What I learned: Honestly, this was a super simple project. Mostly I just learned that there are Doctor Who Weeping Angle christmas ornaments.

Rules for Malifaux: Blocking, Impassable, Hard Cover

Friday, September 23, 2016

Alps

Nothing fancy. Just wanted to make them stand out.

Thursday, September 22, 2016

Terrain: Serene Fountain

Here's the first of a recent surge of terrain building for Malifaux. I've been horrible about taking in-progress pictures, so these are less like tutorials and more like post mortems.

What it is: It's a peaceful looking fountain. It's not meant to be spooky or daemonic or evil or anything like that. Just a nice peaceful centerpiece to a town.

How I made it: I started with a form for the well from a mission kit I got at Michaels. Sorry, no link for it as I can't find it listed anywhere. It came in 2 halves and had the basic stonework pattern to it. I then put it together and attached it to a piece of chipboard, using some clay to attach it down. I then built up some styrofoam blocks and plastic tube to create the fountain part, and added some mixed grain sand around the outside edge. Next I primed and painted it up, putting a little extra effort into the bronze tubes to give them a weathered look. After that I added moss and grass and such, putting a little extra highlighting on all that stuff. The falling water was the tricky part. I used some fishing line and glued it at both ends (inside the tubes and to the bottom of the well), and then applied a liberal amount of gel super glue to the lines and let that dry. Next I poured Envirotex into the well part and let that dry for 24 hours. After that I applied a thin layer of uneven super heavy gloss gel and let that dry overnight to give the water surface a much more uneven look.

What I learned: Here's a really great video tutorial by Terrain Wench of doing pool water effects that I highly recommend. I learned a lot from this. Some key things that I would do differently in the future are as follows: First, I would do a much better job of sealing up the bottom edge of the pool, since a fair amount of Envirotex leaked out and made a mess. I was somewhat prepared for this, but in hindsight I should have just gone the extra mile to make sure. Second, I would change the angle of the water pouring out from the fountain pipes. It just doesn't look quite right unfortunately. Third, I would use Terrain Wench's tip and pour the Envirotex in multiple layers, do a very minor amount of swirling of wash medium to make it look more uneven. Other than that though, I am really quite happy with my first attempt and animated water effects. I'm already dreaming up ideas for more such projects.

Rules for Malifaux: Ht 1.5", Blocking, Impassable, Hard Cover

Wednesday, September 21, 2016

Terrain: Malifaux Style

In an effort to get our Malifaux games to the next level of awesomeness, I'm embarking on a terrain quest. Terrain is far more important in Malifaux than in any other miniatures game I've ever played. Coming from Warmachine predominantly, but also Dropzone Commander, Warhammer, 40K, and so on, terrain was essentially window-dressing and an afterthought. For Malifaux though, it dramatically swings the balance of the game. After playing the first couple games of our campaign, it became painfully obvious to me that I needed to do some research as well as some terrain building. The first step was to tap into my primary resource for Wyrd stuff: A Wyrd Place, the completely awesome Facebook group of Wyrd players. This is hands down my favorite miniatures game Facebook group due to the positive attitude and helpful nature of everyone on it. In addition to getting several good insights, I got links for some excellent resources. First I'll share the resources, then the remainder of the post will be a summary of all the stuff I took away from all the helpful comments and resources that I read.

Fantastic pinned post on the forums - Has great visuals. Fantastic first place to start.
Terrain is a Big Deal in Malifaux - Great article on Pull My Finger. Incorporates stuff from the forum post along with other great material.
Chronicles of Breach Fighters - Fantastic Facebook page of battle reports, showing lots of table configurations. Perhaps even more fantastic just for the ideas of terrain pieces to build.

What I learned from all this...
* Always discuss the terrain up front before starting the battle to ensure no confusion later on.
* Terrain should cover 30-50% of the table. Test this by collecting it all into one solid section at the start.
* 3 important types: Cover (to curb shooting), LOS blocking (to curb casters), slow/block movement (to curb melee). Balancing these is important.
* Don't use hills, except near the edges of the board. They don't fall into any of the 3 important types and end up introducing elevation. Elevation itself is tricky, and will need house rulings to be workable.
* There should be little to no direct LOS from 1 deployment zone to another. Maybe 1-2 narrow lanes.
* Terrain in the center of the board is good, whereas along the edges is not as useful.


Now it's time to build some terrain! I'm finishing up a bunch of pieces (which I'll post during the coming days), but doing this research was helpful. Next I'm going to take a close look at which of the 3 categories each of my existing terrain supplies fall into, and see how much board coverage capability I have. In the mean time, here's some ideas I have for more terrain projects:
* Sign posts
* Low hedges
* Gravestones / open graves
* Archway opening to a graveyard area
* Large spooky tree

Tuesday, September 20, 2016

Black Blood Shaman

Strange model. Not entirely happy with it, but it's done. A little too bright with the reds perhaps. Anyway, it's a freaky sort of thing and I'm looking forward to fielding it.

Malifaux Campaign: Week 1

We started a Malifaux campaign! I'm documenting the progress of it on my blog. The week recap posts will mostly just be notes rather than narritive. I'm also just trying to get a handle on how to track and report this stuff since it's our first games of Malifaux in years, and it's our very first time using the campaign format.

Starting crews:
Lance: Anna (leader), Hannah, Datsu Ba, Gaki. Decaying Aura upgrade.
Me: Nekima, Lilitu, Lelu, Young Nephilim. The True Mother upgrade.
Henry: McTavish, Lenny, Rooster Rider, 3 Bayou Gremlins. I'll Love It And Pet It upgrade.

Week 1:
Event: Fate Favors The Bold

Game 1: Reckoning (standard deployment)
Henry, Assassinate + Murder Protege, win, 7vp, 6 bonus scrip, total earned scrip=11. Card hand: 11 Crows, 2 Rams. Barter card: 3 Tomes. Injury on Lenny to resolve.
Scott, Make Them Suffer + Murder Protege, loss, 5vp, 6 bonus scrip, total earned scrip=9. Card hard: 2 Tomes. Barter card: 6 Crows. No injuries.

Game 2: Squatter's Rights (standard deployment)
Henry, Breakthrough + Make Them Suffer, win, 10vp, 2(?) bonus scrip, total earned scrip=12 (but capped by weekly max to 5). Card hand: 13 Rams, 9 Masks. Barter card: 2 Masks. Injury on one Gremlin to resolve.
Lance, Make Them Suffer + Frame For Murder, loss, 6vp, 6 bonus scrip, total earned scrip=9. Card hand: 3 Masks. Barter card: 12 Masks. No injuries to resolve.

Game 3: Reckoning (standard deployment)
Scott, win, 8vps, 4 bonus scrip, total earned scrip=9 (but capped by weekly max to 7). Schemes: Cursed Object and Breakthrough. Card hand: 2 Rams, 7 Tomes. Barter card: 9 Masks. No injuries to resolve.
Lance, loss, 6vps, 4 bonus scrip, total earned scrip=7 (exactly hitting weekly max). Schemes: Assassinate and Cursed Object. Card hand: 5 Tomes. Barter card: 3 Masks.


My aftermath and purchases:
From game 1 barter - Clockwork Seeker (for 5 scrip)
From game 2 barter - Quick Reflexes (for 4 scrip) for Nekima
Bounty - Map It Out (for 4 scrip)
New Hires - Iggy (for 0 scrip)
Remaining scrip = 3

Tuesday, September 13, 2016

Lilitu

This was a delightful model to paint. Since I've picked up Malifaux with sincerity in recently, this is the first model where I really felt like I had poured myself into. In contrast to Lelu, I toyed around with the skin tones toward a more blueish tone for the highlights. I also tried to push the overall contrast a bit further, and especially used her hair as a way to pull attention towards her face by having the lightest portions right around her face. Just overall I really enjoyed painting this model so much.

Monday, September 12, 2016

Lelu

Lelu here is half of a pair that I painted at the same time (the other model being Lilitu). Thematically these models are meant to be paired, and so to accent that, I decided to use some color accenting of their flesh tones. Lelu's tones start with the basic blue/purple tones, but then I highlighted upwards towards a more red tone to represent his anger. Inversely, Lilitu got a bluer highlight tone to represent her colder calculating nature.

Sunday, September 11, 2016

From the Desk: Weekend Roundup #132

.

Finished Lelu and Lilitu. Got my Alps and Stitched Togethers primed. Got started painting on the Black Blood Shaman (pictured here). Went through my terrain building supplies and got organized in the hope that I will start building terrain in the next couple weeks. Got my wet palette refreshed with a new sheet. Now for sleep.

Thursday, September 08, 2016

Interview with Mike McVey

Go read this interview with Mike McVey. Right now. It's fantastic.

Nekima

I'm not really sure what to say about this model. It was a bit intense for a Malifaux model due to its sheer size. It was also a little awkward to paint because of the wings. Even getting it assembled was tricky because of the position of the arms and sword. However I will say that I like the pose of this older metal version of Nekima better than the new plastic one, simply because she's huge and regal. I'm eager to see her swat gremlins tonight!

Tuesday, September 06, 2016

From the Desk: Weekend Roundup #131

Oops. Missed a couple weeks.

Sort of a mediocre week for hobby progress. Painted Jakes, although I'm not sure how soon I'll be playing her. Also finished the 3 Daydream and Nekima. Nekima was a bit of a challenge and I got stalled a couple times getting her done, but I pulled it off. Pics of her to come tomorrow when I have more time to post. I also got 3 Alps and 2 Stitched Togethers assembled, along with just some general organizing of remaining unpainted models. Speaking of...

In the process of sorting through my remaining unpainted Malifaux, I did something extremely rare for me. I found my old metal Mysterious Effigy model. I was trying to interpret it and finally just decided it was unreadable visually. So I opted to toss it into my parts bin and get the new plastic version of it. The plastic one is very nice in comparison. It still pains me a bit to do this. However having looked through my existing metal models and at the new plastic sculpts, if there was a single model to do it with, this was the one. As my friend aptly put it, "the old sculpt looks like Picasso throw up".

Another task I wrapped up was swapping the bases on my Neverborn models that have the type "Spirit". All of them happened to have Incorporeal which is a very relevant thing to remember, and I decided that the best way to represent that with a visual reminder was to use the translucent purple bases that Wyrd sells. The only problem was used straight as is the bases were too bright. So I opted to hit them with a matte coat, then a purple ink wash to darken them a bit. I like the result. The Dreamer one was the tricky one since I needed to re-paint the glowing fire effect on the bottom.

Here's a shot of the newly updated bases in among the other traditional ones.

And finally I have this little experiment. I did a primer undercoating of black and then white, and then did 3 washes of various sepia colorings and control levels. This was just to test out how easy it may (or may not) be to do a western style look (a la sepia colored old photographs) on a model. The results are, well, less than exciting, but as a proof of concept they did show that it's feasible. I'd obviously need a more interesting model for the overall look and way more work, but the effect is interesting. I might fool around with this a bit more later when I pick out a more appropriate model to test on.