Monday, September 29, 2008

Orin Midwinter

Another model off the desk: Orin Midwinter. Nothing especially fancy here. Overall I'm not super pleased by it, but I used a couple techniques that I've been trying to practice, so the quality sometimes dips. I aimed to have some red in the majority of the model to tie it together better. The black robes are shaded using red for that reason, along with including some red in many aspects of the model.
In addition, I tried to work the metals a bit more than normal. I painted a faux horizon line being reflected on the end of his staff, and generally tried to do a lot more specific shading on the metals. This same stronger shading scheme was used on the skin as well, making more dramatic definition to his face and hands. I also took this opportunity to try painting the pupil of his eye so that the color in it was visible.
Overall, not a terrible model, but lately I've been on a kick to practice painting black and just not feeling like I'm succeeding at it too much. I'm working on Capt Kraye now for another friend and painted the horse black, which also just didn't turn out to my liking. Hopefully this is just a pessimistic slump. If nothing else, at least I'm getting a lot more practice with painting black, which is forcing me to practice shading more smoothly.

Wednesday, September 24, 2008

Stannis

This was my first model that included a mounted rider. I really enjoyed it, although overall the sculpt had some odd things that I had to work around. Still, of all the Privateer mounted sculpts, this is one of my favorites so far. It also made a good warm up for painting Kraye for Jeff. This also rounds out my showdown challenge for myself for mercs. I haven't really worked out my upscale to 750pts yet either, so getting done for Sept early is an extra bonus. Anyway, no time for extended chatter... here's the pics!

Sunday, September 21, 2008

Productive Weekends Rocks

This was a remarkably productive weekend for me. I got 21 more lava bases made (plus writing up the tutorial for them). Then I got a large amount of progress done on Stannis, and got all my Bane Thralls assembled. I'm not specifically planning on working on the Bane Thralls soon, but it was nice to get them assembled in case I get the itch to work on them. Painting them would indeed bring my Cryx force up over 500pts, but I've been so much more interested in mercs lately that they are taking a back seat. Anyway, it's time for sleep. Stannis can wait until tomorrow.

Saturday, September 20, 2008

How To: Lava Bases

Well, it's about time I got around to this. Today I decided to tackle finishing up a big batch of lava bases for my impending Cryx infantry. So, while working on this project, I snapped some pics (some of which aren't so great unfortunately), and present this how-to on making lava bases.

What you'll need:
* An old WM blister pack
* Hobby knife
* Drywall joint compound (available at hardware and home improvement stores)
* Green stuff
* Bases
* Paints (detailed below)
* Pliers

Getting Started:
The first big hurdle is to create some pieces of joint compound that you can break up into lava rocks. First, take your old plastic blister pack and cut the back part off. You want to use the back part as a tray for a mold. Next, fill in the "mold" with drywall joint compound. It's not important to fill it in perfectly, just to get it pretty well filled in and decently smoothed out on top. Let this sit out in the sun for a day or two until sufficiently hard. It's very important that it completely dries out, otherwise when you start breaking it into smaller pieces it will simply crumble into unusable parts. Once it dries, you can pop it out of the mold and you should have a nice rectangular piece.

Assembly:
Next, start breaking it into smaller pieces. I keep a base handy for sizing the pieces as I break them. The goal is to have a piece that covers the inset top of the base without sticking out too much. I use needlenose pliers to help break the pieces more accurately. It's good to keep it somewhat irregular to make it look more natural. Once you have your broken piece for a base, mix up some green stuff and use it to attach the piece of compound to the base. Make sure to squeeze it down well, but not so hard as to break your piece of compound. Let this dry appropriately.

There's definitely an economy of scale here. Today I was making 21 new bases to save myself time. Since there's a lot of time spent waiting for things to dry, mixing green stuff, and painting layers, it becomes easy to make a bunch at the same time once you have the hang of it. I've got 2 full squads of Cryx models that will eventually need bases, so this seemed like an appropriate amount to make.

Painting:
Ok, time to start painting. Here's the spread of colors I use. I've arranged them in the order that I use them. I'm using the P3 line from Privateer, but any line of paints will do. The key is to have a decent spread of colors. The compound takes paint well on its own, so there's no need to prime it beforehand. I just paint right over it, and the white base color helps a lot in this project. I start with the yellow and move towards the darker range as I go. Basically, the first pass is just laying down a good swath of yellow along the side of the compound. Then the next few colors are a combination of drybrushing and rough shading.

Now, when you get about halfway through, you're probably going to feel like I do and say to yourself "Where the heck is this going? It isn't looking very promising." Especially if you do like I do here and only paint the sides, leaving the tops white. It doesn't look very impressive and it's easy to get disenchanted with the process. Just stick with it. Your patience will be rewarded.

The transition from orange to red can appear pretty abrupt, as you can see in this comparison shot. I use extra care once I reach the first red step to make sure I am accurate with where the paint lands. It's important to keep the band of glowing lava pretty thin, otherwise it will look like whoever is standing on the rock is about to get themselves burnt to a crisp.

If the pieces of compound you selected had bubbles or cracks in the top, such as these, you can fill them in with some of the orange and red shades to give the look of lava in the pits of the rock. This is why I mentioned not to fill in the mold too perfectly. These sorts of irregularities can really add to the realism.

Just keep working up until you get to your rock shade. In my case, I've used Cryx Bane Base. I like it due to the slightly greenish shade which helps offset the orangish colors of the lava. At this point I like to make sure that the rock color is spanning at least one third of the side of the rock, then I paint the top as well. Once this base coat of the rock color is done, I give it a wash of black, then drybrush again with the base color. And there you have it!

It's important to note that these bases, although relatively sturdy, are not indestructable. When you drill a hole for a pin, make sure to let the drill bit do the work. Too much pressure and you could cause the compound to crack, ruining all your work.

Monday, September 15, 2008

Battle: Mercs vs Cygnar

Another battle against Lance, this time Mercs vs Cygnar. I played my previous Fiona list (Fiona, Nyss, Sea Dogs, Gudrun, Rupert, Aiyana&Holt), but with the addition of Stannis and a Mariner. Lance had Nemo, Thunderhead, Journeyman, Strangeways, Gorman, Alexia, a Bokur, and a Lancer. The Thunderhead's pulse and Nemo's chain lightning really had me worried that it would be a one-sided game.
This was an amusing game. If it weren't for a lucky set of dice rolls in my favor, Nemo would have set a pair of chain lightnings through most of my Nyss. Fortunately the bounces on both were only 1 additional model and the Nyss made all their tough checks (thanks to Rupert). As a result, I spent a lot of time shooting the heck out of the Cygnarans. I'd have to say that the Nyss were probably the stars of the show, but overall the entire army felt useful. Stannis flanked around the side, the Nyss held a wide swath of the center supported by Rupert, Gudrun functioned as Fiona's faux-arcnode, and the Mariner took a number of shots. Aiyana's harm was very helpful for laying out damage on the Thunderhead as well.
In a rematch, I'd expect to get crushed, but this time I came out victorious. It was a little challenging to actually get at Nemo, but once I did, he tends to go down fast since he's a weak old man like Severius. I have to admit, it was amusing to play a game with a lot more ranged capability. I think I still like the melee-based armies, but this was quite entertaining.

Saturday, September 13, 2008

Painting with the Inner Circle

Today I hung out with the gang from the Inner Circle painting group, which is a group of people that paint miniatures and take it seriously. This was a pretty interesting experience. Multiple folks there seriously outclassed me. One guy, Derek Schubert (sp?), had recently won gold for the diorama category from the Privateer GenCon painting competition. He brought the piece with him and it was amazing to look at in person. Foolishly though, I didn't take any pictures. Laszlo was there too and I picked up one of his painting DVD's. Overall it was a good time, and getting to hang out with really badass painters was highly educational. Here's a few of the key points I walked away with:
* I need to take a Color Theory class
* It's worth my time to try out a wet palette again
* The "french" school of thought on shading involves using the complementary color to shade a color, so for example, use purple to shade yellow
* Lots of thoughts on color, which is probably the next thing I need to work on next as a skill

Second 1k Battle

And the Victory goes to: The Trollbloods! This time I shocked myself. I actually won this game against Jeff. There were a couple of key dice rolls that made a huge difference. Overall though, it was a pitched battle and a total blast to play. Again, it must be said, Jeff is a class act opponent.

The lists:
Me: Madrak, Grim, 2x Maulers, 2x Impalers, Axer, Blitzer, Champs, Krielstone Bearers (6), Totem Hunter, Gudrun, Swamp Gobbers.
Jeff: Darius, Kraye, 2x Centurions, Ol Rowdy, Thunderhead, Charger, Sentinel, 2x Journeymen, Gun Mage Capt Adept, Mechanics (6), Strangeways, 2x Squires.

The dice:
Overall, my dice felt pretty even. There was a fair amount of betrayal on damage rolls in the middle, but a couple key rolls that they made up for (which I will cover below). Jeff's dice seem to roll fairly well too. All things considered, our dice didn't create a one-sided battle which was nice.

The rounds:
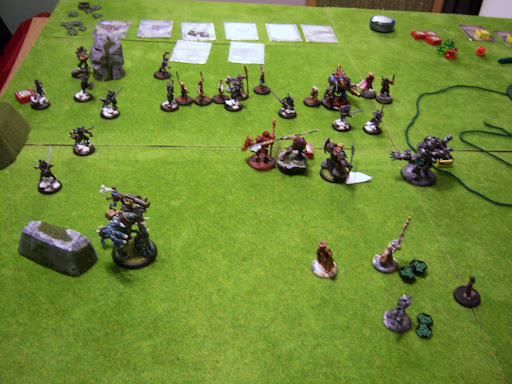
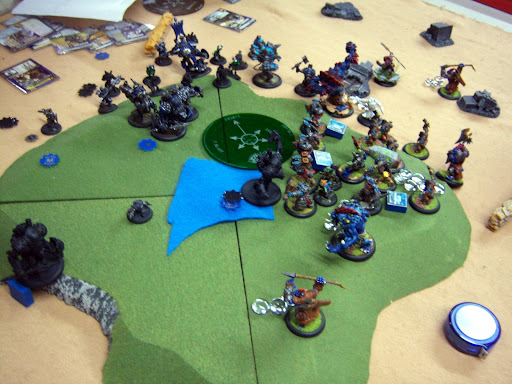
Round 1 consisted of the typical surge. Jeff used his BS crazy casters to get some serious mobility up the field. I did as much surge as I could without putting myself in charge range of his entire army. My big fear was to have a whole line of heavy jacks crash on top of me before I even got to make a single attack. Madrak's Sure Foot spell on the Champs formed my tough center, and the Totem Hunter and Gudrun made to flank on either side, with Grim holding a careful spot on the right side next to an Impaler.
Round 2 got messy. Ol Rowdy marched in and opened up with a critical on the left end of my line. He knocked down the Blitzer and took him out all by himself, but Sure Foot saved the Champs. A Centurion took out the Totem Hunter with little trouble, but my right side held well. On his turn, I marched the left Mauler up to Ol Rowdy and unceremoniously tossed him into the pool of water in the middle of the table, extinguishing him. Gudrun continued to flank and everyone moved up some more, aided by Sure Foot and a fully loaded Krielstone. On the right side however, in order to start taking better control of when and where the battle took place, I charged the Charger with the right side Mauler and snuffed it. Then Grim charged the Mauler to gain some additional distance and I used his feat to pin most of his army back. I missed Darius with the feat, but caught the Thunderhead, Kraye and the other Centurion.
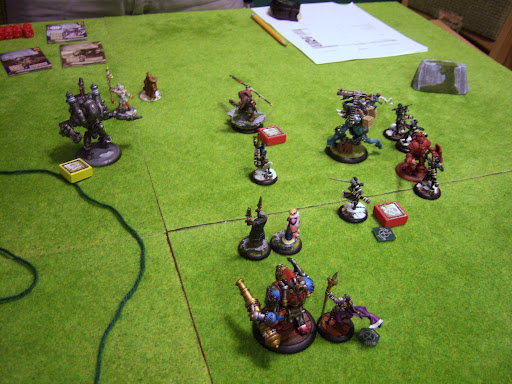
Round 3 began with Jeff furiously scribbling on a piece of paper for over 5 minutes while he worked out his strategy for the turn. I'd like to point out that at this point, I had scored a moral victory for myself. I was honestly expecting to get rolled but my strategy seemed to have paid off. Jeff used some incredibly clever and judicious activations on his side. His flanking Centurion charged in and killed the left side Mauler. A newly created Halfjack walked in and restarted Ol Rowdy. Darius used his feat to completely restore Ol Rowdy and the Charger that I had completely destroyed (stupid Darius!). The Thunderhead did a devastating Pulse which caught most of my Krielstone Bearers as well as laying out some damage on Grim and a fair amount on Madrak due to the sustained attack. There was some shifting in the backfield, but overall nothing too major. Kraye had used his feat as well, but due to Grim's feat, its effect was noticeably minimized. Then my turn began... I managed to get a crit slam using the left impaler and slam the Centurion into Ol Rowdy, knocking them both down in the water (Yay!). The right side Mauler advanced up and 2-handed threw the Thunderhead into Kraye, softening up Kraye and leaving the Thunderhead knocked down (and not blocking LOS). Grim used Far Strike to get a tether shot on the other Centurion and lock it in place well back from my front line. At this point, I moved the champs around and Madrak moved up. Using the Mauler's animus on himself, he launched an axe throw at the Thunderhead, hitting but doing very little damage. However the ricochet from the axe went into Kraye and here I rolled an amazing 16 on 3 dice! 34 damage in a single hit was enough to put the already damaged Kraye into an early grave.
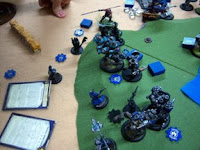
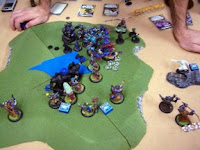
I have this photo to commemorate the event I titled "Where did Kraye go?". Jeff was... let's call it flustered. This very lucky dice roll came on the heels of a series of pathetic charge damage rolls for the Champs trying to clobber the knocked down heavies in the water.
Rounds 4 and 5 are kind of a blur. There was more advancing, and more damage laid on Madrak, but mostly what happened was more jack restarting (including Darius gaining control of the Thunderhead) and a huge wall of heavies forming up to protect him under Fortify which prevented further 2-handed throws or knockdowns. On round 4 I got a few hits on Darius and brought him near death (partially due to another ricochet hit from Madrak and partially from Grim's rifle). Another lovely source of damage was a hit from Madrak's Stone Fall spell and due to Darius being knocked down I hit him with a roll of a hard 6 (that's a critical hit for you folks playing along at home) which has the added critical hit effect of causing the already knocked down Darius to forfeit his next activation and be unable to allocate focus to his jacks. This very lucky dice roll saved my bacon and round 5 ended with me getting another raged axe ricochet into Darius. With his camped focus and Arcane Shield, Darius was at an impressive 26 ARM, but with Rage, Madrak was at P+S 18. I rolled exactly average on my boosted damage (getting a 10), and doing exactly the 2 points necessary to finish Darius off.

Overall:
Again, this was an immensely fun battle. Jeff was a stand up guy and there were several places where we both took the casual route and let each other fix minor mistakes (like forgetting to allocate focus or rile for fury and such). I can not express how much I appreciate this small amount of leniency in an opponent since it makes the game more fun to know that silly little mistakes didn't give you a huge opening. I had a great time playing trolls again and really felt like I did a good job of using my army's strengths as well as using the terrain to my advantage. Grim and the Sure Footed Champs were key to making sure the battle took place mostly when and where I wanted it to. I can't wait for another battle when I can bring Menoth's best against Jeff and see how much he's refined how to use Kraye.
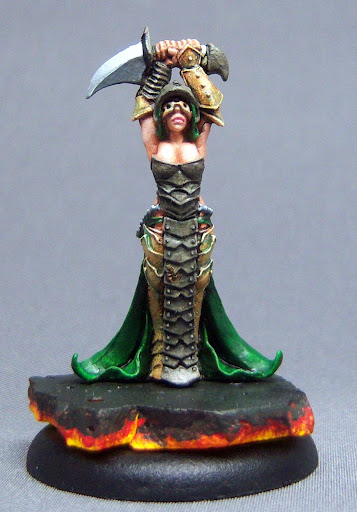
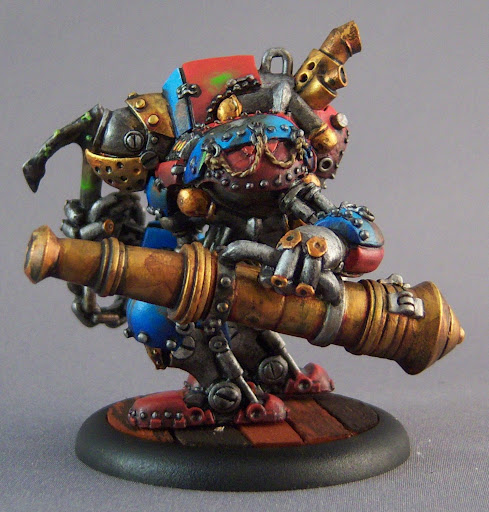
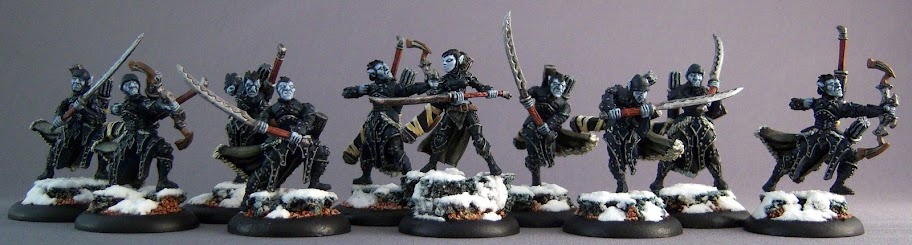
Friday, September 12, 2008

More Magnets

Tonight will be the first use of the magnets/tooltray transport technique. I'm playing a 1000pt game against Jeff at the LGS, and decided to play trolls. I'd gotten them all set up with magnets on the bases except for the ones with swamp bases. Those required creating holes underneath for the magnets to sit in, flush with the bottom of the base. I tried carving out a hole with a knife, but in the end, I broke down and used the Dremmel. I was terrified to do this, but I have to admit, it worked perfectly and I never felt like things got out of control. Maybe there's something to all this talk on the forums about using Dremmels for pinning.

Wednesday, September 10, 2008

Mariner

Mariner: done! I'm well ahead of schedule to make my showdown challenge for this month. Although now I probably jinxed myself. Anywho, here's the big guy, all ready to go. I painted him in a similar scheme to the Freebooter, but replaced the green with red to give some variety. Overall I'm very happy, especially with how the blending worked out on the large surfaces. Of course, it wasn't until I was done sealing it that I realized I hadn't fully finished the chest on the back. I spent a bunch of time experimenting with algae simulation and the battle damage. Some of it worked out well, and some not so great.

Tuesday, September 09, 2008

What to say...

This is one of those evenings where I realize I've made a bunch of progress, but don't have pictures at the moment. So, before sleep overcomes me, I figured I'd check in. The Mariner is done except for sealing it. I may do some additional touch ups, but for now I'm feeling pretty good about it. Kraye and Stannis are both assembled, except for attaching them to the base. It took most of this evening, but the effort was well worth it. They seem like they will be very fun models to paint. Nothing much interesting to report on without pics though, so I'm going to sign off and get some sleep.

Sunday, September 07, 2008

Last Revenant

And finally I round out the Revenant Crew that I have been working on for so long. This one is a converted Press Ganger Pirate. I loved the model, but wanted to make him a Revenant instead and this worked out pretty well. Probably one of the more extensive conversions I've ever done, which is kinda sad for my conversion abilities. Anyway, no more Revenants until Rengrave managed to press a warcaster into service on the field of battle.

Thursday, September 04, 2008

Stalled Out

Quick note before sleep. Painting and assembly has come to a halt while I've been reading the Legends fiction. Plus I've got another book that I need to read before Monday as well, but that's another story.

I managed to get magnets attached to most of my trolls, but I ran into an interesting problem. The models that I did water bases for don't have the inset space for a magnet cause it was all carved out. I'm going to have to experiment with some other options, but I think this is solvable using lower profile large disc magnets and carve out a space of balsa wood from the bottom. However I'm leaving that for the weekend when I don't feel so rushed. Overall though, the magnets are working great. I have a removable tray from a metal toolbox that is working excellent.

Tuesday, September 02, 2008

Another Revenant

Here's Revenant #10. This one is half Risen (bottom half) and half Revenant. It makes his torso seem a little extra long the way I assembled him, but I don't think it's terribly obvious. This is another fast tabletop quality paintjob. One last Revenant left on my desk at this point.

Monday, September 01, 2008

Cylena Raefyll and Nyss Hunters

Well, I cheated on my challenge. I did the final pinning this morning because the snow was still drying last night when I got too tired to keep going. So this morning consisted of an hour or so of pinning, sealing, and attaching magnets. I think the snow turned out pretty good. The bases in general follow the Brushthralls Tutorial on making cork and snow bases. However for the snow, after trying a few things, I finally settled on making a runny paste of white glue, water and baking soda, which I then slathered randomly on the bases and then sprinkle more baking soda on top. I was terrified that sealing them would ruin the effect, and that the baking soda would just come off, but so far, both fears appear unjustified.