Wednesday, March 16, 2011

RtC: Underpainting Trial

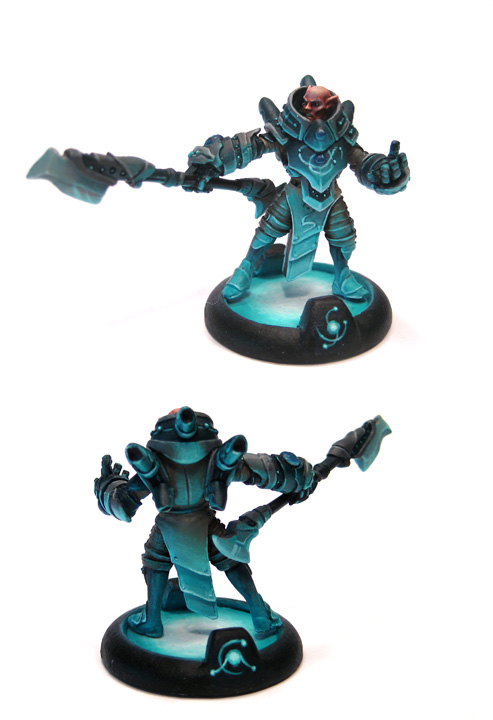
If you picked up No Quarter #34 and read Matt DiPietro's article about underpainting, you may have found yourself curious just as I did. Well, I decided to try this technique out. Now I need to at a disclaimer here: This is the very first time I've tried this specific technique, so my execution was less than optimal. In the past I used to prime models black and then drybrush white to get an idea of surfaces. This process was new for me. With that caveat out of the way, let's see my results.


First, I started with my freshly primed Feralgeist. I chose this model due to it being a good candidate for multiple wash layers. I followed the article as closely as made sense. The grey coat covered probably 80% of the surface, and the white coat covered probably 30%. My first note here is that doing light shots of primer like this left some graininess that I'm not used to having when I do solid coats. No matter, it seemed to have little effect on the final product.
First, I did a wash of P3 Carnal Pink, probably about 1:3. It was thick enough to give a strong tint of the pink to the entire surface. At this point I definitely noticed that the underpainted coat has a noticeable effect on the pink wash layer.
Next, a thinner wash of half P3 Carnal Pink and half VMC Pink. This was probably at about 1:4, with a drop of flow aid thrown in for good measure. At this point, the underpainted coat is becoming less obvious.
Now a wash of just VMC Pink, at roughly 1:5 with a couple drops of flow aid in there. Again, even less obvious of the underpainting.
Now a wash of half VMC Pink and half P3 Beaten Purple. About 1:5 with definite flow aid added.
Ok, I have no idea what happened with my camera here. This step was where I went back and re-higlighted some areas with slightly thinned (1:1) P3 Carnal Pink to bring some surface back to a brighter shade.
Next, I did a very controlled wash of P3 Beaten Purple and some VGC Violet ink. This was something like 2 parts paint, 1 part ink, 3 parts water, 2 parts flow aid. By controlled wash I mean that rather than washing the entire surface, I just washed the recessed areas that I wanted to darken.

It is at this point that my step-by-step comes to an end because...
... Where'd the underpainting go? Ok, perhaps my wash technique was not entirely the best option here. The article really only does 1 or 2 washes on top of the underpainting, and they tend to be darker colors. So I'll admit, my test is probably not entirely reflective of the way the technique should be employed. In any case, here are my takeaways:

1) Underpainting via 3 primer coats (and necessary black painting the recesses) takes time.
2) The technique definitely works better with just a couple washes.
3) Taking the time to underpaint definitely gives a much better sense of where to highlight, particularly if you follow the zenithal highlighting methodology.
4) This is not particularly compatible with my own painting style.
5) I'm glad I took the time to try it out, and hey, my Feralgeist went from blister pack to done in 2 days, which is a record for me! (I'll post the final model tomorrow)

So, will I use this for my War Hog? Probably not.
Will I use it for select future projects? Very likely yes.
Do I recommend other people try it out? Absolutely! See if it works for you! Trying out new techniques is what it takes to step up your painting.

Until next time, paint like you have a pair!

Monday, March 14, 2011

Spell Martyrs

Adding another 1pt option to my army building is nice. I can't imagine that I'd ever field 3 of these, but in a large game at least I've got the option. On the actual gaming side of things, I've been wanting to round out all my 1pt options for list building, so adding these gets me nearly complete. All that's left is the Feralgeist, which is currently in progress.

All things considered, these were pretty quick to paint. Everything on the model is easily accessible to the brush. I didn't want to spend a ton of time on them, but I could easily see myself getting one more just to do a premium paint job on it just for kicks.

What went well:
* Athanc stone glow - I think this worked out pretty well. I didn't go all-out trying to OSL their chins and such, but it works.
* Overall composition - I tried to keep the rest of the model darker for the most part so that the glow would stand out better, which I feel that I accomplished.
* Black armor plates - I reproduced the same scheme from Anyssa for the black armor and it worked out pretty well. I really should have made notes this time.

What could have been better:
* Metals - The little dots and edges of Legion armor continue to drive me nuts. Those parts could have been cleaner.
* Blending on Skin - There's some splotchy places, particularly with the sanguine wash. I didn't notice it until after I'd already sealed it unfortunately.


Sunday, March 13, 2011

SPQR: Adding That One More Step

Philosophy
Regardless of what your goals are, an essential quality of speed painting is about efficient use of time. I would imagine that most people out there are already working on multiple hobby projects at once. I find generally that gamers tend to have some level of awareness at how to optimize things. However there's some value in exploring the topic in case there are little nuggets of wisdom out there. In terms of efficiency, there are two primary areas that I focus on: workspace and multitasking.

Having a dedicated workspace for hobby projects can make an enormous difference in terms of efficiency. My workspace has evolved over the years that I've been painting. It started as a box of paints and brushes accompanied by whatever mug I grabbed from the shelf. Later it turned into a large portable serving tray. Today I have a dedicate desk, shelf space, paint racks and lamp. There are many articles out there about workspaces, and I've included a couple in the list of references at the end of this article. Focusing specifically on efficiency, it's important to organize your workspace so that the most commonly used items are within arm's reach, and you know exactly where to find them. Having plenty of area also helps so that you aren't shuffling things around frequently to accommodate whatever you shift to work on. The key here is to evaluate your space every so often to ensure you are getting the most of out it.

As a visual aid to my philosophy on multitasking, I've included a photo of my desk. Since I wasn't able to put labels on the items, consider this a bit of a scavenger hunt. I've got a can of primer because I'm waiting for a model I just primed to dry. I'm working on basing the Spell Martyrs. My Gun Mages patiently await their next SPQR step. My War Hog relaxes on the styrofoam where he awaits the next step in his progress. And on my tool rack, a piece of clay experiment is drying (more on that another time). As you can see, I've got 5 different things going on at once. The value in doing this is that while one thing dries or cures, I can be working on another thing. In some cases, I'm waiting for inspiration to strike and having them within visual range helps. This is more ambitious that my typical, but the point still applies. If you're able to keep juggling back and forth between assembly and painting, you'll make good use of time when something needs to sit and dry/cure.

Practice
So back to my Gun Mages. As a part of my goal of speed painting in order to get better, I'm taking one more step on the coats. I'm going to two brush blend (2BB) to deepen the shading.

For reference, here's the UA model from the unit as of the end of the previous post.
And here he is after 2BB some P3 Coal Black into the deeper areas. As you can see, this definitely deepens the shading as the recesses have much more coverage at this point. The 2BB technique can yield pretty good results in a short amount of time once you get good at it, but it takes a fair amount of practice. I forced myself to practice it on models that I was speed painting in order to get that practice in. Combining washes and 2BB techniques like this can work well to step a model above just basic tabletop quality.

Total painting time: 30 minutes. This time it literally is 30 minutes to paint this step for all 7 in the unit. Although the 2BB technique is relatively fast for the results, it isn't as fast as wash techniques.

References:
* Matt DiPietro's PP painting desk
* CMON Article about basic tools, including workspace
* YouTube video of Ron Kruzie using the 2BB technique at Gencon (terrible video quality, but you can get the general idea)

Friday, March 11, 2011

RtC: Assembly Finished

Countdown to KublaCon painting competition: 78 days

Assembly is finished for the War Hog! The last of the work was just getting the tusks and right hand attached, and then doing a bunch of gap filling around some of the major joints. The places where his skin is stitched together required some particular attention. Normally I might have just skipped that gap filling and used dark washes to disguise the joins. For competition purposes though, I felt it was really important to fill those gaps properly. It stretched my green stuff skills a bit since those stitch joints were somewhat fiddly to fill in. However, that work is now done, so it's time to move on to priming next.

Speaking of priming, I read the recent NQ article about "underpainting" and it got me thinking as to whether that might be a good technique for this. However, never having used the technique before, I honestly have no idea. I'm planning to do a test model using that technique but I'd love to hear from other folks out there about it. Post your comments!

Ok, and now for something more life-related. Part of my lack of progress on painting the last month was due to this project. My father-in-law and I spent a bunch of time working on my back yard area. The pavers and deck are all new, and it was a ton of work. But the end result has transformed the space into something much more functional and tranquil. Anyway, now that this project is complete, I should be getting more painting progress done.

Now it's time to start working out color schemes for this beastie and get on task.


Wednesday, March 09, 2011

SPQR: Speed Painting and Quality Results

Goal #3 for 2011: Do a series of posts on "speed painting".

It's high time I got started on this goal! This is the kick-off post for the SPQR series I'll be doing on an ongoing basis to tackle the large topic of speed painting. My goal is to give a balance between the "philosophy" of speed painting, and concrete examples of speed painting in practice.

Philosophy
The term "speed painting" has a pretty wide spectrum of definition for time, technique and quality. Those definitions vary primarily due to different goals, which each painter needs to define for themselves. Are you looking to get a painted army on the table? Are you looking to improve your brush handling techniques? Is your available painting time limited and you're looking to balance quality and completion? The goal is what will drive what type speed painting you undertake.

In my case, I have 2 goals. The secondary goal is to get stuff painted for playing with. But my primary goal is really to improve my skills. My underlying theory is that I can always buy another copy of a model rather than strip and start over if it isn't perfect. I've been doing this sort of balance between speed and quality for the last couple years and I've seen a noticeable improvement in both brush accuracy and blending quality. One key factor to this improvement is that I always take time after I seal a model to review what I liked and what I didn't like, even if I don't blog about it. Occasionally I will set aside the speed painting mentality and go all-out on a model just to test where my upper limit is, but I can honestly say that taking this specific speed painting philosophy has indeed improved my skills.

Ok, enough of the philosophy, let's start a real example...

Practice

For the practice portion of these posts, I'm going to start with this unit of Gun Mages. They've been sitting in my paint queue for quite a while now, and although I don't expect to be playing them in the very near future I do want to get them painted. I should note that this is my second unit of Gun Mages to have painted (the first unit being here), so I've got the upper hand on these so to speak.

Here's my starting point... a white primed model. I'm actually painting the whole unit at once, but I'm only going to show one model for the purposes of demonstrating the progress.

I'm using a "wash over white" technique to help speed up the process of the major areas. The idea is that the washes over white do a lot of the hard work in terms of highlighting and shading. It's certainly not competition quality, but for tabletop standards it gets good results. Note that I'm not going to discuss other primer color options here. This technique is specifically for white primer.
First painting step, base wash with Trollblood Highlight 1:1 (paint:water ratio). You'll notice that the coverage here is pretty good. Some white shows through, but not a whole lot. I'm starting with a more gray base before going to blues just to give it a more military feel.
Step 2, wash with Cygnar Blue Base 1:2:1 (paint:water:matte medium). The coverage here is significantly less, but it does create a translucent glaze over the entire thing.

The reason reason I include matte medium rather than glaze medium is that it 1) helps glaze even the top surfaces, and 2) helps reduce reflectivity in the recesses.
Step 3, wash with VMC Dark Sea Blue 1:3:1 (paint:water:matte medium). Similar goal as the previous step, just darkening things.

Now normally there's a lot of advice about painting the recessed areas first, and moving to the higher areas to avoid making mistakes on completed areas. The reason I'm doing the washes first is simply that washes tend to be messy, especially when working fast. Doing the washes first means I won't slop on other areas later and cause more damage.

And there you go, about 1/3 of the model's entire surface has already been covered using this technique. It's not outstanding, but it gets the job done.

Total painting time: 30 minutes. Ok, let me add a caveat there. I did paint 7 of these guys at the same time ("assembly line" style), but it was about 30 minutes of actual time spent mixing paint and applying it. There was drying time in between, but I'm not going to count that. The reason being that I spent drying time working on other projects at the same time.


Feedback!

If you've made it this far, thanks! I'm planning to keep these relatively short and work my way through my backlog of unpainted models, so expect more in the near future. This being the first post in what I hope will be a continuing series, I'd love to get feedback on what would be useful in future posts.

Sunday, March 06, 2011

Anyssa Ryvaal

I feel compelled to point out something amusing about the Anyssa Ryvaal model: She's got a sword on her back. Now normally this wouldn't be so interesting, and when put along with the other Raptor models since they all have swords. However Anyssa's stat card has no melee weapon listed at all. Not even the blades on her bow. She only has the bow on her stat card. Again, not necessarily odd except that the PP conversion rules are pretty clear about having to preserve the weapons of the model per the stat card. Ok, now that I've gotten that out of my system...

It's always a little challenging to get back to painting after an extended break of multiple weeks. This model was definitely no exception. Trying to pick out all the details on a larger complex model was really testing my patience. It didn't help that I ended up taking her to a tournament before she was completely finished and having some paint get rubbed/chipped off. However she's done now, and I'm moving on to some other speed painting projects to have more of a sense of accomplishment.


Friday, March 04, 2011

From the Desk: A Complete Lack of Progress

There are balances in my life. Work vs personal. Family vs hobby. Speed vs quality. Sometimes they swing towards more hobby time and this blog gets a lot of updates. Sometimes they swing the other way. Right now I'm getting very little hobby time. Anyssa is sitting on my desk, waiting to be spray sealed, and I don't have her to show yet. So instead, I have these two pictures.

The last couple days I was on a business trip. I had high hopes of getting some model trimming and assembly work done. However working dinners and wine and 1:00 am emergency calls got in the way of any hobby progress. However the trip was very fruitful. These pictures are from my hotel room. This whole month is pretty busy with business trips. And when I'm not on a trip, I'm going to be finishing the landscaping work in my back yard. So the hobby is taking a bit of a hit right now.

This is usually when I would post some philosophical exposition about the hobby and all this thinking I've been doing, but not today. Instead, just pictures, and a couple updates on projects:

Anyssa is nearly done. I'll have pictures posted of her this weekend.

I've started painting my second unit of Gun Mages. I've got an initial post ready about "Speed Painting with Quality Results" that I'm going to turn into a series. Hopefully I'll be able to start that soon.

Speed painting is about all I'm going to have time for during the month of March, so it's a good time to step back and acknowledge the "reality" of my situation. Ok, that started to get dangerously philosophical. Enjoy the pictures!

Monday, February 28, 2011

Tournament Report and Something More

So yesterday I was at a 25pt tier fight tournament at my LGS. The super quick summary is that I ended with 3 wins and 1 loss. And that 1 loss was because my opponent made his tough roll on Borka and my remaining attacks missed. The unfortunate part was that 1 loss was in the first round, so my 3-and-1 record didn't actually net me a 2nd place either. Anyway, there were 16 people there. The faction spread was quite interesting: 3 Legion, 2 Menoth, 1 Circle, 3 Trolls, 2 Mercs, 2 Cygnar and 3 Khador. The whole tournament was a pile of fun and everyone had a great time.

Ok, with that summary of the tournament out of the way, I'm going to do something different for the rest of the summary. I attempted to take pictures of several of the painted models at the tournament to showcase how there are some very dedicated painter/players at the LGS.

These trolls were painted by my buddy Mike. His new painting blog is here. I really like what he's done with the obsidian theme to his troll army.
It's a shame this picture didn't come out better. This chap's Gun Mages were really nice. The color scheme is really striking and the work on the browns in particular was quite nice.
These Troll wealps were painted by my buddy Lance, who also has a new painting blog here. He's started a new Troll army and painting them using a "magma" theme. He refers to these wealps as "briquettes".
These were Alan's new Rhulic force that he's been working on. I managed to snap this group shot because it was, unfortunately for him, his destroyed pile.
Another model by Lance, this Devastator is a cool example of an aged and damaged jack. For this tournament, Lance was loaning it out to Henry who is still assembling his Khador army.
Unfortunately I have to admit I didn't catch this fellow's name, but he had been working on his Cygnar jacks and this one really caught my eye.
Mahir's Nemo was definitely striking in color. This particular battle was an amusing "old man" fight between pNemo and pDoomshaper.
This shot was less about the models, and more about the situation. It was Khador on Khador and I was stunned at the scrum taking place. And yes, there was a wrecked Spriggan in the pile too. Go Karchev!
And finally this Woldwarden, who was about to deliver a might thump to eSeverius' noggin!
Ok, well that about wraps it up for me tonight. It was awesome to see so much dedication to painting at the tournament. But now, time to get some sleep. Hopefully tomorrow I'll be able to seal up Anyssa and post pictures.

Saturday, February 26, 2011

Saeryn, Omen of Everblight

This model was actually completed a couple weeks ago, but due to extended visitors I wasn't able to reassemble my photo area. So finally I'm getting back into the painting swing and getting caught up on projects that were partially started. Tomorrow there's a 25pt tier tournament at the LGS, so I'm in a bit of a scramble to have things ready for that as well. I've been working on Anyssa the last couple days and just finally got her in enough of a state that I can use her on the table. I'll have pics of her in a couple more days when I finish painting her. For now though, I want to ramble on about Saeryn and where my head has been in regards to painting lately.

Overall Saeryn was a pretty enjoyable model to paint. After my feeling of moderate success with Vayl, I wanted to spend some extra time on this warlock as well.

What worked well:
* Black armor - I spent a lot of time on the black armor pieces, and despite them being a bit washed out in the photos, the highlighting worked out pretty much to my liking.
* Green cloth - Using the colors from Vayl as a template, I again spent a lot of time focused on the green cloth parts of the model. My real goal is practicing my color theory, so it does look a little "overdone" in contrast to the rest of the model.
* Leather straps - I'm not sure what I did on these, but overall I like how most of them turned out.
* Base - For some reason, the basing material turned out great, looking like broken layers of slate. No skill. Just random luck on this one.

What could have been better:
* Skin - The shading on the skin was hit and miss though. The outstretched arm was a little odd to work through and I'm still not comfortable with the end result.
* Metals - As usual, I'm not completely happy with the metals. It's not that I'm unhappy with them, I just feel like they could have been so much better. I suspect it's because I don't shade them down enough and the highlights are just too bright of metallic.

Time for some rambling thoughts... So lately, in addition to being busy, I've been in a bit of a painting funk. I'm working on Anyssa right now and it's hard to focus on maximum quality. I'll elaborate more about that particular model when I post the final pictures. In general though, it's been hard lately to sit down and paint for more than an hour or so, which really undermines my focus on quality. Honestly I need to re-frame how I go about painting probably, especially in light of my goal to paint the War Hog for KublaCon this year. It's a big multifaceted model that will require a lot of hours of work. If I'm ever going to pull it off, I need to be able to summon a high focus on quality on a routine basis.

Ok, enough rambling. Time to sleep and dream of winning tomorrow's tournament!

Tuesday, February 08, 2011

From the Desk: Musing About Mood

Continuing my trend of contemplative posts (due to a busy home life), I've been thinking about how to create an overall mood for a model. It's easy to say that I want to do this, but the actual execution is something I tend to fail at routinely. As I start to work out a scheme for my War Hog, I'm examining my own process of how I go about painting. I typically fall into a trap of having an army scheme and just painting to that with some slight variations. This pretty much excludes any concerted attempt at a holistic painting approach. But let's back up a bit and look at some examples of creating mood.

Yesterday a friend of mine forwarded me this link to a post on the PP forums. The paint job on this Adeptis Rahn is quite impressive. However it's not just the blending quality, basing, OSL execution, or color choices that do it. The overall mood is what makes it impressive. The whole piece gives an overall feeling of arcane power and darkness. The paint scheme really ties the whole thing together and draws the eyes to key places. It's easy to look at it as a completed work and see the whole composition, but staring at a primed piece of metal can make it hard to invoke the "mind's eye" and see that end state before it happens.

Of course, there are numerous other examples of this, not the least of which are Ramos and Tiriel by EricJ. Both of these are examples of dark mood, but there are plenty of others as well. I've found CMON to be a valuable resource for this by looking at some of the top rated models and artists and getting a better feeling for whether a model seems to exude a singular feeling or not.

So what do I take away from this in terms of my War Hog? Well, that's a tough question. As a model, the War Hog itself is a frankenstein of components and surfaces. Marrying them together into a single vision is going to be a challenge, and something I need to put decidedly more thought into. My first impulse is to create a mood of rage. Pure... animalistic... RAGE.

Sunday, February 06, 2011

From the Desk: Random Inspiration

Like most people, my life is a roller coaster. Sometimes I get a lot of time to paint, like 2 weeks ago. Other times I get almost none. I have house guests for the next month and this is cutting into my hobby time (rightfully so). My photo area has to be taken down whenever we have guests too, so anything I do manage to complete won't get posted until the end of the month.

On the flip side, I have come across various sources of inspiration, and one in particular I wanted to share was this thread from the BrushThralls forums. It's a showcase of a number of top-quality painted models from a variety of artists. I'll warn you though, this thread can potentially break your will to paint if not taken in context. I recommend keeping two things in mind while viewing it (and any other painting blogs for that matter):
1) The artists painting these models are doing them for painting competitions and pour many hours into them.
2) Instead of focusing on how well they are painted, look for ideas on color schemes, bases or even just little features that jump out (yeah Butcher, I'm looking at that base of yours).

Sunday, January 30, 2011

From the Desk: The Forest for the Trees

Another weekend comes to a close, but I got some good work done. Among the various projects I hit was finishing up these little trees. I got the inspiration when I found some moss balls in Michael's. I'm a big fan of using felt templates for terrain elements because they provide clear delineations of where that terrain element begins and ends. However they don't provide very much ambiance. So I wanted to create some simple trees that could be put on the templates to spice them up a bit. Here you can see the final product in action, currently being occupied by a few Striders. What follows is a quick description of how I constructed these trees.

First I made these trunks. I sort of did several steps at once, so let me summaries. I cut out small circles of matte board, put a small nail through the center, then used some caulk and stuck it to a small tube. The tubes were just some simple hard plastic pieces of tubing that I cut to length. Sticking out the top is a wood screw which is intended to hold the moss ball. Once all these dried I was able to move on to the next step...

To simulate the bark, I grabbed some bandage tape from the first aid kit and just wrapped it around the tube.

Next I added the moss balls to it. Pictured here are the moss balls that inspired the whole thing. They are roughly 2" in diameter and are light but relatively solid.

After that I glued some garden sand to the base and was all set to paint. The base was relatively straight forward; just base with a dark brown and drybrush a tan on top of that. For the bark, I drybrushed a medium brown onto the bandage. This gave a somewhat decent looking bark effect for the trunk of the tree. After all of the paint dried I put some random flocking onto the base and called it done.

And there it is! A completed tree! Another simple piece of terrain to upscale my battlefields.

Saturday, January 29, 2011

RtC: Slow and Steady... is Boring!

Weekends are great. I don't really get a big block of time to work on stuff, but I get plenty of small slots to get stuff done. Today is a good example of that. In addition to the work in this post, I also got some work done assembling Annyssa Ryvaal, and some work on my upcoming SPQR series. More on that later.

First of all, I wanted to start getting the main body together. One of the challenging pieces to line up is arms that have these sorts of indentation sockets. I read a tip once of using a drop of paint to line up holes, which is what I'm (sort of) doing here. Unfortunately I ended up with a bit too much paint, but it will still serve my purposes. While that dried, I moved on to other parts.

Putting together the torso looked easy enough, but of course I chose to make it more difficult. The tail was the real reason. I wanted to pin the tail but quickly discovered that the bottom half of the torso has quite thin metal in the slot designed for the tail. So I opted to use a technique I've used before where I run a single pin through the middle of the torso to hold everything together. This photo is the before shot, with the pin obviously too long. The process is simple enough though. Drill the holes, put green stuff at the joins, put a bead of glue on the pin, and jam the whole thing together. The glue dries quickly enough to hold everything in place while I then proceed to smooth out all the green stuff. In this case, I went ahead and added on the tail as well.

Next was the head, which I kept simpler. Again, I ran a bead of green stuff around the edge (after scoring the surfaces to improve the join) and smashed it all together. Because part of this join included his mohawk, I added some extra green stuff and did some very basic sculpting to make the join look relatively seamless. The big problem I ran into here was the gaps around the neck. Rather than knead up more green stuff, I decided to let this part harden a bit first before I decide to tackle those spots and smooth things out.

Lasty, I went ahead and assembled the leg and arms. These were straight forward pinning and placement (with the aid of paint drop marks). There's some putty work to do to make those joins look a little nicer, but at this point I'm running out of time and need to get some sleep. I also finished the last of the assembly work for Annyssa Ryvaal at the same time which was a nice bonus.

The next step will be to start building a base, put on the remaining two pieces, and do the putty work to clean up joins. Taking my time to pay attention to all the assembly details is taking additional time, but I definitely feel it will be worth it in the end.

Wednesday, January 26, 2011

RtC: Progress is Progress

Some nights I get a lot done. Others... well, it's a struggle to get anything done. If I know that I'm going to have a tight evening for time, I tend to focus on things where a small amount of time can still net progress that feels good. This evening was one such evening. I opted to get some assembly work done on the War Hog. I had about an hour so I reviewed the pieces to assemble and strategized on where to start. This model will require a fair amount of putty work, I determined which pieces were key to get done first so that putty could dry before moving on to other parts. The big key part here was the lower body. I scored these two parts and put them together with putty. I needed to do a slight bit of cleanup for the rope that runs around the waist due to a break where the join was. Easy enough though.

Next I worked on putting the smokestacks and aggression dial on to the upper body. While not strictly a key part to get done, these were easy to put together with just a bit of putty work.

Lastly I assembled the left arm, putting the hand onto the forearm. Although the join surfaces are pretty substantial, I opted to pin these together. I tend to be a little extra crazy about pinning even though it takes some extra time. I've rarely felt like pinning was wasted effort however, and with my dremel in hand, the work is pretty quick.

Well that's all for tonight. As I mentioned, progress is progress. This model has a target date of May so I feel a slow-and-steady attitude will serve me well.