Tuesday, September 25, 2007

Krielstone Bearer

Finished up the Krielstone Bearer. The scribes are queued up for later though. I spent a little less effort on the painting quality this time and more effort on the overall composition and story effect instead. There were a couple specific things I focused on. First, I wanted to pick out a handful of the runes to have glowing. My "glowing" effect isn't great, but I'm more satisfied with it than I was on the Fell Caller. I also did a little OSL work on the runes around his hands and above his head, putting some reflected green on those spots. Second, I wanted to make the stone look like it had been uprooted from the ground recently, so I used some Vallejo smoke to make a "dirt line" on the bottom of the stone. Overall I wanted this to draw the attention to the stone more than the troll. Again, not my best painting quality effort, but I'm happy with the overall results.

Leaf it to Nature

I've had a couple people ask me where I got the leaves that I used on the various bases I've done (like Doomshaper for example). So, it got me curious myself about these little magical decorations.


The "leaves" are actually a part of the seed pods of Birch trees. Here's a picture of a Birch tree:


The seed pods grow in great numbers on a single tree and look like this:


When you flake apart the seed pods, they separate into seeds and then the little "leaf" bits, that are great for basing, like this:


And there you have it!

Monday, September 17, 2007

Alten Ashley

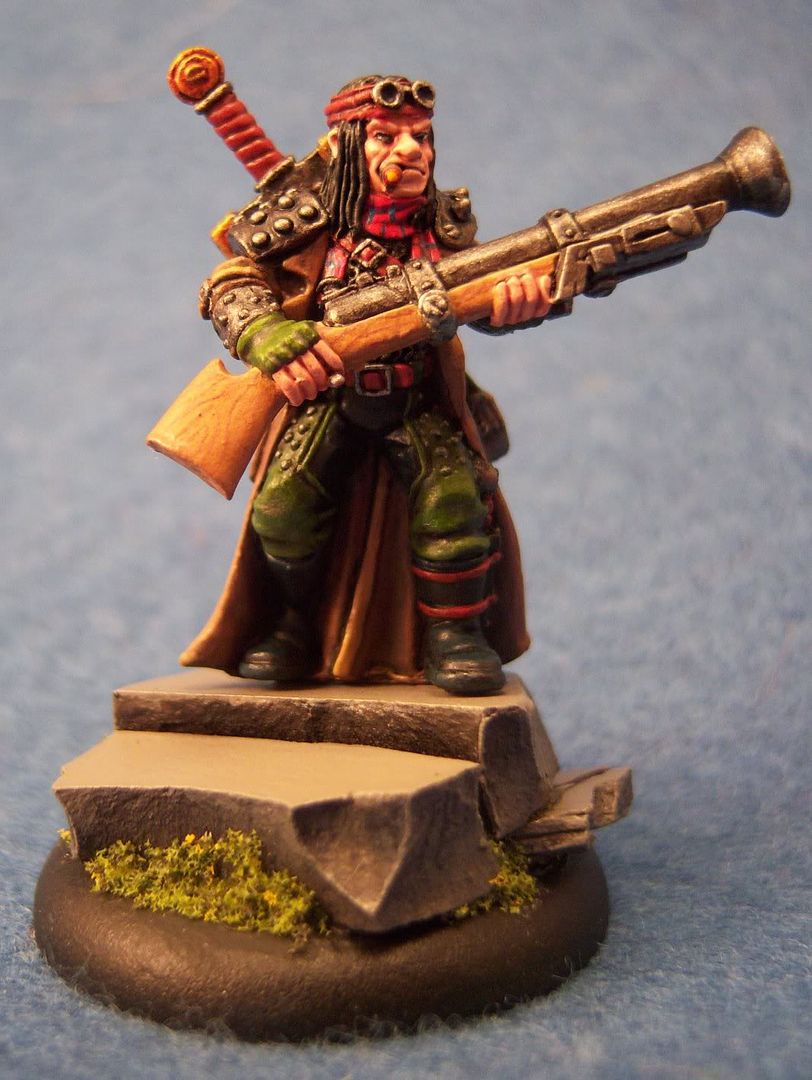
Finished up Alten Ashley this weekend. He was pretty fun to paint actually, despite a rather plain pose. I took this opportunity to try out a bunch of things. First, pics...


Basing: I wanted to try my hand at a slate base. I wasn't able to get any milliput in time, so I picked up some stuff called Super Sculpey. It requires baking, which limits its uses. However, it worked relatively well as a substitute. I used Ali McVey's slate bases tutorial on the brushthralls' site (which seems to be unavailable at the moment, so no link). Overall though, I like how this base turned out for a first attempt.

Wood grain: I tried my hand at painting wood grain on the rifle stock. Basically I started with rucksack tan, then painted grain lines with bloodstone, then did a couple thin glazes using a mix of rucksack tan, bootstrap leather and matte medium in roughly a 1:2:4 ratio. The key was making sure the glaze was thin enough to not hide the detail below, but thick enough to shift the color.

Two Brush: I used the two-brush technique much more extensively here. His coat, pants, and other misc places. The coat really turned out great I think. Still a couple rough transition spots, but after I finished it, I just kept staring at it thinking to myself how I've started to turn another corner with painting now.

Armor: I used a mix of armor wash and matte medium when washing the metals. It really dulled them down noticably, which I actually liked. I think less matte medium will be better in the future, but I do like the initial results I had. It also helped so that highlights added after the armor wash really stand out more.

Red Leather: This is something I wanted to try out just for kicks. I love the reddish leather look on some of the stuff that I've seen come out of the PP studio lately, and wanted to start figuring out how to build up that color. For this model, I used a mix of khador red base and bootstrap leather, and then glazed it with rust brown ink and matte medium. It's ok, but definately needs more refinement, especially in highlighting. The basic color is pretty close to what I'm looking for, but it needs more depth.

Photo: Ok, this is actually a problem area. The color on the above photos is really bad. I need to spend some time to enhance my photo rig some more. I'm thinking the background is a big issue at this point. That'll be my first adjustment.

Enough for now... All hell's broken loose at work, and I need to try to stay sane. Hopefully my painting time doesn't suffer too much.

Friday, September 14, 2007

Flameguard Cleansers

Finished up the flameguard cleansers. Actually ended spending more time on these guys than I originally intended. I skipped some detail level but they are tabletop quality enough. They were great for practicing the two brush technique though. Nothing here got more than 1 highlight and one shade coat.

Wednesday, September 12, 2007

Late Tournament Report

I played in a 750pt Warmachine tournament last weekend, and am just now getting around to posting. *sigh* The tournament was actually alot of fun with one minor issue. I tied, lost and won (in that order) my games, which unfortunately left me 2 tournament points short of the Menoth coin. Oh well.

I only really played one list for all three games, despite having a backup Amon list: Severius, Guardian, Revenger, Daughters, Deliverers(6), Zealots(10) with Monolith, Knights Exemplar, Rhupert, Eiryss, Vilmon, Paladin, 2 Seneschals, and Grogspar.

The first game was against my old arch rival Lance who was playing Cryx with eDeneghra. This battle was truly epic, with very dramatic moments. In the end, the battle resulted in a tie for VPs.

The second game was against a Cygnar player using Seige. This game unfortunately only lasted 2 rounds before time was called. This made me sad for a couple reasons. I had gone first, and at the beginning of my third turn, I was still in control of the 3 control points AND I was primed to deliver a severe beatdown. As it was, I lost the game due to time being called and not having enough opportunity to leverage my troops. I'm still a little pissed about this, but my opponent was clearly having issues dealing with the Menoth knot, so hopefully I gave him a nasty headache at least.

The third game was against a superb Cryx player named Brian, who has previously stomped the ever living crap out of me. Somehow, I managed to get a caster kill against eSkarre and pulled out the win. However, I should note, that Brian had me dead to rights a couple times and either opted for a different strategy, or had a bad dice roll. Severius was down to 3 damage left by the end of the game. All in all though, it was an incredibly fun battle and I had to give kudos to Brian for such a fun and challenging battle.

Overall, the tournament was a blast. I still dislike the time/turn limit, but honestly I think the only good solution is chess clocks and penalties for taking too long. Anyway, life/work is taking up all my time, and I need to bolt now.

Monday, September 03, 2007

Dervish

Finished the Dervish. Nothing special here, and really a mediocre paint job. However, this was my last protectorate warjack left to paint. Odds are I probably won't get any more of them. For this one, I decided to add some battle damage and really dirty it up a fair amount.

Sunday, September 02, 2007

Two Brush Update

Well, I got a bit of practice in today in the midst of working on the Devout. I opted to use my six Temple Flameguard Cleansers for practicing on (rather than the Devout) since they had several surfaces that seemed easier to practice on. I of course (un)cleverly chose black as the color for the robes to work with which made the exercise a bit more challenging I suspect. I started with a base coat of Coal Black, shaded with Thamar Black, and the highlighted with a mix of Coal Black and Frostbite (about 2:1 roughly). That's it... just 3 colors used in order to achieve the look below.

Now, here are some notes on the experience:

  • Matt DiPietro is right: Highlighting is way easier than shading.
  • The mechanics of switching brushes was made easier after I watched carefully how Ron Kruzie did it in the video. I held the blending brush in my mouth while using the applicator brush, then slightly rotated the applicator brush to hold the blending brush at the same time. After a few swaps, this became very smooth to do.
  • Switching quickly after applying paint is key, so it worked best to do small pieces at a time. For example, the high folds of the cloth, I would apply some paint and work one direction, then apply some more paint and work the other direction. When I tried to work both directions in one application, the second side was already starting to dry too quickly.
  • The right mix of paint and "water" was important. I'd say the optimal was approximately 5:4 paint to "water". In my case, water is a mixture of water, flow extender, and matt medium (I haven't a clue what the actual ratio was, but probably something like 20:1:4).
  • The effect for shading really is a pulling mechanism, with lots of paint in the crevice and pulling paint out of the crevice.
  • The effect for highlighing really is a sort of erasing mechanism, sort of pulling paint back up on top of the highlight to erase where there's too much. It will take me a while to get used to this since I'm used to smoothing by slowly pulling paint outward from the highlight.

I think there were probably plenty more things I noticed/learned, but it's getting late, and I'm too sleepy to recall them now. Tomorrow I'm hoping to practice again on some of the smaller armor plates with red tones and see how that compares.

The "Two Brush" Blending Technique

In honor of this 3 day Labor Day weekend, I've dedicated myself to learning the "Two Brush" blending technique that has been talked about much lately. If you aren't familiar with it, here's a video clip of Ron Kruzie at GenCon Indy 2006 using the two brush technique to highlight.

The concept is relatively straightforward, but I'll defer to a description by Matt DiPietro on one of the Privateer Forum threads (the post is buried somewhere in the thread):

"One method is called pushing and the other is called pulling and they are often used in conjunction. You can also just run your blending bush (you're using two brushes I assume) along the edge of your fresh paint and just smooth the transition. Pushing paint is kind of like using your second brush like an eraser. Highlights are much harder to do than shades using blending so if you're just starting out you should start with shading. lay down a midtone as your base coat and make sure that there is absolutely no patchy bits. Then choose a color for your shadows. glob a bunch of paint into the a crevice of your model then use a second brush that has been wetted with blending medium (aka saliva*) use it to pull some of that paint out of the crevice. If you pull too much or too far just push the paint back in to the crevice/fold repeat until satisfied. Afew tips... if you get water marks/bath rings when you blend adjust the consistency of your paint; too much water and you'll get a ring not enough and the same thing happens. Use your best brush as your blender and your more worn brush as your paint aplicator. It often helps to use a bigger brush for blending, I use a #2 almost exclusively, even for fine details. Once you've mastered blending your shading then move on and try highlighting at least thats my advice."

So, with the video, description, plenty of W&N S7's, and a fresh load of motivation, I am embarking on learning this technique this weekend. I'll post notes as I go along, and if I get extremely motivated, I'll even try to take a little bit of video with my new camera and see if I can post it.