Showing posts with label archangel. Show all posts

Wednesday, August 14, 2013

From the Desk: When Disaster Strikes

As a painter, I really enjoy the hobby aspect of the game and take a great amount of care with the models I paint. Thus it is with some frustration that I share these pictures with you today.

I was headed to play a game the other night and included in my force was my Archangel. Now I've put magnets on the bottom of it and I was using my metal toolbox which it sticks to fairly well. However as I was crossing the street, disaster struck, and I heard the sound of plastic landing on asphalt. I turned and to my horror, my Archangel was on the ground, broken. After spending time collecting up the pieces and making sure I had all the bits. What follows is a documentation of the damage, and the repairs I did last night.

So here's a view of the model itself. It looks worse than it actually is. The left wing is broken, but it was a fairly clean break. There's a bunch of paint chipping on the nose and the wing talons.
Here's the broken pieces. As you can see, it looks bad, but the breaks are pretty clean for most of them.
When it landed, the nose took a pretty hard hit as well.
Here you can see the pieces that were all broken off. The one wing really did snap pretty cleanly, but it was still ugly to see. There were also several broken talons from the wing. 3 were broken off entirely.
Another talon was just severely bent. The pin held, but at the cost of surrounding area.
And here you can see another talon that although not terribly bent was really scraped up.
So the first repair I made was to reattach the broken talon on the unbroken wing. Some super glue worked wonders here. The only problem was I got a bit of glue on my finger and it tore up the paint a bit more. At this point though it was a minimal addition to the overall damage. The nice thing was that the piece bonded quite well though.
Next I reattached the tip-most talon on the broken wing. Again, it bonded nicely. I also made sure to avoid spillover glue causing more paint damage.
Next I attached the other broken talon on the broken wing. This went very smoothly.
Finally I reattached the wing. This also went quite smoothly and bonded really well. This is a view of the top side of it.
And here's the underside.
So here you can see my original 3 magnets that I had trusted to keep it held fast. That plan has clearly changed.
Now I have 6 magnets, and kept them strategically placed as far outward as possible. I'm debating adding a couple more in the middle, but I need to test a bit more first.


I'm leaving on another flight in about 8 hours so I'm not doing any further repairs. There's a lot of paint touch ups to do, but fortunately my painting diary will really help out here. All things considered, it could have been far worse.

Saturday, June 22, 2013

More Archangel Pictures

As requested, here's a few more photos of the Archangel. I took these photos from within my miniatures cabinet. The lighting wasn't so bad actually since it's the white LED lights.

Tuesday, June 18, 2013

Archangel

Finally done! Most of these pictures are terrible unfortunately. The Archangel is simply bigger than anything else I've painted and my normal photo set up just isn't even close to capable of handling it. The whole project really stretched my normal processes to their limits and I had to do a lot of adapting. I'm going to use this post as sort of a cathartic release and just dump all my thoughts. For those of you uninterested in all that self indulgent blabbering, I've includes extra pictures!

Time: I started this project at the beginning of April, and it took me 2 months to get to an assembled and primed state. Then there was a big break on June 7th and I started painting it. My wife and son left for vacation visiting family and I was left by myself. What would have taken me at least a month if not more of evening painting sessions got done relatively fast, thanks in large part to a couple of full days of painting. I'd conservatively estimate probably 20+ hours of actual painting time. Without those couple full days of paint binging, I'd have really faced mental challenges working this project.

Holding: Normally I like to fully assemble a model except for putting it on its base and paint it that way. In this case having the wings separate made a really big difference since the wings make it really awkward to shift around. Painting in these 3 parts was, in retrospect, a good plan. I actually waited until it was fully painted to attach them. I had even done the bulk of the basing work before attaching them. I was able to just mount the main body on my normal spray cans and hold it that way pretty easily. I just wish I could have mounted the wings on cans as well, but that didn't work so well.

Color Mixing: There's a lot of surface. I mean seriously, a LOT. A very real problem was paint drying in the paint well before I could finish doing all the painting with it. The was particularly true with the skin which I did after the wing flesh and chitin. This made it really fidgety to work through. To overcome that, I tried to stick predominantly with pre-mixed paints. That kept the consistency throughout the painting process. Although this isn't the way I normally work, it worked well for this project. I would have loved to have done much more color mixing, but working with only the pre-mixed colors forced me to really push my 2BB skills further and that was a nice side benefit.

Painting Techniques: As I mentioned, I had to do a lot of aggressive 2BB work on this model and for the most part that worked out well. I also use a lot of controlled washes and using the larger-well palettes made that work pretty easy as long as I mixed enough paint. Layered washes has been a cornerstone of doing materials like chitin and stone for me for some time. The airbrush was also king for painting the wing flesh. All things considered, my normal techniques worked pretty well when scaled up.

Storage: Uhm, yeah, it's huge. I had to re-arrange my display case to accommodate it. And as for transport to events, I still have no clue. I magnetized it so I'm just planning to stick it to the top of my toolbox. Hopefully that doesn't end in disaster.

So anyway, overall I loved this project. I really do wish that I had the patience to spend far more time on it since it's a beautiful model. If I were to do it again and I was going to spend lots more time on it, I'd probably approach the whole project differently. It's FA:2 anyway, so I could legitimately field a second, but those odds are low.

And it's late, so I'm done. Time for sleep. If anyone wants close-up shots of parts of the model, just leave a comment and I'll snap more pictures.

Sunday, June 09, 2013

From the Desk: Roundup #30 and Archangel Progress

I got practically the full day today to work on projects. The rest of my family is out of town so I'm using the time to get as much painting progress done as possible, particularly the larger projects.

So first up is the progress on the Archangel. The wings are about 2/3 done now, with just the blue flesh really remaining. I also got the main body primed. I'm trying to build a plan of attack on how to paint the main body. I'll probably do the chitin first and then flesh, but I'm still not 100% sold on that plan.

Other stuff, that I don't have pictures for:
* Got Lylyth 3 assembled and primed.
* The last putty work on the second Angelius is done.
* Finished stripping and re-assembling the Extreme Carnivean.
* Got a painting diary started, which I'm using to chronicle the Archangel painting scheme.

And that wraps up the week. My goal for the next couple days is to get all my Lock and Load notes written up and posted.

Friday, June 07, 2013

From the Desk: Archangel Painting Started

I had intended to do my Lock and Load wrap up post, but I got distracted and wanted to post this up real fast.

So first of all I want to sing the praises of this small device, and especially for Ron Kruzie for the tip about it. It's basically a small filter made from tubing, pantyhose, and a rubber band. It fits nicely into the paint well of my airbrush and makes it easy to strain for granules that could clog the airbrush. It's simple and elegant and works really well. I tried both with and without and definitely had a smoother result with it. Of course, I did get interesting looks from the checkout clerk when I was buying all these supplies, but that's part of the fun of having this hobby.

So what did I get done? Well some base coating of the wings and initial highlighting and shading work. There's plenty more to do, but this really did get a ton of baseline work done. Next step will be to add some texture, glaze it, and then deepen the shadows.

Ok, enough for tonight. There should be far more regular posts from me over the next couple weeks due to a big break from work and life craziness. I'm looking forward to getting a lot of painting time in.

Wednesday, May 15, 2013

From the Desk: Archangel Nearly Assembled

So I've finally got myself a bit more focused on my painting desk and I made some serious progress the last couple days. Specifically on the wings.

As it turned out, I opted to order the Scythean spines from the PP parts store and use those as replacements for the wing claws. They are obviously different in shape, but I like the look of them overall. Here you can see also that I've got pins in place for the wings. I've actually got the whole thing assembled in that respect (other than some remaining gap filling), but I'm planning to leave the wings off for the initial painting work and then I'll clean it up afterwards. I'm even debating whether to leave them detachable for transport purposes, but the painter in me revolts at that idea.

Here's a shot of the entire assembled thing, excluding an actual base. There's a Stormguard there for size reference just for kicks.

Thursday, April 25, 2013

From the Desk: More Archangel Assembly Progress

Life really erupted on me the last couple weeks. It also doesn't help that I picked up the first Dresden book and spent a few evenings reading instead of painting. However there is some progress to show.

So more assembly on the main body. Everything except the wings at this point, along with green stuff work on all these parts as well. Something in particular I'd like to point out is the tail. I opted to run a pin from the base, outward, and then up into the tail to help stabilize it. This also allows the tail to curve upwards a lot more and give just a hint extra sense of movement overall. I really didn't like the idea of having the tail simply resting on the ground.

I appreciate the previous comments about sending in the wings for replacement. After pondering it I have opted not to, mostly because I actually want to take on the task of the repair work myself just for the experience of it. Hopefully some of that will start this weekend.

Saturday, April 13, 2013

Archangel: Trimming and Disappointment

Ok, first the good news. I got some solid progress in this week on assembling the Archangel. Here you can obviously see a big chunk of assembly in getting the main body attached to the base along with the back half of the head, the left leg and leg chitin, and the upper half of the tail. I've done the vast majority of the gap filling as well which really feels good. Not pictured here, but I also got the upper and lower half of the head put together but didn't get them attached to the neck yet. Ok, good news over. Let's take a look at the bad news.
In my "quick scan" of the parts in the store and from before I totally missed a major problem: one of the claws on the wings is entirely missing. You can see it here. There appears to be a small hole as if to receive a pin, but there's no claw in the kit to go there. My plan at this point is to try to sculpt one myself. A friend of mine classified this project as a "collaborative sculpting experience" which is turning out to be somewhat true. In any case, I'm mildly annoyed but not so much that I intend to delay progress by trying to request a replacement wing. I'd rather take this as a challenge in order to strengthen my sculpting skills.
The tail had a bit of a problem as well. At first glance it looks like a major issue, but it turns out this miscast is actually along the lower side of the tail and sort of blends into the surrounding base. I did some quick greenstuff work to smooth it out and then once it was attached to the main body and base it's basically unnoticeable.
And what do we have here? Nasty mold lines. This is actually the more frustrating thing about the wings to me. It's going to take a while to clean these up so that I'm sufficiently happy.
More on the wings, even though one claw was flat out missing, several of the other claws aren't really much better. Due to how the flashing braced the whole thing, the claws really were a mess. I just did some basic trimming to start but there's going to be a lot more work to do in cleaning these up. I may even just surrender on them, sculpt a whole new set, and replace the stock ones. I've got to think that one over though.

Tuesday, April 09, 2013

Archangel: Beginnings and Unboxing

The new Archangel model is a majestic thing to behold. This will now be the 4th huge-based model that I'll be working on and I decided that this one above all the others really deserves special attention. To that end I'm going to chronicle my progress here as I go along. It'll be a slow process since I'm also working on other projects, but my goal is to have it completed in time for Lock & Load. So with 7 weeks to get it completed, I now embark upon my quest!

The first step with any model is to take all the parts out of the box, make sure everything is accounted for, and look for anything obviously mis-cast or broken that would need replacement. Fortunately I was able to do a quick scan of the pieces at the store to make sure everything looked intact. With that first step out of the way, let's take a quick survey of the parts.

Body and Base:
The main body and the base are pretty solid pieces. On a cursory glance, the base looks like it has virtually no trimming needed, and the body looks like it has minimal trimming.
Arms and Tail:
There's actually a couple extra bits in here, but these are all the smaller resin pieces which is mostly legs, arms and the thicker half of the tail. There's also a piece of the head there. Again, upon cursory glance they look pretty good.
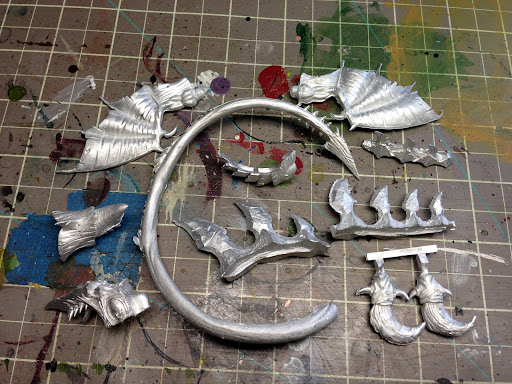
Bits and Tail:
These are all the metal bits. Smaller wings, head, spines and claws. These bits all look great. Admittedly I worry much less about flashing and miscasts on metal parts. I rarely see miscast metal parts and trimming of metal is super easy for me.
Wings:
Ok, now we come to the ugly part. Now seriously these are nice wings. Really nice. But holy smokes are they going to be ugly to trim and clean up. Really ugly. I see why they did what they did, but honestly they look like they will be a nightmare to take care of. Let's take a closer look...
Wing Details:
Here's a closer picture of some of the wings. As you can see, it's a real mess for trimming. I'm not sure I should have expected any less though. In order to mold them so that they wouldn't be too fragile during transport or too difficult to get out of the molds they had to have all the extra bits, but cleaning it up is going to take a while. I imagine that I'll spend at least as much time cleaning up the wings as I do all the other pieces combined.

So that's 20 pieces, which is significantly less than many other Colossals have been. And unlike my Judicator project, I expect to be able to assemble this entire model before painting which will be nice.

At this point I did a quick dry fit as best I could to get a sense of size at this point. My best estimate is that this model stands between 11 and 12 inches tall.

Now that I've unboxed and accounted for everything, my next step will be to start trimming and build a plan of attack. My top concerns at this point are the assembly of the tail so that it's solid, and the trimming of the wings. As I said above, my hope is to have frequent progress updates here, even if they don't seem very significant, just to keep my motivation high.