Saturday, June 30, 2012

Blackhide Wrastler

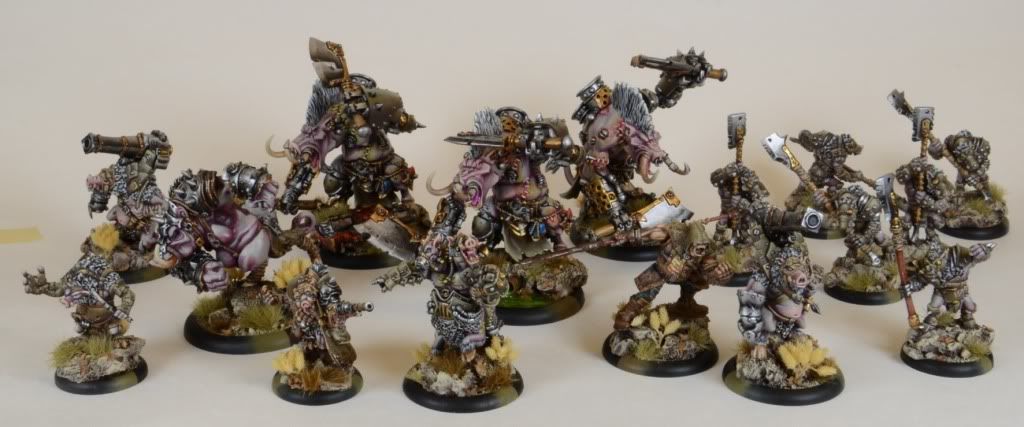
Just a quick gallery post. It feels good to actually have a finished model again after such a long dry spell. This gets me even closer to functional with gators. Some notes about this model compared to other gators thus far...

I used dry pigments to do some of the weathering of his shoulder armor. It worked out pretty good overall I think, although the photo makes it hard to really see unfortunately.

This guy has more contrast on the skin than the previous gators. It's not so much as to make him look out of place compared to the rest fortunately. Honestly I like the stronger contrast. I think it gives him more table pop.

Ok, enough posting. On to finish up Calaban and get more stuff rolling.

Monday, June 25, 2012

From the Desk: Lots of Progress, Zero Completions

April 2nd. It's been 84 days since I finished a model. Talk about a dry spell! It's more than a little depressing. I'll abstain from focusing on the past any further, and instead focus on the present and future...

First item from the desk is the most significant progress being made. I'm pretty much done with the Wrastler and Calaban at this point. Just need to pour the Envirotex and then add the grass tufts. I even got a chance to play my initial 15pts of Gators over the weekend! I have to say they were a blast to play. Gators are definitely not a legit faction, but they are pretty amusing to play. I'm really stoked to keep working on more of them as well, which leads me to...

This is a quick travel assembly kit that I've assembled. I wanted to have the ability to easily bring my assembly projects with me for those times when I will have some downtime. I even managed to use it last night while playing Torg with a bunch of friends. The bamboo roller has sculpting tools and micro files in it. In addition there's glue, cutters, drill, brass rod, knives, Vallejo putty (basically their version of liquid green stuff, but white), and of course the models that I'm working on. The kit includes everything I need except for green stuff (which needs to be added somehow).

As you can see from the kit, it's full of gators. Wrong Eye, Snapjaw, a Boneswarm, Maelok, Barnabus, a Bull Snapper, and an Ironback Spitter. The first 3 in that list are the ones next up on the painting table once I wrap up Calaban and the Wrastler.

And one last update. I started painting the 2010 Skarre alt sculpt. It's really a beautiful model and I'm planning to take my time on this one. It will be the model I OCD on while working on the rest of the gators. I've done the initial passes on the skin, and now I'm just starting to block in colors to get a rough gauge of the composition and contrast balance. I'll post this one every so often to show status. It may end up as a competition piece eventually.

Friday, June 22, 2012

Daily Inspirations: Master Craftsman Ghoul

Today's inspiration comes from the Privateer Press forums where Ghoul posted photos of his hardcore army for Lock and Load. Needless to say he won the master craftsman award. It's easy to see stuff like this and get disheartened because it sets the bar so high. On the flip side though, I think this is a well deserved award for Ghoul who I have been a long time fan of his work, particularly now on Hand Cannon Online where he's been doing a lot of great tutorial videos. This one definitely deserves a virtual high-5!

Wednesday, June 20, 2012

Daily Inspiration: Dark Insinuations

Today's inspiration comes from Dims' Galleries where he's been working on Isabella von Carstein as a part of a mini exchange. You can see the past posts around this and read how he was going to put a railing on the steps, but I have to agree that the candles create a much darker and more sinister mood. Lovely!

Sunday, June 17, 2012

From the Desk: A Little Inspiration and a Big Triumph

Today's Inspiration comes from the Massive Voodoo guys. This post about shaking off the Diablo 3 addiction was a timely reinforcement for myself as well. I spent a fair amount of time painting today and got a serious amount of work done on my Blackhide Wrastler.

Here's a WIP shot of him. He's mostly done except for some final details and some basing work. It felt good to get multiple hours of painting in, and I think this sort of progress has really shaken off my own D3 addiction.

It's late, otherwise I'd put up pictures of the progress on Calaban as well. Instead, time to sleep and dream of more painting.

Saturday, June 16, 2012

From the Desk: Droppers (part 2) and Organizing My Paints

In response to a question from my previous post, here's more information that you probably ever wanted about transferring to droppers and my overall paint management strategy...

Transferring the P3 paints from pots to droppers was not a huge deal, however I should note a couple key things that helped:
  • To aid in the pouring, I sometimes used wooden coffee stirrers to guide the paint as I poured it from the pot into the dropper. This cost a little bit of paint, but dramatically reduced the amount of accidental spillage, particularly for those paints that were thicker.
  • Once doing an initial pout of the paint into the dropper, I would add several drops of water to the pot, close it, shake the heck out of it, and then pour the remaining paint in. This often recovered considerably more paint than the water that was added to get it. The net dilution effect was minimal and honest somewhat favorable.
  • I wasn't super concerned about "paint loss". I knew there would be paint stuck to the sides of the pot and I decided it wasn't worth my time to meticulously scrape a few cents worth of paint from the insides of each pot.
  • Most of my paint pots were roughly half full or more, so there was plenty of paint to recover. A few pots were quite low and I simply bought more paint for those.
  • Some of the older and more used paints had big "chunks" of dried paint in them. In those cases I didn't worry too much about trying to fish out the chunks because, quite frankly, it would have been very messy and would have meant losing significantly more paint. Eventually I'll probably just clean out the droppers entirely when the paint gets low enough.
So here's a shot of my paint racks. You'll notice that I store most of the paints horizontally which saves me a lot of space. I also put the paint color on the top of the cap to make it easy to find them. For anything that's a wash I'll put the color as an X. For anything that's an ink I'll put a circle of black around the cap.

There are plenty of paints that I didn't transfer. Specifically the GW Foundations and the metallics. Mostly because both those have tendencies to be thicker and can clump up too much for a dropper.

Anyway, that's enough of that. I'd love to hear from other people about what makes their organizational system work well for them.

Friday, June 15, 2012

From the Desk: Droppers!

So I finally bit the bullet and transferred all my P3 paints into dropper bottles. It was a fair amount of work, but I believe it was worth the effort. I first considered doing this when I started a black and white study piece and made up some of my own shades of grey using P3 white and black. As a part of doing this, I mixed them and put them in droppers which turned out to be not as hard as I expected, and well worth the effort in terms of speed and simplicity. Making the leap to do the rest of them in droppers only took a slight extra nudge, courtesy of Justin.

Now, knowing that this isn't for everyone, I'm not going to promote that everyone run out and do this. I will however share my reasons for going through this effort:
  1. Droppers are easier to use with an airbrush
  2. I'm always thinning my paint now, so using a dropper helps me maintain better ratios of water to paint
  3. When mixing multiple paints, droppers are just faster than using a brush to scoop and mix
  4. When mixing multiple paints, droppers are definitely more precise
  5. After 20 years of painting on and off, and trying out 9 different lines of paints, I just happen to like droppers better

Tuesday, June 12, 2012

Daily Inspiration: Step By Step

Today's inspiration comes from the Reaper forums. Derek Schubert did a series of posts of his work painting the Hellborn Paladin model that he sculpted a while ago. Having the opportunity to see how he worked through the paint job was really insightful. I do have to say though, the following quote from that post is terribly amusing:

I picked up this figure at Reaper HQ and they were out of stock at first, so they fired up the spin-casters to make a casting just for me.

Monday, June 11, 2012

Daily Inspiration: Colossal Basing

I love painting. Seriously, I really gain great joy from paint. I've been in a serious slump lately due to work travel and Diablo 3. However my travel has died down dramatically, and I'm starting to emerge from my Diablo 3 fixation. Part of my ability to shake off that fixation is the inspiration I've gotten from following some specific blogs. Seeing updates on my iPhone's Reader app from various blog RSS feeds keeps a steady stream of inspiration pouring into my soul. To that end I'm going to start posting bits of inspiration to this blog. They might be really short, but the goal is to make them happen more frequently. So time for the first installment!

Today's inspiration comes from the Lost Hemisphere blog. The post is primarily an unboxing, assembling and painting of the new Cygnar Colossal model. While I do think it's a pretty cool model, and a helpful post, the real inspiration comes from the basing. Spud routinely impresses me by going the extra mile with some aspect of every model he does in his Free Time Black Hole series. This one is no exception. The basing really sets a story in place for the mammoth warjack. The mangled fence really helps tell the story of the Colossal marching across the battle field. Even though most of the basing elements are relatively easy to execute and not overly challenging, it's the composition that makes it so inspirational. Thanks Spud!