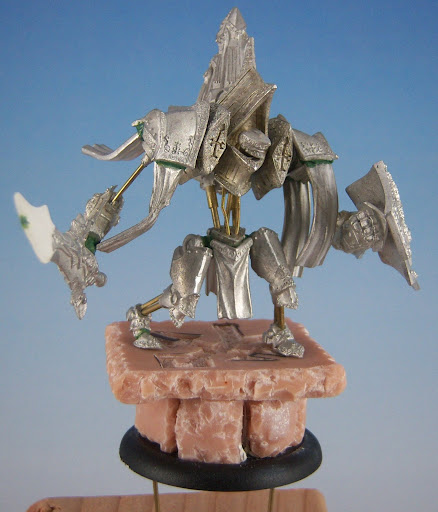
I've been absent for a while (working lots, plus trying out Malifaux), so the Warmachine aspect of this blog has been on a bit of a hiatus unfortunately. However, with the preview release of the final MKII stats (and if you haven't seen them, head over to the
PP site), I got a sneak peak at the Avatar and was pleasantly surprised at him gaining reach! It was the one feature I felt he was really lacking that would give him the extra edge he needed to be worth taking. The Avatar is the last unpainted PP model I have currently, and this preview was enough of a kick in the shorts to get motivated to work on him. To that end, as I did with a couple of other key projects, I'm going to do a series of posts of my progress on the Avatar.
First, let me be blunt: The stock sculpt is kinda... dumb. I'm almost done with a post about my favorite models to paint which will get more into what I like in a model, but I think I'm not the only one who dislikes the Avatar's standard pose. I've had this model in my backlog for probably at least 2 years now and had decided it needed to be a serious conversion project. I'm pretty pitiful when it comes to converting, and I'm primarily a painter, so this will be a big departure for me. My goal is to turn this model into something truly worthy of being the Avatar of Menoth, without trying to cobble together an entirely different model.

So, the first step was to make a plan. I got all the pieces out, trimmed them, and started reviewing them (all 18 of them). I also did some research by searching the PP painting forums and CMON for examples of conversion work that was done. There also used to be a great conversion job on the BrushThralls site, however that set of pictures seems to be inaccessible now. In any case, the following is a list of things that need to be done to the existing pieces:
* Extend hips lower from the body - This will help make him look taller.
* Widen hips to give a wider stance - This will help make him look more stable.
* Lengthen legs - This will allow for a more dynamic pose to his lower body.
* Extend upper arms - This will allow for a more dynamic pose to his upper body.
* "Fix" sword - Yeah, seriously... the flaming butter knife is just dorky, especially now that he'll have reach.
* Remount shield - Not sure exactly what I plan to do here, but something that improves the pose angles.
Well, that's about it for now. My goal is to have at least a small amount of progress every two to three days.
 I'm calling this one done. I did some final clean up work on various places where the blending was a extra rough, and some metal work had gotten away from me. To be blunt, it was hard to come back from a month away from painting and consider doing too much more work on it. The clean up work was plenty to tighten up some fine details though and overall I'm happy with the end result. After having this model in my backlog for so very long it feels great to wrap him up, and to finally close out my remaining unpainted Protectorate models.
 I loved this project, from start to finish. It was very enjoyable to take the time and think through what I wanted to do and really make this model my own rather than just accept what I felt was a sub-par sculpt. The painting portion was also enjoyable, and the end result really didn't feel like it came together until it was nearly done. The final shading and highlighting really put that slightly more dark gothic feel to the overall tone and brought it more to where I wanted.
 If I was going to do this project over again, there a few things I might change. First, I think the base could have been tighted up a bit more. I still like the concept, but I could probably have executed it better. Also the rods between the waist and torso could use some change, but I still haven't figured out what would have been better. Also I think the fine inlaid details of the metal sections could have been made to pop a little bit more. Probably there's other details, but off the top of my head that's really the main points.
 Having fielded this guy just the other night under MKII, I can honestly say that my favorite thing about having done this project is to bring his sword in line with the new rules, specifically making it obviously have REACH! I've always loved the concept, art, and (small) story pieces around the Avatar. When I first fielded him though I was always disappointed at his performance for the point cost. That made it really hard to get excited about assembling and painting him. Now in MKII, he's a big pile of iron awesome and I'm very much looking forward to fielding him a bunch.