I sort of lumped the progress of the whole weekend here. I was hoping to get more done, but I was distracted with a number of other things. It's late here, so time to get on with the updates.
 First, I decided to create a somewhat epic base. I decided to go with a stone slab, raised up on top of some stones. To that end I created a couple rough shapes and then marked out where I wanted to cut the circular slab into individual stones.
 Once the pieces were cut up I went through and roughed up the edges appropriately. Then I reassembled them using some Miliput and put the whole thing together on the base. Although not pictured here, I also carved a menofix into the slab's surface. This whole process turned out to be rather labor intensive, taking pretty much the whole day. Cutting up the slab into blocks took a while since I had to drill and saw to break it up. Then I had to rough up the edges with the cutters. Then the re-assembly with the Milliput. At that point I painted the menofix on the surface and carved it out with a blade.
 After the work on the legs, I decided to re-angle the toe of the back lag to give it more of an action pose. To create a stronger join all around, I drill the holes so that I could use a single bent pin to join the toe to the foot and also have the pin stick down for when I joined the leg to the base. This guy is big enough that a thick pin for each foot is totally warranted. The space between the toe and foot of course got filled in with some green stuff and smoothed out. Once it all dried and hardened it was remarkably strong.
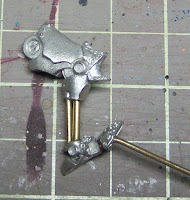
 Speaking of stronger joins, when it came to attaching the legs to the hip, I needed to put some extra strength into the whole thing. I've had some problems in the past with hip joins and wanted to avoid those troubles (pins shifting and causing the join to rotate). So this time for the join I used two pins and then green stuff. This picture shows both halves to give an idea. Perhaps it was overkill, but with the Dremel doing most of the hard drilling for me, I might as well do it. The Dremel also makes it easier to drill nice deep holes to ensure a strong fit.
 Finally, I got both legs on and attached the big guy to the base after drilling holes. For his left leg I left the thick cast pin still on the foot and drilled out extra space to get a nice tight fit for it. Overall this whole thing is incredibly sturdy. I've also got the two long pins sticking out the bottom so that I can attach it to an empty spray can for painting purposes.
Whew! Well, it doesn't look like a pile of progress, but this really gets me a long ways toward done. I'm unfortunately going to be gone for a few days so it might be a while before I finish up the last of the assembly unless I manage to squeeze in a little more work tomorrow night.
Whew! Well, it doesn't look like a pile of progress, but this really gets me a long ways toward done. I'm unfortunately going to be gone for a few days so it might be a while before I finish up the last of the assembly unless I manage to squeeze in a little more work tomorrow night.
3 comments:
This is going to look absolutely amazing when you get it complete. Keep it up! I've been following the progress so far, and can't wait to see where it goes from here. This will be an avatar that deserve's to be the center piece of your army.
Can only really say WOW - very impressive work it is going to look fantastic.
Very nice! Can't wait to see the finished product. That monster will look way better from all the work you're putting into it.
Post a Comment