Thursday, October 15, 2009

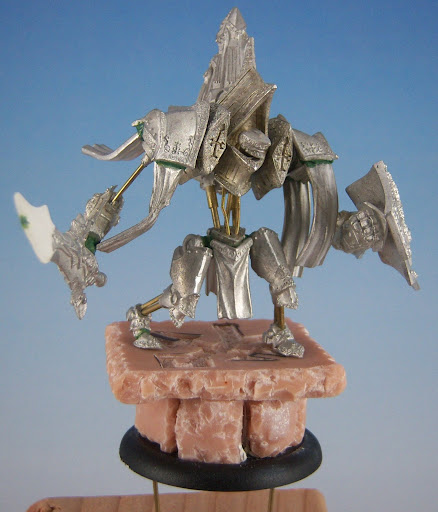
Avatar Assembly Finished

Assembly finished! I'm not going to get super detailed here on my pros and cons, but just some quick notes.
* I'm happy with how he has more of a presence. He's tall and in charge.
* He's a little thin in places. It sort of makes him look spindly, but we'll see how that looks after I finish painting him.
* The pose is much better. It's more dynamic, and conveys more motion.
* The effort involved wasn't overwhelming. Despite my busy schedule, I was able to complete this fairly quickly, given my skill level at conversion work.

Now, as soon as the weather changes and the humidity goes down, I can prime him and get started painting!

Wednesday, October 14, 2009

Avatar Progress Part 10, and a battle report!

Minor update on the conversion project. Got the cloths attached. Tomorrow night I should have time to finish the rest of the assembly and snap pics.

On another note, I got in a game tonight! A practice game for the upcoming Retribution tournament event this weekend at the LGS. I brought an eThagrosh list and was playing against an eGaspy list. It was a pretty vicious battle in the middle, with a swarm of Bane Knights breaking into the middle thanks to Tartarus' beckon. eGaspy's feat round was brutal with both Bane Knights and Soul Hunters driving in, however eThagrosh hung in there and survived the onslaught. At that point the remainder of the battle was academic, with the Totem Hunter, eThagrosh, Typhon, and a Seraph all with clear charge lanes to eGaspy.

Tuesday, October 13, 2009

Avatar: 1, Fingers: 0

Well, tonight I was doing some additional assembly and managed to jab my finger. I was drilling holes for the cloths that hang from the shoulders and the drill bit slipped and drilled my finger. Ouch! Anyway, I got the holes drilled at least, as well as finished assembling the other arm with extensions. With the additional work of getting a model ready for the small painting competition at the LGS, progress is a bit slow. However, I'm closing in on the end now. I'm planning to finish the cloth attachments to the shoulders tomorrow night and then the final complete assembly the next night.

Sunday, October 11, 2009

Judge

I've been working on the Judge off and on for a couple weeks now and finally finished him up. This model was a complete delight to paint. It has a marvelous pose that allows for some really dramatic highlighting.

For the base I decided to go with a somewhat western theme and have some wood planks. I was trying to make them look like steps up, but the scale isn't really great. The entire base sort of has a scale problem, but I'm fine with how it turned out. The cattails were an amusing experiment that (although being too large) seemed to work out pretty well I think.

Well, no great analysis on this one. There are plenty of spots that I wish had turned out better such as the hair, sword, and gloves. Other parts turned out ok, such as the coat, bandanna, and pants. Overall the color balance is a point of contention in my mind. It has a relatively common set of colors, with just the bandanna and chain to draw the eyes around the model, but it seems to be enough to achieve that goal. Despite the numerous little mistakes and problems that catch my eye on close analysis, I'm pretty happy with how this turned out, and especially happy with the learning experience. Spending the extra time on all the Malifaux models is really worthwhile.

Saturday, October 10, 2009

Back to the Knife

After being gone for the last few days for a much needed vacation, I've returned to my desk to get a bit more work done on the Avatar. This evening I managed to chop the arms apart at the forearm and get the sword arm reassembled. When I cut the arms, I decided to swap the shoulders. This gave a better angle to both arms, opening up the pose. Here I've gotten the sword arm completely reassembled. I wanted to create a bit more dynamic pose to the arm. I've also drilled holes for pinning the shoulders to the body, but have only done an initial dry fit for the moment (to ensure the arm position is ok).

I'll probably work on the shield arm tomorrow. Before I attach the arms to the body I also want to work out how to pin the cloths that hang from the shoulders. Once that's done there will be very little left to do before priming. The biggest barrier to moving forward is a painting contest at my LGS, for which I need to get an entry ready in short order. Depending how well I managed to juggle tasks, I may still get more progress done on the Avatar while getting that entry ready.

Sunday, October 04, 2009

The Avatar Stands Tall

I sort of lumped the progress of the whole weekend here. I was hoping to get more done, but I was distracted with a number of other things. It's late here, so time to get on with the updates.

First, I decided to create a somewhat epic base. I decided to go with a stone slab, raised up on top of some stones. To that end I created a couple rough shapes and then marked out where I wanted to cut the circular slab into individual stones.

Once the pieces were cut up I went through and roughed up the edges appropriately. Then I reassembled them using some Miliput and put the whole thing together on the base. Although not pictured here, I also carved a menofix into the slab's surface. This whole process turned out to be rather labor intensive, taking pretty much the whole day. Cutting up the slab into blocks took a while since I had to drill and saw to break it up. Then I had to rough up the edges with the cutters. Then the re-assembly with the Milliput. At that point I painted the menofix on the surface and carved it out with a blade.

After the work on the legs, I decided to re-angle the toe of the back lag to give it more of an action pose. To create a stronger join all around, I drill the holes so that I could use a single bent pin to join the toe to the foot and also have the pin stick down for when I joined the leg to the base. This guy is big enough that a thick pin for each foot is totally warranted. The space between the toe and foot of course got filled in with some green stuff and smoothed out. Once it all dried and hardened it was remarkably strong.

Speaking of stronger joins, when it came to attaching the legs to the hip, I needed to put some extra strength into the whole thing. I've had some problems in the past with hip joins and wanted to avoid those troubles (pins shifting and causing the join to rotate). So this time for the join I used two pins and then green stuff. This picture shows both halves to give an idea. Perhaps it was overkill, but with the Dremel doing most of the hard drilling for me, I might as well do it. The Dremel also makes it easier to drill nice deep holes to ensure a strong fit.

Finally, I got both legs on and attached the big guy to the base after drilling holes. For his left leg I left the thick cast pin still on the foot and drilled out extra space to get a nice tight fit for it. Overall this whole thing is incredibly sturdy. I've also got the two long pins sticking out the bottom so that I can attach it to an empty spray can for painting purposes.

Whew! Well, it doesn't look like a pile of progress, but this really gets me a long ways toward done. I'm unfortunately going to be gone for a few days so it might be a while before I finish up the last of the assembly unless I manage to squeeze in a little more work tomorrow night.


Friday, October 02, 2009

Sharper, Taller, Better...

A little more progress. First up is the sword. After the Milliput had properly hardened, I used the dremel to grind down the end of the blade into (roughly) the shape I wanted. Now, a fair word of warning here. The dremel is king at this task, but it also throws a fair amount of dust obviously. It saves lots of time over filing it down and certainly can be just as precise. When I was sanding it down, it turned out there was a tiny air bubble inside which got exposed. I simply added some green stuff, smoothed it, and filed it once it was hardened. It's not a super great job, but it's close enough. I specifically didn't want a pointed tip to the blade in this case, but it would definitely be possible using this method I bet.

Second is the legs. Again, not long enough. His stock legs make him look like a dwarf. I want this guy to stand taller than the other jacks, and this was definitely a necessary step. Here I did very similar to the hip replacement. I used the jeweler's saw, cut, filed, drilled, and reassembled. This was actually not so much work as the other, primarily due to the simpler cuts and pins. I did however make sure to drill deep holes to make sure the pins would easily support the weight of the body once everything was assembled.

That's it for tonight. With the weekend coming up I'm hoping to make significant progress.


Wednesday, September 30, 2009

Minor Avatar Progress

Yadda yadda yadda... Work is kicking my butt and slowing my progress, but I'm still making headway!

First change is the sword. I wanted to extend it, not just to reflect reach, but to create a bit more of a dramatic balance to the pose overall. I actually did a few steps here. First I lopped off the top point of the sword. Then I drilled a hole and put a thick pin sticking out to a length that I wanted to extend the blade to. I gave it just a bit of a bend to put some angle to the sword. I should point out that I repeatedly and obsessively verified that I was putting the right angle on the blade tip relative to the hand's pose. Finally here I used some Milliput and built out a rough shape for the blade extension. My goal was not to create the final shape for the blade. I intend to use the dremel to shape it down.

Second, I added the sides of his torso, and also added a couple "tubes" to the hip join. For these tubes I used thick guitar string as the shape gives them that ribbed hose look.

That's it for today. Hopefully I'll get some more time tomorrow to work on this. Thanks to everyone for the feedback so far! Although I'm not real confident with doing conversion work, this is turning out to be quite fun.

Monday, September 28, 2009

The Avatar Gets a Hip Replacement

Step one is complete! I chopped the hips off of the center torso. It took a while to saw through and then file and clean up the surrounding material. Once that was done I drilled some small test holes and made sure things line up ok. Then I drilled the larger holes and put in the supports. In order to make two of them look more like pistons, I picked up some brass tubing and slid shorter pieces of them over the main pins. If you buy your brass rod at hardware or train stores, they usually have a variety of types including tubes as well. I just made sure to get ones that slid over smoothly. Note that you can't just cut the tubs with wire cutters since it will mash the tube. Once that was in place I just added a little milliput to the surrounding area to smooth things out. Despite seeming like a small step, this actually took me quite a while to do, mostly because of the sawing and dry-fitting steps.

Sunday, September 27, 2009

Project: Avatar of Menoth

I've been absent for a while (working lots, plus trying out Malifaux), so the Warmachine aspect of this blog has been on a bit of a hiatus unfortunately. However, with the preview release of the final MKII stats (and if you haven't seen them, head over to the PP site), I got a sneak peak at the Avatar and was pleasantly surprised at him gaining reach! It was the one feature I felt he was really lacking that would give him the extra edge he needed to be worth taking. The Avatar is the last unpainted PP model I have currently, and this preview was enough of a kick in the shorts to get motivated to work on him. To that end, as I did with a couple of other key projects, I'm going to do a series of posts of my progress on the Avatar.

First, let me be blunt: The stock sculpt is kinda... dumb. I'm almost done with a post about my favorite models to paint which will get more into what I like in a model, but I think I'm not the only one who dislikes the Avatar's standard pose. I've had this model in my backlog for probably at least 2 years now and had decided it needed to be a serious conversion project. I'm pretty pitiful when it comes to converting, and I'm primarily a painter, so this will be a big departure for me. My goal is to turn this model into something truly worthy of being the Avatar of Menoth, without trying to cobble together an entirely different model.

So, the first step was to make a plan. I got all the pieces out, trimmed them, and started reviewing them (all 18 of them). I also did some research by searching the PP painting forums and CMON for examples of conversion work that was done. There also used to be a great conversion job on the BrushThralls site, however that set of pictures seems to be inaccessible now. In any case, the following is a list of things that need to be done to the existing pieces:
* Extend hips lower from the body - This will help make him look taller.
* Widen hips to give a wider stance - This will help make him look more stable.
* Lengthen legs - This will allow for a more dynamic pose to his lower body.
* Extend upper arms - This will allow for a more dynamic pose to his upper body.
* "Fix" sword - Yeah, seriously... the flaming butter knife is just dorky, especially now that he'll have reach.
* Remount shield - Not sure exactly what I plan to do here, but something that improves the pose angles.

Well, that's about it for now. My goal is to have at least a small amount of progress every two to three days.


Saturday, September 26, 2009

Sorrows

Well after what has felt like an eternity, I've finally finished painting something new. Work was absolutely kicking my ass lately, otherwise I'd have gotten these done a while ago. Now, to be honest, they aren't my best work, but the photos really seem to have come out worse than they are in real life for some unknown reason to me. Probably a problem with how skinny they are against the backdrop or something. However I don't photoshop anything anymore (cause I'm lazy), so I'm stuck with mediocre photos. Sorry out there. Anyhow, these guys were actually quite fun to paint as I opted to practice more with using washes to smooth out blending transitions and also practice using more variance of hue in my paint schemes. Overall I learned a lot and am quite happy with how they turned out.

What went well:
* Lots of color variation. I feel like I'm really starting to build a better sense of color, both in terms of when to add a different hue, and what hue to add. These have a lot of variation in the washes which gives them a much more rich and complex color scheme.
* Washes, washes, and more washes! Really, I feel better about my abilities here. On these I did some pretty rough highlighting on them and then used multiple controlled washes to smooth out the transitions which worked great.
* Themed, but varied. For these guys I decided to make them all different, yet cohesive. I kept the same sort of flowing magical mist beneath them, and the eyes and tongues are all the same, but the skin was all handled quite differently.

What could have been better:
* I could have spent more time on them. Honestly, it could have made a noticeable difference. These were half experiment and half serious.
* Better zenithal highlighting. I did a little of this, but I don't feel like I made it dramatic enough to make it obvious. It's something I'm always conscious of, but still haven't quite mastered.

Well, the good news is that this wraps up my Pandora box set for Malifaux! I'm pretty stoked to have made it this far. I'm looking forward to more Neverborn models being released that fit with her crew, but I've certainly got enough backlog to keep me busy until then. Before I close this out, I wanted to include a group shot of all three of them, just because the basing scheme really helps to bring them together as a group. Until next time, happy painting!

Sunday, September 20, 2009

Lady J Strikes Again.... Almost

Today I played two more games of Malifaux. Well, sort of. The first game was the Lady J box vs the Zoraida box. The quick summary is that I ended up forfeiting after turn 2. The whole Zoraida thing is turning out to be completely broken. Both Henry and I worked through the mechanics and math of it and it turns out she basically can't fail on the Obey whack. There was a battle report I failed to post from last Sunday where we played Lady J vs Zoraida and it went pretty much the same way. I hate to say it but I highly recommend steering clear of Zoraida for your first 30 games, particularly if someone knows how to play her well. The game honestly feels broken.

The second game was the Lady J box, Scales of Justice and Bishop vs Leviticus, Rusty Alice, Bete Noire, and Desolation Engine. This game was a blast. The Leviticus list was pretty crazy to play against. Lots of weird things going on, with Bete Noire popping back in a couple times. It was very strange. In the end it looked like I was about to lose and then Lady J made a gamble to move over and engage Leviticus. It turns out that Lady J is pretty much a freight train of pain. She walked twice and then carved Leviticus to ribbons, and that sent the rest of the game solidly in my direction.

All in all, I think we both had a great time, and it was certainly nice to use the gamer side of my brain again after an absolute hell of a week at work. I haven't picked up a brush for over a week now!

Games played: 8
Dollars spent: $115.00
Cost per game: $14.50

Sunday, September 13, 2009

Pandora

Quick post today. I sealed up Pandora last night. Work has been quite busy lately so I've just been tinkering away as I can. This model was, unfortunately, not one of my favorites to paint. Something about the sculpt was just a struggle. There's an awkwardness to her features that I can't entirely pin down that made it hard to paint and be happy with. I think a large part of it was her hair, but also the "stuff" coming out of the box. Some parts I'm happy with, and other parts are just very blah.

For this model I decided to follow the art in the book rather than anything resembling the studio scheme. I opted to ditch any OSL work on it as well, which now that I'm finished I think was maybe a poor choice. Overall, not my best work by a long shot, but I'm happy to get her finished and on the gaming table.


Monday, September 07, 2009

Candy

Another ridiculously small model. This is definitely stretching my skills to paint these tiny models and to do it to the best of my abilities. I'm enjoying the challenge though, and I can honestly say that I never really felt like I just wanted to "be done" with this model. It has a certain sort of fun to it due to the pose and implied story. Unlike the studio scheme, I wanted to capture a more realistic skin tone and more innocent looking appearance while still maintaining a hint of malicious intent. In hindsight, I think having the eyes looking to the other direction would have been better (since the scissors would have been more "behind" her), but I still like how this turned out.

What went well:
* The eyes looking to the side gave a bit more of a scheming look to her.
* The overall composition turned out ok, although there is a something I can't quite pin down as wrong. Maybe someone will notice and let me know.
* Lots of details! I really spent the time to pick out the little details on this model rather than gloss over them. I feel it really helped the overall appearance and yet it doesn't look too "busy".
* Lots of happy accidents! I'll point these out later, but there were a number of happy accidents that happened.

What could have been better:
* Blending on this small scale is still difficult. There are a few spots I'm not terribly happy with (shirt and skin for example).
* Mounting to the base just didn't work out. I knew it would look like she was somewhat floating, but there wasn't much I could do. I either needed to file the bottom of her shoes down more, have her leaning forward, or just go with it. In the end I decided not to stress over it and just do my best to minimize it without doing surgery or making her look like she was going to fall over.

Ok, now it's time to talk about "happy accidents" and what I learned while doing this model. Typically when I paint, I tend to focus on a particular area and base, shade and highlight, before moving on to another area. Then at a later point, I'll go back and clean up things that need some adjustment. While I was working on Candy, specifically her face, I had a number of happy accidents along the way. Rather than correcting them at the time, I decided to just leave them and I'd address them later. The main ones were the corner of her mouth (her left) had a little extra dark shading to it, and her eyes were off center when I painted the irises. Once I was done with the first pass of work on the face, I noticed that these (and other subtle "mistakes") led to a more mischievous expression. So the lesson I learned? Sometimes the small mistakes should be left until later when the overall composition of the model is more assessable.

Anyway, my long weekend is nearing a close. Time to get Pandora primed before I have to start tackling my weekend tasks that I've been putting off.


Sunday, September 06, 2009

Lady Justice vs Ramos

Just a quickie battle report here. Played two incredibly fun games of Malifaux today with Henry. I was fielding the Lady Justice box set and he was fielding the Ramos box. Both games were to the wire and I can honestly say we are really starting to get the hang of the game. We played both games in under 4 hours!

The first game pitted Ramos with a Reconnoiter mission against Lady J with a Claim Jump mission. We were quickly battling in the middle and the Steamborg was really bringing the hurt train. However Lady J is a powerhouse in melee and made short work of the mechanical monstrosity. At that point it was a matter of mopping up, and the Judge was able to deliver some serious pain to Ramos. Ironically though, it was the Slow To Die attack from a Death Marshall that really put the nail in the proverbial coffin.

In the second game, Lady J was charged to Assassinate Ramos while he was trying to perform a rapid Treasure Hunt. Again, the Steamborg brought a pain train, nearly killing all three Death Marshalls in one turn. Lady J quickly held off the Arachnids from making off with the Treasure. This one was a nail biter! At one point Ramos had Lady J down to 1 damage point left. Then she and the Judge rallied back and nearly killed Ramos. Through some judicious use of soulstones to stay alive, Henry averted a loss and pulled out a tie as the game to a close after turn six, thwarting my attempt to pull out the victory.

There were a number of highlights in these games. First, we played two games in under 4 hours! Second, we really have a better handle on the rules and there were no significant rules questions that came up that we couldn't handle. For only being game four, those two points are pretty huge.

I really really enjoyed playing Lady J's crew. It was very entertaining and I felt like I had lots of good options. As entertaining as Pandora is, she's more tedious to plan out. Having more terrain on the board really helped as well. Unlike WM/H, this game plays well with lots of terrain since it really is a skirmish based game. Anyhow, I'm very much looking forward to my next game of Malifaux already!

Saturday, September 05, 2009

Allegiant of the Order of the Fist

I love long weekends. Nothing like a three day weekend to get out of a painting funk. Work has been kicking my ass lately and so it was nice to round out my week with an evening of painting. I had his guy primed and decided to just start working on him last night. I was just aiming at tabletop quality and to get him done fairly fast, but it was still surprising to me to finish him off in about 4 hours. It would have been faster but I was watching the latest disc of Torchwood that came from Netflix.

Anyway, I'm skipping my normal painting analysis this time. I got him painted fast, and I'm happy with the quality. I didn't want to go overboard since this guy isn't in my "my paint awesome" category. He's more in my "must collect everything for Protectorate" category which has pretty much stopped being an obsessive thing for me now.

At this point I'm down to just the Avatar for all my PP models. I'm sure that will change next time I hit the LGS. Anyway, it's time to get back to my Wyrd stuff and perhaps working on the Avatar conversion some more.

Monday, August 31, 2009

Lylyth, Shadow of Everblight

This closes out my unpainted Legion models! I'm sure it won't remain this way for long, but it's nice to reach this point. This wasn't my favorite model by any stretch, mostly because of the pose, but I managed to make the best of it. It was a fast paint job which I have to admit was a nice change of pace from Kade and all the other stuff I'd been doing recently. I stuck with my general strategy of balancing speed and quality, perhaps erring more on the side of speed this time. I have to admit, I'm not sure how often I'll actually field eLylyth, but at least she's an option and this gives me 100% painted epic Legion warlocks!

What went well:
* Placing the rock in front of her, although blocking a portion of the model, helps make a bit more sense of the pose.
* Runes on the bow worked out better than I expected.
* Speedy paint job. I managed to knock this one out pretty quick.
* Hair weave. Although not amazingly painted, I like the way that it turned out.

What could have been better:
* Positioning of the rock could have been a little better, but I'm not super picky.
* Feathers lack good shading or definition. I had primed this model in black and just had a lot of trouble working the feathers back up without losing detail.
* Armor lacks shading. I went for a faster technique. It has good definition of the details, but not very good shading of the different surface angles.


Sunday, August 30, 2009

How To: Obsidian Rune Bases

Recently a created a new basing theme for my Neverborn Malifaux models and figured I'd write up a tutorial for it. As is often my strategy, I like to have a basing scheme where the base is relatively efficient to produce multiples of, echos the right ambiance for the group of models, and creates a unique style for the models. My goal here was to create something that evoked an ancient and magical feel. After kicking around a number of ideas, I arrived at the concept of rune-carved short obsidian pillars.

What I used:
* Super Sculpy - Available at craft stores. It's a bakeable clay that I find is durable and yet can be carved.
* Hose Clamps - Various sizes that match your bases.
* Parchment Paper - Standard baking paper.
* Gloss Coat - I used Testors spray on gloss coat.
* Craft Knives - Duh... when do you not need these?
* Hobby Cutters - The standard kind that they sell for miniature modeling.
* Paints - I used the following P3 paints: Morrow White, Cygnus Yellow, Necrotite Green, Iosan Green, Gnarls Green, Coal Black, Underbelly Blue, Thamar Black, Armor Wash

The Process:
Before I start the process, I want to quickly note about hose clamps. If you've never seen these before, they are automotive hose clamps, available at any automotive parts store. To "operate" them you use a screwdriver to tighten and loosen them. When you turn the screw it increases/decreases the circumference of the clamp. These aren't perfect circles but close enough for my purposes and the advantage of the hose clamp is that it can be loosed to release the formed putty without any sort of pressing.
The first step is to create the pillar shapes. To do this I first measure the base so that I know how big I need to create it. In this case (and for the rest of this tutorial) I'll be using a small 30mm base. The same process applies to any other size base.
Then I adjust the hose clamp until it matches the size measured. It's important to leave just a little bit of wiggle room if the base has a lip to it (as these 30mm bases have).
Next I cut out a strip of parchment paper in order to line the inside of the clamp, and 2 more to put on top and bottom. Then I fill in the clamp with Super Sculpy and press in the clay and make sure it's flattened flush to the edges of clamp.
Then loosen the clamp to let the molded piece slip out, put it on a piece of parchment paper, and pop it in the toaster oven for baking (following the Super Sculpy instructions). When you finish, you'll have disks like this...
Next I carved runes into the side of the base. A note on "runes": For all of the runes I did on these, I tended to use mostly straight lines and dots for two reasons. First I like it stylistically. Second is that on smaller Super Sculpy surfaces it is easier to do straight lines rather than curves. Curves tend to cause the material to carve chucks out and it requires a bit more care. However, any shape is possible with enough patience.
Next I painted in the runes with white (just to make them easier to see for the next step). Then I added some roughing to the edges and surfaces to make it look like aged and weathered rock. To do this I mostly use the Craft Cutter and just make small choppings into the edges randomly. I've found this makes a nice random effect to the Super Sculpy to simulate rock.
At this point I begin painting in the runes. First I fill in the runes with Cygnus Yellow, and then the surrounding surface with Gnarls Green. The end goal is to create just a slight green glow effect on the surface surrounding the carved rune, but not too much.
At this point I go ahead and paint the surfaces with Coal Black, mostly because I find that painting the rune against such a light background makes it more difficult to get the right level of contrast. I also hit the bulk of that Coal Black surface with slightly thinned Armor Wash.
Next I painted the runes. My technique here is to add to the rune, near the edges, build around the core yellow. I start by shading in some Necrotite Green and then Iosan Green. Then I go back and add some white spots at key points in the runes (usually where two lines intersect). Finally I re-add some yellow as necessary to clean things up and then use some Gnarls Green to tighten up the edges of the runes to the surfaces.
At this point it's just surface finishing. I do a little 2BB work with Coal Black to smooth the transitions between the Gnarls Green and the very black portions from the Armor Wash. Then I use Underbelly Blue to highlight the edges. Then one last step of using Morrow White to create some point highlights on the edges on top of the Underbelly Blue.
Finally, gloss coat it fairly heavily. Obsidian is essentially glass so it needs to look slightly transparent near the surface to create a somewhat shiny effect. I did two coats of Testors Gloss on these. When I did the initial one for Baby Kade I used Testors High Gloss, which has the distinct disadvantage of always feeling a bit sticky when touched but has the advantage of being shiny after a single coat.
Finally, just stick it to a base using a little green stuff and glue and you're all done. Here is the completed one I did during the course of this tutorial along with a second one done as 2 tiers. For the second one, I used the same process but created a smaller step that I attached with green stuff before starting to carve and paint. Hopefully you've found this useful.

Tuesday, August 25, 2009

Comparing Malifaux and Warmachine/Hordes

For those tracking me through IABN, I've been a bit out of the loop as I've been trying out Malifaux the last couple weeks and painting non-Privateer stuff since I finished eThagrosh. Painting other model lines is not really a big change for me, but playing a different game is definitely a change. I've been playing Warmachine/Hordes exclusively (in terms of miniatures games) for about 5 years now. I've debated picking up other games over that time (Confrontation and Flames of War most notably), but never did take the plunge. Malifaux however lured me in. So I wanted to take some time to share my experience of Malifaux so far in the context of having been a Warmachine/Hordes player.

Disclaimer:
This is my own personal view. I'm not a hardcore gamer. I'm not trying to promote one game over the other. I plan to keep playing both games.

What I like about Warmachine and Hordes (herein refereced as WM/H):
* Excellent models - Overall the models are high quality. Painting is an important aspect of the hobby to me, so if a game has lame models, I'm unlikely to play it.
* Focus/Fury mechanics - I really like these mechanics, particularly the Fury mechanic. I think they create an interesting resource management aspect to the game.
* Giant Robots! - Warjacks and Warbeasts are a very cool feature of the game. I like the idea that these huge hulking critters are intimately tied to the leader of the army.
* Cards for models - Yah, I know, but I'm listing it anyway. I love having the cards for the models during the game. Makes things easier.

What I like about Malifaux so far:
* Skirmish scale - It really is skirmish scale. Each model is a character unto itself. There are no units in this game. To give a point of comparison, it's like having an army of all solos. Even the simplest model has a comparable number of rules to it as Aiyana from WM/H.
* Cards instead of dice - The card mechanic is pretty intriguing. It brings a new form of strategy to the game in the form of resource management of your control hand, and it allows you to bend probabilities to make sure a plan works instead of relying on averages.
* Models are majestic - Seriously, I really like the majority of the models. They are characterful and every one of them is unique. No soul-crushing unit painting weeks.
* Slim simplified rules - Ok, I'll admit that there are rules questions and a FAQ is definitely needed, however overall the rules are pretty sleek. LOS, movement, actions, duels... they all move swiftly during gameplay and don't require as many of the "I need a neutral decision here" moments.

Some key differences:
* Turn order - Malifaux turn order is different, with each player takes turns activating models. This is contrasted with WM/H's complete army activation turns.
* Dice vs Cards - This isn't so much the substantive difference as how the "resource management" aspect plays out. In WM/H you manage Focus/Fury as a resource to boost rolls. In Malifaux you use the Control Hand as a resource to "cheat" card flips and improve success rates.
* Missions - Malifaux focuses a wide variety of missions and in fact the game is meant to be played using their random mission chooser. Typically when I play WM/H, every mission is basically assassination. This causes the game balancing to work differently between the two.
* Terrain - Malifaux is best played with dense terrain, whereas WM/H is best played with moderate to sparse terrain.
* Army size - A typical WM/H battle of 500pts is usually going to be around 20 to 25 models on average. That could easily vary from 5 to 50+ though depending on the faction and the focus on the army. A Malifaux "scrap" which would be the equivelent smaller-sized game would typically be around 7 to 12 models.

Summary: If I like Warmachine and Hordes, will I like Malifaux?
* If you like the larger scale battles and engaging in strategy at that larger force level, then no, you won't. Malifaux is more about a smaller scale skirmish and the playing out of troop formations is absent from the gameplay.
* If you like forming the "No Quarter" set of actions on your turn and playing it out by moving all your forces in a particular order to unravel the puzzle, then no, you won't. Malifaux's turn sequence creates a more fluid game in terms of how to plan your turn.
* If you like rolling lots of dice, then no, you won't. Nuff said.
* If you like emergent interactions between multiple complex models in your army, then yes, you'll like it. Every model is complex and many of them are unique characters that there an only be 1 fielded of. It makes for many interesting combinations.
* If you like missions over pure assassination, then yes, you'll like it. Malifaux puts more emphasis on the mission, allowing you to win even if you end up losing all of your mission objectives in the game.
* If you like games with more turns, then yes, you'll like it. Every game I've played has gone at least 6 rounds. The game actually has a minimum of 6 rounds.
* If you like spending more time painting fewer models for an army, then yes, you'll like it.

Overall, I'd suggest giving it a try. The base sizes are all the same as WM/H, so worst case you pick up the main book, proxy models for a couple battles, and you've ended up spending $35 bucks and a few hours on the chance of finding a new game. Hopefully this has been helpful, and if there are questions feel free to post a comment here.

Monday, August 24, 2009

Baby Kade

This is my first Malifaux model completed! This was a rather challenging model, mostly due to the size. The model itself (not counting the base) is less than 3/4" tall. However I've decided that all my Malifaux models are going to get premium treatment. Mostly this is due to my desire to get better and really pour lots of time into some models, but also since Malifaux requires fewer models it is easier to justify the additional time.

What went well:
* Spending lots of time was nice. Not just because I feel like I did a decent job, but it felt nice to really obsess over little details.
* Color variation worked well for me. I tried out combinations of using more hue variation for Kade's skin, and less variation for the bear. In the end I feel like it created the effects I was aiming for.

What could have been better:
* Blending on small surfaces is hard. I totally need more practice at that. These models will help a lot.
* NMM was ok, but could have been better. The knife blade and handle especially could use more work. On the other hand the clothes pin worked out well.

One last note before I fall asleep, the basing worked out pretty well. I'll write up a tutorial on them later. I wanted to create a basing theme for all of the Neverborn models and this was what I came up with. It doesn't look exactly like obsidian, but it's close enough. I'll probably refine the process further.

Thursday, August 20, 2009

Malifaux Round 3: Pandora vs Zoraida

Game 3 panned out to be very entertaining! This time Henry brought the Zoraida box set. We decided to play with scenarios this time as well. Admittedly, this 3+ hour game turned into another huge rules question session, but this time we did manage to play a full and legit game. I haven't decided on a good battle report format for Malifaux yet, especially since I'm still learning the game, so this will be a bunch of random notes.

Zoraida is pretty nasty. The whole voodoo doll thing is pretty crazy since once created it bypasses LOS and range requirements. It became sort of obvious that more terrain is good. That being said, I didn't really feel like Zoraida was completely outrageous. On the first round she took control of Kade from across the table and assassinated one of my Woes, but after that things got much better. I managed to position carefully and avoid further pain.

After playing 3 games now, I'm really enjoying the card mechanic in place of dice. It very much reminds me of the possibility mechanic in the old Torg rpg. It provides a nice opportunity to ensure you can pull off a strategy, or keep something alive. The soulstones are similar in that respect. Last night even though my card draws were not amazing, I found that I was still able to plan effectively.

I'm starting to feel like I'm really getting the hang of Pandora. At first I was a little confused how to really hurt my opponent, but now it's starting to come together. She's really slippery and slowly wears things down, but in combination with Candy and Kade, the whole train can pick up speed quite quickly.

One thing I really like about Malifaux is that terrain and missions are NOT an afterthought. They are an integral part of the game, and it really shows. Most of the time terrain is just there to work around, or let specific model's features shine. And don't get me started on missions. Let me just say that I'm sick of every mission defaulting to Assassinate. Not the case with Malifaux. There's rules for all kinds of extra terrain, and a rich set of missions. Even if your master dies, you can still with the game by mission.

For my own amusement, I'm going to keep track of my cost per game ration for Malifaux, given that my recent foyer into MonPoc came to a screeching halt pretty fast. So far...
Games played: 3
Dollars spent: $106.50
Cost per game: $35.50

Sunday, August 16, 2009

More Malifaux

Henry and I played our second game of Malifaux today. Again it was the Pandora vs Ramos box sets. This time we were building upon an already fairly solid understanding of the basic rules, so it was more a matter of working out details and understanding all the features of our models. I have to say, I still like the game. There's some pretty ridiculous things that can happen during the course of the game, and many models have a pile of abilities.

We ended up with 15 questions as a result of our game. Many of these have to do with wording questions and ordering, more than about actual problems or vagueness in the rules. Fortunately they have a rules forum, so I'm going to find out what the protocol is and post there. However, so that I don't lose my list (since it's written on a scratch piece of paper, I'm going to include them at the bottom of this post. [Note: I'm posting the answers here as well]

The battle itself ended in a draw. Things went back and forth, and at one point I was sure that I was on the ropes and would be dead, but then I managed to rally back. Some of the highlights of the battle were having Ramos' Arachnid swarms split into singles and then threaten to self destruct all over my entire crew. Baby Kade managed to get a backstab run in on Ramos but unfortunately didn't pull out much damage. In the end, it was down to just Pandora and Ramos, chasing each other around the board. Ramos is a great tank and Pandora is really slippery to actually get to attack, so in the end we decided to call it a draw.

Although my desire to paint this models is climbing sharply, I'm still determined to get at least my Allegiant and eLylyth models painted before working on the Wyrd stuff. We'll see what actually happens. As for the Malifaux game itself, it's going to be interesting to balance playing both Hordes and Malifaux, as I am very much enjoying this new distraction.

Outstanding rules questions:
* Does Pacify trump Companion for when to activate?
* Can other models move through Spirits? - Yes
* Do Spirits block LOS? - Yes
* When you cheat fate, does the replaced card go into your hand, or is it just discarded? - Discarded
* If Pandora triggers Mental Anguish on a model with Terrifying, does that model still fall back? - Yes
* If a model moves toward a Terrifying model and fails the morale check, does it immediately move to fall back immediately? - Yes
* When an Arachnid Swarm splits into individual Arachnids, the text says "summon XXX to Arachnid Swarm". Does this follow the standard summoning rules for location (i.e. within 6" of the summoner)? - Arachnids must be placed as close as possible to the original Swarm
* What is the order of resolving damage from pulses? Specific example: Baby Kade and a Woe both have 2 damage remaining and are in B2B with each other in the area of effect of an Arachnid Self Destruct. The order becomes important as to whether Baby Kade can Martyr the damage to the Woe before it is destroyed.
* Does a Push need to follow a straight line? - No
* More detailed explanation of placing Blast markers? - Basically measure edge-to-edge unless otherwise specified
* If Pandora succeeds with a (0) Pacify, can she keep chaining them until she fails one? - Yes
* If 2 friendly models and 1 enemy model are all in melee with each other, and one of the friendly models wants to cast a spell at the enemy model, does it follow all the standard in-melee rules given that there is another friendly model in melee with the target? - Yes
* When a model is charged by a Terrifying model, when is the Terrifying check made? - Immediately, but they dont' Fall Back until their next activation
* Which takes precedence between "ignore" and "lose immunity"? Specific example: Raputina's Frozen Heart vs Pandora's "The Box Opens". In this case they aren't specifically in conflict, but awaiting an answer on the wording conflict in general
* Does Armor stack? Specific example: Ramos (Ability: Armor 2) standing behind cover (grants Armor 1). - Yes

Saturday, August 15, 2009

Malifaux - And So It Begins...

Today I picked up the Malifaux main rule book from my LGS. Their line of miniatures is majestic and when I found out they were going to be releasing a skirmish game for their miniatures I was quite excited. So of course, after picking up the book, I swung by Henry's and we got in an initial test of the game. This post will be more review than battle report, but I'm going to count this game anyway.

The Book: The rule book itself is quite nice. The artwork carries the Malifaux style through the whole book, and where released, they have pictures of the actual miniatures next to each models' stats. It's fairly well, with fiction interspersed between sections for rules. The rules themselves are organized fairly well, and within an hour of flipping through the book we were ready to try it out.

The Rules: I'm not going to outline the rules here obviously. It's a miniatures skirmish game so there's plenty of obvious things that are a given (miniatures, tape measure, model stats, etc). I'll just note some of the key features of Malifaux itself.
* Diceless! - The game uses a standard deck of cards instead of dice. I really like this feature, but admittedly it will make the strategy more challenging to pick up. On the plus side, the mechanism for doing action checks is fairly simple, making it quick to learn.
* Alternating turn sequence - Models activate in an alternating fashion, with each player activating one model at a time. Once everything has been activated, then the turn ends and a new one begins. This is different than most games I've played, so it will take a while to get used to.
* Character based - Everything in the game has its own stat card. I'd estimate that over 50% of the models in the game are unique characters. Every model is bought individually. There are no "units" in this game which is quite refreshing.
* Over the top - This game feels a lot like Warmachine did when I first started playing back when Escalation had just come out. Everything has multiple features and its card is full of text.
* Simplicity - Despite the small skirmish feel (4-6 models on a side) and complex character cards, the core game rules are fairly streamlined simple. LOS is any straight line from anywhere on both bases. Models don't have a facing. No units means no formations. It's pretty refreshing.

The Sample: The game we played was relatively short (2 turns). Henry was playing the Ramos Arcanist box and I was playing the Pandora Neverborn box. He squashed me since we were purposefully not trying to "win" the game in order to try out various rules. It plays pretty fast with each player interacting all the time due to the activation sequence. The rules for melee and ranged attacks is uniform and the rules for casting is very similar. I really like the card mechanic as it tends to reduce the "random" element of the game to something you can plan around. Instead of orchestrating a plan that tries to overcome dice odds with more attacks, this system allows for buffering good cards into your hand to support that plan. Of course, this works defensively as well.

The Faction: Pandora of the Neverborn faction is sort of a denial shutdown group. Not much damage output, but a lot of abilities to slow down and stymie opponents. Ramos of the Arcanist faction was more of a hard hitting melee and spellcasting group. The Steamborg Executioner laid out a pile of damage on Pandora in our test game.

The Reflection: I'm very much looking forward to trying out a serious game of this. I'm not sure Pandora will be my favorite choice rules-wise, but it's hard to tell at this point. We're planning another game tomorrow and by then I should have read through the majority of the rules. I'm confident this new game will be making appearances on this blog in the future, especially as I start to paint the models.

Thagrosh the Messiah

Well it took me much longer than expected, but epic Thagrosh is finally finished. Just when I was down to detail work I got the flu, and then shortly after that work slammed me. However, he's all finished up at this point and ready for action. I'm just sad that I missed the 750 tournament last weekend. Anyway, this will be a quick post.

What went well:
* Model is awesome. It really was quite fun to paint.
* Basing turned out ok. Despite his legs and arm not coming together into a flat plane (due to my own challenges in assembly), I managed to form a base underneath him that matched.
* Small details turned out ok, and don't cause major distractions to the overall model.

What could have been better:
* I had some problems with the primer, for the first time in ages. I think it was because I rushed too quickly to start painting. The primer may not have been completely dry. Anyway, some areas tended to rough up a bit (like his left shoulder) and caused some problems.
* Just not enough time spent. I could have done a much better job, but I really wanted to just get him done. I don't regret the situation since I'm trying to strike a balance between painting time and quality with all my Legion, however this was one that I could have easily spent more time on.

Well, now I'm down to 3 Privateer models left! The only threat to not reaching fully painted is that Malifaux is coming out very soon, and those models are majestic. However I really am enjoying Legion so I think there will be some sort of careful balance struck between the two.

Thursday, August 06, 2009

eGoreshade vs eThagrosh

I've been playing a lot lately it seems. Last night was another practice game towards the tournament this weekend.

The Lists:
Me: eThagrosh, Typhon, Carnivean, 3 Shredders, Striders+UA, Deathstalker, War Chief, Forsaken, Totem Hunter, Swamp Gobbers
Henry: eGoreshade, Deathjack, 3 Deathrippers, Bane Thralls (10), Bile Thralls (10), Withershadow Combine, Skarlock, Pistol Wraith, Bane Lord Tartarus, Gudrun

The Mission:
Break the Line - This is the 6 zones mission, and one that both Henry and I wanted more practice at.

The Throwdown:
This battle was pretty vicious. Sudden Death on the Bane Thralls is a pretty nasty combo, especially since they create additional BTs when they kill stuff. This caught me off-guard more than once. However the Striders and Incubii made for a decent counter to this. The Carnivean got an assault charge in on Tartarus but then got cut to ribbons by BTs the next round. The Striders managed to get a good charge in on them (since shooting them was simply not an option) and took out half of them. From there the battle started to sway in my direction. Typhon walked in and killed a couple more, putting himself in a dangerous position, but I wanted to test his resiliance. There were a couple of key missed dice rolls on Henry's part that made a big difference as well. The Deathjack missed Typhon on a slam attempt (needing an 8 on a boosted dice roll). At that point Thagrosh and Typhon took him apart, using him as a bowling ball for Withershadow at the same time.

The Endgame:
Henry nearly pulled out a victory on scenario. On the right side I only had the Deathstalker engaged with Gudrun on his side of the board. He walked Gudrun around but failed to kill the Deathstalker. Then he attempted to blast her with a spell from an arcnode, but I had one Incubii remaining which popped out to maintain dispute of the zone. At that point is was merely a matter of rolling in with Thagrosh to cut Goreshade down.

The Highlights:
* The Incubii are excellent for scenarios and ruining plans. Not only did they hold the zone, but when Bile Thralls purged they got to walk on up and mess up the remaining purges.
* Typhon continues to perform like the badass he is. With Dragon's Blood and Excessive Healing he can stand up to a fair amount of punishment (pretty much blowing off Bile purges.
* Being conservative with Thagrosh is clearly a better plan. He does a great job of boosting Shredders especially.
* The Carnivean continues to please me with his assault charges.
* eGoreshade is pretty awesome. He's got a really cool spell list. Overall I loved playing against him (as opposed to regular Goreshade).

The Reflection:
I'm loving this list. It's huge fun to play and gives me the flexibility I need to respond to a variety of armies. Even in this battle with a lot of stealth I was able to leverage my strengths and get the job done. Swapping out the Shepherd for an additional Shredder was definitely a good choice. I think swapping out the War Chief for Gudrun will definitely be a good choice for scenario play as well. I'm really looking forward to the tournament on Saturday. Hopefully I remember to bring the camera!

Wednesday, August 05, 2009

Mordikaar vs eThagrosh

Another game last night! This time against my long-time arch nemesis Lance. I should note that we played this game with "tool tips enabled" so to speak. We made sure to point out features of the things we were playing as we went along since I'd never played against Mordikaar or Karn, and half of my Legion list was new for Lance.

The Lists:
Me: eThagrosh, Carnivean, Typhon, 3 Shredders, Incubii, Striders+UA, Deathstalker, Forsaken, Totem Hunter, War Chief, Gobbers
Lance: Mordikaar, Karn, Gladiator, Krea, Agonizer, Arcuarii (6), Paingivers (5), Ferox (3), Saxon, Gobbers, Tyrant Commander, Void Spirit

The Mission:
Mosh Pit, although we did a pretty pitiful job of paying attention to it. There was a forest in the middle of the table over part of the mosh pit as well which made for a real tar pit itself.

The Throwdown:
Talk about a battle between the irresistible force and immovable object. The combination of Karn's Fate Ward, Mordikaar's feat, and then that nasty Manifest Void, it was a righteous pain in the butt to get an attack in. Even with Glory of Everblight running, I was having a difficult time getting proper attacks in. The Striders' CRA was a huge bonus in this battle since it allowed me to reliably take out Ferox and Arcuarii. The Deathstalker was a good luck charm, going up the middle and taking out the Tyrant standard, which then led to a failed mass casualties command check. Later she dodged a trample from Karn and continued to cause amusement in the middle. The Totem Hunter got to collect Saxon's skull, but was quickly flattened by a very angry elephant. The Void Spirit got to charge Thagrosh, causing 8 damage but also generating a Shredder. In general though, all 4 heavy beasts spent much of their time trying to maneuver for a good charge and never ending up with one. Perhaps the most amusing part was when the Carnivean did an assault charge lining up Mordikaar, the Tyrant, the Agonizer and a Paingiver, but despite Glory of Everblight, missed all 4 attacks, and then the feat round kicked in pushing him back 4d3"!

The Endgame:
In the end, I was getting tired and decided to go for the kill. I charged in with Thagrosh, nearly leveled the Krea, and then tried to drop Black Chasm on Karn and Mordikaar. Unfortunately I missed the attack roll which then deviated away from Mordikaar. I continued to execute my plan, but at this point all the attack rolls were failing due Mordikaar not being knocked down. 2 Shredders went rabid and charged in on Karn, but Fate Ward trumps rabid, so they did minimal damage. Typhon charged the Forsaken, killing it and producing an Incubii, then sprayed at Mordikaar twice by targetting the Shredder I had lined up. I got 2 hits, but those got transferred to the Gladiator. The Carnivean walked in but was out of control area to assault charge and thus didn't have range to reach Mordikaar but did finish the Gladiator. The Incubii walked around and smacked Mordikaar, but then I was out of juice, and Thagrosh was out of Fury. At that point it was a trivial matter for Karn to walk around and snuff him.

The Highlights:
* The Deathstalker and War Chief both killed things!
* eThagrosh continues to amuse. I think being more conservative with him in terms of when to take the damage to spawn a Shredder is a good plan.
* Mordikaar and Karn are a painful combo. Karn especially is difficult to dig out with the whole Fate Ward thing.
* Positioning is key. The Striders got to serve the dual purpose of CRA'ing key things and blocking charge/trample lanes. Without that careful positioning, I would have gotten snuffed.

The Reflection:
The Skorne list I faced was pretty challenging in the denial department. It was really difficult to find an opening so I had to pick away at it. In hindsight our late evening start resulted in having to just go for the kill and making a mistake. As it turns out, I forgot to use my feat and that would have probably won the game at that point. Swapping out the Shepherd for an additional Shredder was totally worthwhile though, and in general I like the way this list plays. It has plenty of punch, plenty of speed, and plenty of anti-infantry if the occasion calls for it.